Netgear FVS328 FVS328 Reference Manual - Page 207
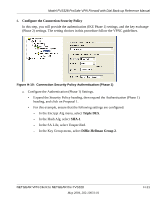
Step-By-Step Configuration of the Netgear VPN Client B, Enable Authentication, SHA-1, NETBIOS Enable
 |
UPC - 606449026528
View all Netgear FVS328 manuals
Add to My Manuals
Save this manual to your list of manuals |
Page 207 highlights
Model FVS328 ProSafe VPN Firewall with Dial Back-up Reference Manual - Select Enable Authentication in the ESP Configuration Enable Authentication check box. Note: Do not confuse this with the Authentication Protocol (AH) option. Using the AH option will prevent clients behind a home NAT router from connecting. - From the ESP Configuration Authentication Algorithm drop-down box, select SHA-1. This will also be entered in the VPN Client Security Policy Key Exchange (Phase 2) Hash Alg field, as seen in "Connection Security Policy Key Exchange (Phase 2)" on page H-12. - Select the NETBIOS Enable check box to enable networking features like Windows Network Neighborhood. Click Apply to save your changes. You will be taken back to the VPN Policies Menu page. 4. When the screen returns to the VPN Policies, make sure the Enable check box is selected. Click Apply to save your changes. Step-By-Step Configuration of the Netgear VPN Client B Note: The Netgear ProSafe VPN Client has the ability to "Import" a predefined configuration profile. The FVS328.SPD file on the FVS328 ProSafe VPN Firewall with Dial Back-up Resource CD (230-10041-02) includes all the settings identified in this procedure. Whenever importing policy settings, you should first export any existing settings you may have configured to prevent the new imported settings from replacing an existing working configuration. To import this policy, use the Security Policy Editor File menu to select Import Policy, and select the FVS328.SPD file at D:\Software\Policies where D is the drive letter of your CD-ROM drive. This procedure describes linking a remote PC and a LAN. The LAN will connect to the Internet using an FVS328 with a static IP address. The PC can be directly connected to the Internet through dialup, cable or DSL modem, or other means, and we will assume it has a dynamically assigned IP address. 1. Install the Netgear VPN Client Software on the PC. NETGEAR VPN Client to NETGEAR the FVS328 H-7 May 2004, 202-10031-01
-
 1
1 -
2
-
3
-
4
-
5
-
6
-
7
-
8
-
9
-
10
-
11
-
12
-
13
-
14
-
15
-
16
-
17
-
18
-
19
-
20
-
21
-
22
-
23
-
24
-
25
-
26
-
27
-
28
-
29
-
30
-
31
-
32
-
33
-
34
-
35
-
36
-
37
-
38
-
39
-
40
-
41
-
42
-
43
-
44
-
45
-
46
-
47
-
48
-
49
-
50
-
51
-
52
-
53
-
54
-
55
-
56
-
57
-
58
-
59
-
60
-
61
-
62
-
63
-
64
-
65
-
66
-
67
-
68
-
69
-
70
-
71
-
72
-
73
-
74
-
75
-
76
-
77
-
78
-
79
-
80
-
81
-
82
-
83
-
84
-
85
-
86
-
87
-
88
-
89
-
90
-
91
-
92
-
93
-
94
-
95
-
96
-
97
-
98
-
99
-
100
-
101
-
102
-
103
-
104
-
105
-
106
-
107
-
108
-
109
-
110
-
111
-
112
-
113
-
114
-
115
-
116
-
117
-
118
-
119
-
120
-
121
-
122
-
123
-
124
-
125
-
126
-
127
-
128
-
129
-
130
-
131
-
132
-
133
-
134
-
135
-
136
-
137
-
138
-
139
-
140
-
141
-
142
-
143
-
144
-
145
-
146
-
147
-
148
-
149
-
150
-
151
-
152
-
153
-
154
-
155
-
156
-
157
-
158
-
159
-
160
-
161
-
162
-
163
-
164
-
165
-
166
-
167
-
168
-
169
-
170
-
171
-
172
-
173
-
174
-
175
-
176
-
177
-
178
-
179
-
180
-
181
-
182
-
183
-
184
-
185
-
186
-
187
-
188
-
189
-
190
-
191
-
192
-
193
-
194
-
195
-
196
-
197
-
198
-
199
-
200
-
201
-
 202
202 -
 203
203 -
 204
204 -
 205
205 -
 206
206 -
 207
207 -
 208
208 -
 209
209 -
 210
210 -
 211
211 -
 212
212 -
213
-
214
-
215
-
216
-
217
-
218
-
219
-
220
-
221
-
222
-
223
-
224
-
225
-
226
-
227
-
228
 |
 |
