Netgear FWG114Pv2 FWG114Pv2 Reference Manual - Page 138
Scenario 2: FWG114P v2 to FWG114P v2 with Certificates, Obtain a root certificate.
 |
View all Netgear FWG114Pv2 manuals
Add to My Manuals
Save this manual to your list of manuals |
Page 138 highlights
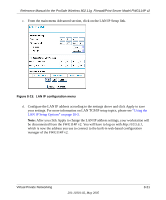
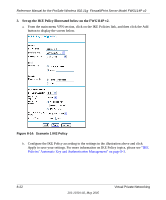
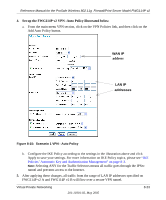
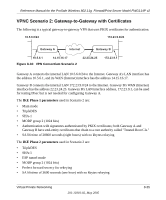
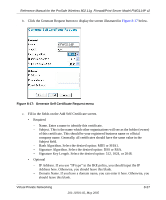
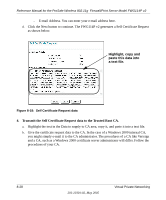
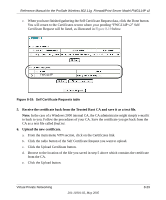
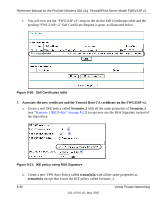
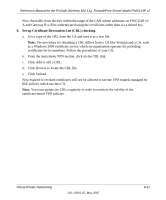
Reference Manual for the ProSafe Wireless 802.11g Firewall/Print Server Model FWG114P v2 • Selectors for all IP protocols, all ports, between 10.5.6.0/24 and 172.23.9.0/24, using IPv4 subnets Scenario 2: FWG114P v2 to FWG114P v2 with Certificates The following is a typical gateway-to-gateway VPN that uses Public Key Infrastructure x.509 (PKIX) certificates for authentication. The network setup is identical to the one given in scenario 1. The IKE Phase 1 and Phase 2 parameters are identical to the ones given in scenario 1, with the exception that the identification is done with signatures authenticated by PKIX certificates. Note: Before completing this configuration scenario, make sure the correct Time Zone is set on the FWG114P v2. For instructions on this topic, please see, "Setting the Time Zone" on page 6-13. 1. Obtain a root certificate. a. Obtain the root certificate (which includes the public key) from a Certificate Authority (CA) Note: The procedure for obtaining certificates differs from a CA like Verisign and a CA, such as a Windows 2000 certificate server, which an organization operates for providing certificates for its members. For example, an administrator of a Windows 2000 certificate server might provide it to you via e-mail. b. Save the certificate as a text file called trust.txt. 2. Install the trusted CA certificate for the Trusted Root CA. a. Log in to the FWG114P v2. b. From the main menu VPN section, click on the CA's link. c. Click Add to add a CA. d. Click Browse to locate the trust.txt file. e. Click Upload. 3. Create a certificate request for the FWG114P v2. a. From the main menu VPN section, click the Certificates link. 8-26 201-10301-02, May 2005 Virtual Private Networking
-
 1
1 -
2
-
3
-
4
-
5
-
6
-
7
-
8
-
9
-
10
-
11
-
12
-
13
-
14
-
15
-
16
-
17
-
18
-
19
-
20
-
21
-
22
-
23
-
24
-
25
-
26
-
27
-
28
-
29
-
30
-
31
-
32
-
33
-
34
-
35
-
36
-
37
-
38
-
39
-
40
-
41
-
42
-
43
-
44
-
45
-
46
-
47
-
48
-
49
-
50
-
51
-
52
-
53
-
54
-
55
-
56
-
57
-
58
-
59
-
60
-
61
-
62
-
63
-
64
-
65
-
66
-
67
-
68
-
69
-
70
-
71
-
72
-
73
-
74
-
75
-
76
-
77
-
78
-
79
-
80
-
81
-
82
-
83
-
84
-
85
-
86
-
87
-
88
-
89
-
90
-
91
-
92
-
93
-
94
-
95
-
96
-
97
-
98
-
99
-
100
-
101
-
102
-
103
-
104
-
105
-
106
-
107
-
108
-
109
-
110
-
111
-
112
-
113
-
114
-
115
-
116
-
117
-
118
-
119
-
120
-
121
-
122
-
123
-
124
-
125
-
126
-
127
-
128
-
129
-
130
-
131
-
132
-
 133
133 -
 134
134 -
 135
135 -
 136
136 -
 137
137 -
 138
138 -
 139
139 -
 140
140 -
 141
141 -
 142
142 -
 143
143 -
144
-
145
-
146
-
147
-
148
-
149
-
150
-
151
-
152
-
153
-
154
-
155
-
156
-
157
-
158
-
159
-
160
-
161
-
162
-
163
-
164
-
165
-
166
-
167
-
168
-
169
-
170
-
171
-
172
-
173
-
174
-
175
-
176
-
177
-
178
-
179
-
180
-
181
-
182
-
183
-
184
-
185
-
186
-
187
-
188
-
189
-
190
-
191
-
192
-
193
-
194
-
195
-
196
-
197
-
198
-
199
-
200
-
201
-
202
-
203
-
204
-
205
-
206
-
207
-
208
-
209
-
210
-
211
-
212
-
213
-
214
-
215
-
216
-
217
-
218
-
219
-
220
-
221
-
222
-
223
-
224
-
225
-
226
-
227
-
228
-
229
-
230
-
231
-
232
-
233
-
234
-
235
-
236
-
237
-
238
-
239
-
240
-
241
-
242
-
243
-
244
-
245
-
246
-
247
-
248
-
249
-
250
-
251
-
252
-
253
-
254
-
255
-
256
-
257
-
258
-
259
-
260
-
261
-
262
-
263
-
264
-
265
-
266
-
267
-
268
-
269
-
270
-
271
-
272
-
273
-
274
-
275
-
276
-
277
-
278
-
279
-
280
-
281
-
282
-
283
-
284
-
285
-
286
-
287
-
288
-
289
-
290
-
291
-
292
-
293
-
294
-
295
-
296
 |
 |