Netgear FWG114Pv2 FWG114Pv2 Reference Manual - Page 43
How to Con the Serial Port as the Primary Internet Connection - default password
 |
View all Netgear FWG114Pv2 manuals
Add to My Manuals
Save this manual to your list of manuals |
Page 43 highlights
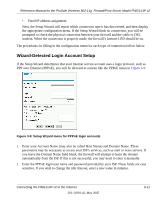
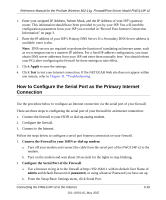
Reference Manual for the ProSafe Wireless 802.11g Firewall/Print Server Model FWG114P v2 1. Enter your assigned IP Address, Subnet Mask, and the IP Address of your ISP's gateway router. This information should have been provided to you by your ISP. You will need the configuration parameters from your ISP you recorded in "Record Your Internet Connection Information" on page 3. 2. Enter the IP address of your ISP's Primary DNS Server. If a Secondary DNS Server address is available, enter it also. Note: DNS servers are required to perform the function of translating an Internet name, such as www.netgear.com to a numeric IP address. For a fixed IP address configuration, you must obtain DNS server addresses from your ISP and enter them manually here. You should reboot your PCs after configuring the firewall for these settings to take effect. 3. Click Apply to save the settings. 4. Click Test to test your Internet connection. If the NETGEAR Web site does not appear within one minute, refer to Chapter 11, "Troubleshooting. How to Configure the Serial Port as the Primary Internet Connection Use the procedure below to configure an Internet connection via the serial port of your firewall. There are three steps to configuring the serial port of your firewall for an Internet connection: 1. Connect the firewall to your ISDN or dial-up analog modem. 2. Configure the firewall. 3. Connect to the Internet. Follow the steps below to configure a serial port Internet connection on your firewall. 1. Connect the Firewall to your ISDN or dial-up modem a. Turn off your modem and connect the cable from the serial port of the FWG114P v2 to the modem. b. Turn on the modem and wait about 30 seconds for the lights to stop blinking. 2. Configure the Serial Port of the Firewall. a. Use a browser to log in to the firewall at http://192.168.0.1 with its default User Name of admin and default Password of password, or using whatever Password you have set up. b. From the Setup Basic Settings menu, click Serial Port. Connecting the FWG114P v2 to the Internet 201-10301-02, May 2005 3-15
-
 1
1 -
2
-
3
-
4
-
5
-
6
-
7
-
8
-
9
-
10
-
11
-
12
-
13
-
14
-
15
-
16
-
17
-
18
-
19
-
20
-
21
-
22
-
23
-
24
-
25
-
26
-
27
-
28
-
29
-
30
-
31
-
32
-
33
-
34
-
35
-
36
-
37
-
 38
38 -
 39
39 -
 40
40 -
 41
41 -
 42
42 -
 43
43 -
 44
44 -
 45
45 -
 46
46 -
 47
47 -
 48
48 -
49
-
50
-
51
-
52
-
53
-
54
-
55
-
56
-
57
-
58
-
59
-
60
-
61
-
62
-
63
-
64
-
65
-
66
-
67
-
68
-
69
-
70
-
71
-
72
-
73
-
74
-
75
-
76
-
77
-
78
-
79
-
80
-
81
-
82
-
83
-
84
-
85
-
86
-
87
-
88
-
89
-
90
-
91
-
92
-
93
-
94
-
95
-
96
-
97
-
98
-
99
-
100
-
101
-
102
-
103
-
104
-
105
-
106
-
107
-
108
-
109
-
110
-
111
-
112
-
113
-
114
-
115
-
116
-
117
-
118
-
119
-
120
-
121
-
122
-
123
-
124
-
125
-
126
-
127
-
128
-
129
-
130
-
131
-
132
-
133
-
134
-
135
-
136
-
137
-
138
-
139
-
140
-
141
-
142
-
143
-
144
-
145
-
146
-
147
-
148
-
149
-
150
-
151
-
152
-
153
-
154
-
155
-
156
-
157
-
158
-
159
-
160
-
161
-
162
-
163
-
164
-
165
-
166
-
167
-
168
-
169
-
170
-
171
-
172
-
173
-
174
-
175
-
176
-
177
-
178
-
179
-
180
-
181
-
182
-
183
-
184
-
185
-
186
-
187
-
188
-
189
-
190
-
191
-
192
-
193
-
194
-
195
-
196
-
197
-
198
-
199
-
200
-
201
-
202
-
203
-
204
-
205
-
206
-
207
-
208
-
209
-
210
-
211
-
212
-
213
-
214
-
215
-
216
-
217
-
218
-
219
-
220
-
221
-
222
-
223
-
224
-
225
-
226
-
227
-
228
-
229
-
230
-
231
-
232
-
233
-
234
-
235
-
236
-
237
-
238
-
239
-
240
-
241
-
242
-
243
-
244
-
245
-
246
-
247
-
248
-
249
-
250
-
251
-
252
-
253
-
254
-
255
-
256
-
257
-
258
-
259
-
260
-
261
-
262
-
263
-
264
-
265
-
266
-
267
-
268
-
269
-
270
-
271
-
272
-
273
-
274
-
275
-
276
-
277
-
278
-
279
-
280
-
281
-
282
-
283
-
284
-
285
-
286
-
287
-
288
-
289
-
290
-
291
-
292
-
293
-
294
-
295
-
296
 |
 |