Netgear M4100-24G-POE Hardware Installation Guide - Page 17
Hardware Installation, NETGEAR Managed Switch
 |
View all Netgear M4100-24G-POE manuals
Add to My Manuals
Save this manual to your list of manuals |
Page 17 highlights
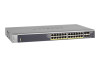
NETGEAR Managed Switch 2. Use the provided Phillips head screws to fasten the brackets to the sides of the switch. M4100-24G-POE+ Mounting bracket 3. Tighten the screws with a No. 1 Phillips screwdriver to secure each bracket. 4. Align the bracket and rack holes. Use two pan-head screws with nylon washers to fasten each bracket to the rack. 5. Tighten the screws with a No. 2 Phillips screwdriver to secure the switch in the rack. Hardware Installation 17
-
 1
1 -
2
-
3
-
4
-
5
-
6
-
7
-
8
-
9
-
10
-
11
-
 12
12 -
 13
13 -
 14
14 -
 15
15 -
 16
16 -
 17
17 -
 18
18 -
 19
19 -
 20
20 -
 21
21 -
 22
22 -
23
-
24
-
25
-
26
-
27
-
28
-
29
-
30
-
31
-
32
-
33
-
34
 |
 |

Hardware Installation
17
NETGEAR Managed Switch
2.
Use the provided Phillips head screws to fasten the brackets to the sides of the
switch.
M4100-24G-POE+
Mounting
bracket
3.
Tighten the screws with a No. 1 Phillips screwdriver to secure each bracket.
4.
Align the bracket and rack holes. Use two pan-head screws with nylon washers to
fasten each bracket to the rack.
5.
Tighten the screws with a No. 2 Phillips screwdriver to secure the switch in the rack.