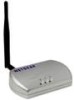
Netgear ME101NA ME101 User Manual - Page 11
Configuring the Bridge for Your Wireless Network - router login
 |
View all Netgear ME101NA manuals
Add to My Manuals
Save this manual to your list of manuals |
Page 11 highlights
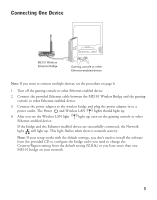
Configuring the Bridge for Your Wireless Network Once you are logged into the Configuration Utility, you can view the status of your home wireless network and current configuration of the bridge, change the password, enable WEP security (if you have it set up on your wireless network), select a specific network for the wireless connection, or make other configuration changes. 1. Choose Programs>NETGEAR ME101 Bridge>ME101 Configuration Utility from the Start menu. 2. If the bridge's name doesn't appear in the Bridge Name list, select Browse to have the utility search for an active bridge. 3. Type password as the password. 4. Click Login. 5. Click the Configuration tab. 6. Either select a name assigned to the wireless router or access point from the Network Name (SSID) list or type the name. Note: If you have NETGEAR wireless devices, the default SSID is Wireless or NETGEAR. 7. If you are not in the United States, select the correct country or region from the Country/Region list. Click Yes to accept the new country or region. Warning: Having the bridge set to the wrong country or region may result in the violation of local laws. 8. If you have a router that assigns IP addresses dynamically (DHCP) select Obtain an IP Address Automatically. Otherwise, if your network uses static addresses, select Use the Following IP Address and type an IP address for the bridge. The first three sets of numbers (xxx.xxx.xxx.yyy) should be the same as your access point or router. The last set of numbers (.yyy) should be a unique set of numbers on your network. For example, if the router uses 192.168.1.1, then 192.168.1.25 is a possible IP address for the bridge. Note: If you have more than one ME101 on the network, only one can use the default address of 192.168.0.200. 9. Click Apply and, if you are through making changes, click Exit. 10. To use the bridge with different computer(s) or other Ethernet-enabled device(s), return to Installing the ME101 on page 4 to connect the bridge. 9
-
 1
1 -
2
-
3
-
4
-
5
-
 6
6 -
 7
7 -
 8
8 -
 9
9 -
 10
10 -
 11
11 -
 12
12 -
 13
13 -
 14
14 -
 15
15 -
 16
16 -
17
-
18
-
19
-
20
-
21
-
22
-
23
-
24
-
25
 |
 |
