Netgear RN32263E Software Manual - Page 87
Use ReadyDROP, Enable ReadyNAS Remote, Enable ReadyDROP, Add ReadyNAS Remote Users
 |
View all Netgear RN32263E manuals
Add to My Manuals
Save this manual to your list of manuals |
Page 87 highlights
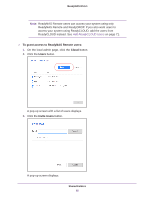
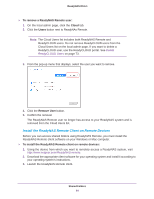
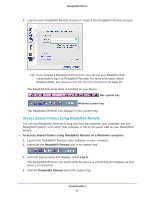
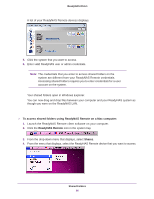
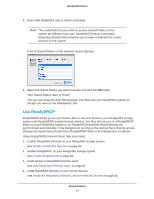
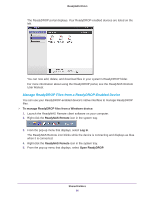
ReadyNAS OS 6.1 5. Enter valid ReadyNAS user or admin credentials. Note: The credentials that you enter to access shared folders on the system are different from your ReadyNAS Remote credentials. Accessing shared folders requires you to enter credentials for a user account on the system. A list of shared folders on the selected device displays. 6. Select the shared folders you want to access and click the OK button. Your shared folders open in Finder. You can now drag and drop files between your Mac and your ReadyNAS system as though you were on the ReadyNAS LAN. Use ReadyDROP ReadyDROP allows you to synchronize files in real time between your ReadyNAS storage system and ReadyDROP-enabled remote devices. Any files that you put in a ReadyDROP folder on your ReadyNAS system or on ReadyDROP-enabled remote devices are synchronized automatically, in the background, as long as the devices have Internet access. Changes are synchronized to all of your ReadyDROP folders in the background, in real time. Using ReadyDROP involves these high-level steps: 1. Enable ReadyNAS Remote on your ReadyNAS storage system. See Enable ReadyNAS Remote on page 80. 2. Enable ReadyDROP on your ReadyNAS storage system. See Enable ReadyDROP on page 88. 3. Grant access to ReadyNAS Remote users. See Add ReadyNAS Remote Users on page 81. 4. Install ReadyNAS Remote on your remote devices. See Install the ReadyNAS Remote Client on Remote Devices on page 84. Shared Folders 87
-
 1
1 -
2
-
3
-
4
-
5
-
6
-
7
-
8
-
9
-
10
-
11
-
12
-
13
-
14
-
15
-
16
-
17
-
18
-
19
-
20
-
21
-
22
-
23
-
24
-
25
-
26
-
27
-
28
-
29
-
30
-
31
-
32
-
33
-
34
-
35
-
36
-
37
-
38
-
39
-
40
-
41
-
42
-
43
-
44
-
45
-
46
-
47
-
48
-
49
-
50
-
51
-
52
-
53
-
54
-
55
-
56
-
57
-
58
-
59
-
60
-
61
-
62
-
63
-
64
-
65
-
66
-
67
-
68
-
69
-
70
-
71
-
72
-
73
-
74
-
75
-
76
-
77
-
78
-
79
-
80
-
81
-
 82
82 -
 83
83 -
 84
84 -
 85
85 -
 86
86 -
 87
87 -
 88
88 -
 89
89 -
 90
90 -
 91
91 -
 92
92 -
93
-
94
-
95
-
96
-
97
-
98
-
99
-
100
-
101
-
102
-
103
-
104
-
105
-
106
-
107
-
108
-
109
-
110
-
111
-
112
-
113
-
114
-
115
-
116
-
117
-
118
-
119
-
120
-
121
-
122
-
123
-
124
-
125
-
126
-
127
-
128
-
129
-
130
-
131
-
132
-
133
-
134
-
135
-
136
-
137
-
138
-
139
-
140
-
141
-
142
-
143
-
144
-
145
-
146
-
147
-
148
-
149
-
150
-
151
-
152
-
153
-
154
-
155
-
156
-
157
-
158
-
159
-
160
-
161
-
162
-
163
-
164
-
165
-
166
-
167
-
168
-
169
-
170
-
171
-
172
-
173
-
174
-
175
-
176
-
177
-
178
-
179
-
180
-
181
-
182
-
183
-
184
-
185
-
186
-
187
-
188
-
189
-
190
-
191
-
192
-
193
-
194
-
195
-
196
-
197
-
198
-
199
-
200
-
201
-
202
-
203
-
204
-
205
-
206
-
207
-
208
-
209
-
210
-
211
-
212
-
213
-
214
-
215
-
216
-
217
-
218
-
219
-
220
-
221
-
222
-
223
-
224
-
225
-
226
-
227
-
228
-
229
-
230
-
231
-
232
-
233
-
234
-
235
-
236
-
237
-
238
-
239
-
240
-
241
-
242
-
243
-
244
-
245
-
246
-
247
-
248
-
249
-
250
-
251
-
252
-
253
-
254
-
255
-
256
-
257
-
258
-
259
-
260
-
261
-
262
-
263
-
264
-
265
-
266
-
267
-
268
-
269
-
270
-
271
-
272
-
273
-
274
-
275
-
276
 |
 |
