Netgear RN526X00 Hardware Manual - Page 168
Attach the new HDD to the mounting bracket.
 |
View all Netgear RN526X00 manuals
Add to My Manuals
Save this manual to your list of manuals |
Page 168 highlights
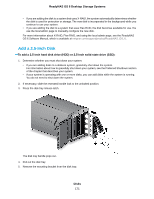
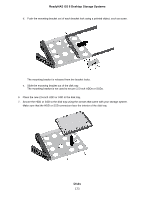
ReadyNAS OS 6 Desktop Storage Systems Make sure that the ends of the mounting bracket are even with each other. c. Slide the bracket down the disk tray, keeping both sides of the bracket even with each other. The mounting bracket stops when it hits the bracket lock. The bracket lock prevents the mounting bracket from sliding all the way off the disk tray. 6. Attach the new HDD to the mounting bracket. Disks 168
-
 1
1 -
2
-
3
-
4
-
5
-
6
-
7
-
8
-
9
-
10
-
11
-
12
-
13
-
14
-
15
-
16
-
17
-
18
-
19
-
20
-
21
-
22
-
23
-
24
-
25
-
26
-
27
-
28
-
29
-
30
-
31
-
32
-
33
-
34
-
35
-
36
-
37
-
38
-
39
-
40
-
41
-
42
-
43
-
44
-
45
-
46
-
47
-
48
-
49
-
50
-
51
-
52
-
53
-
54
-
55
-
56
-
57
-
58
-
59
-
60
-
61
-
62
-
63
-
64
-
65
-
66
-
67
-
68
-
69
-
70
-
71
-
72
-
73
-
74
-
75
-
76
-
77
-
78
-
79
-
80
-
81
-
82
-
83
-
84
-
85
-
86
-
87
-
88
-
89
-
90
-
91
-
92
-
93
-
94
-
95
-
96
-
97
-
98
-
99
-
100
-
101
-
102
-
103
-
104
-
105
-
106
-
107
-
108
-
109
-
110
-
111
-
112
-
113
-
114
-
115
-
116
-
117
-
118
-
119
-
120
-
121
-
122
-
123
-
124
-
125
-
126
-
127
-
128
-
129
-
130
-
131
-
132
-
133
-
134
-
135
-
136
-
137
-
138
-
139
-
140
-
141
-
142
-
143
-
144
-
145
-
146
-
147
-
148
-
149
-
150
-
151
-
152
-
153
-
154
-
155
-
156
-
157
-
158
-
159
-
160
-
161
-
162
-
 163
163 -
 164
164 -
 165
165 -
 166
166 -
 167
167 -
 168
168 -
 169
169 -
 170
170 -
 171
171 -
 172
172 -
 173
173 -
174
-
175
-
176
-
177
-
178
-
179
-
180
-
181
-
182
-
183
-
184
-
185
-
186
-
187
-
188
-
189
-
190
-
191
-
192
-
193
-
194
-
195
-
196
-
197
-
198
-
199
-
200
-
201
-
202
-
203
-
204
-
205
-
206
-
207
-
208
-
209
-
210
-
211
-
212
-
213
 |
 |

Make sure that the ends of the mounting bracket are even with each other.
c.
Slide the bracket down the disk tray, keeping both sides of the bracket even with each other.
The mounting bracket stops when it hits the bracket lock.
The bracket lock prevents the mounting bracket from sliding all the way off the disk tray.
6.
Attach the new HDD to the mounting bracket.
Disks
168
ReadyNAS OS 6 Desktop Storage Systems