Netgear WAC510 User Manual - Page 48
Change the Channel for a Radio, Set Up a WiFi On/Off Schedule for the Radios
 |
View all Netgear WAC510 manuals
Add to My Manuals
Save this manual to your list of manuals |
Page 48 highlights
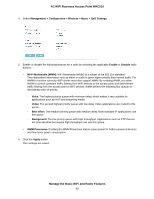
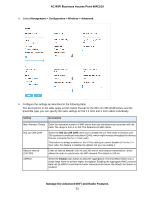
AC WiFi Business Access Point WAC510 Change the Channel for a Radio The available WiFi channels and frequencies depend on the country and the radio. The default is Auto, which enables the radio to automatically select the most suitable channel. Note You do not need to change the WiFi channel unless you experience interference (which is indicated by lost connections). Note If you use multiple WiFi access points (APs), reduce interference by selecting different channels for adjacent APs. We recommend a channel spacing of four channels between adjacent APs (for example, use Channels 1 and 5, or 6 and 10). To change the channel for a radio: 1. Open a web browser from a computer that is connected to the same network as the access point or to the access point directly through an Ethernet cable or WiFi connection. 2. Enter the IP address that is assigned to the access point. A login window opens. 3. Enter the access point user name and password. The default user name is admin. The default password is password. The user name and password are case-sensitive. The Dashboard page displays. 4. Select Management > Configuration > Wireless > Basic > Wireless Settings. The Wireless Settings page displays. 5. From the Channel menu, select a channel. The default is Auto. When you select a particular channel, the channel selection becomes static. 6. Click the Apply button. Your settings are saved. The radio or radios restart and WiFi clients might need to reconnect. Set Up a WiFi On/Off Schedule for the Radios Scheduling the WiFi radios to be turned off is a green feature that allows you to turn off the WiFi radios during scheduled vacations, office shutdowns, on evenings, or on weekends. You can set up one WiFi schedule that applies to both radios. To set up and enable a WiFi on/off schedule: 1. Open a web browser from a computer that is connected to the same network as the access point or to the access point directly through an Ethernet cable or WiFi connection. 2. Enter the IP address that is assigned to the access point. A login window opens. 3. Enter the access point user name and password. Manage the Basic WiFi and Radio Features 48
-
 1
1 -
2
-
3
-
4
-
5
-
6
-
7
-
8
-
9
-
10
-
11
-
12
-
13
-
14
-
15
-
16
-
17
-
18
-
19
-
20
-
21
-
22
-
23
-
24
-
25
-
26
-
27
-
28
-
29
-
30
-
31
-
32
-
33
-
34
-
35
-
36
-
37
-
38
-
39
-
40
-
41
-
42
-
 43
43 -
 44
44 -
 45
45 -
 46
46 -
 47
47 -
 48
48 -
 49
49 -
 50
50 -
 51
51 -
 52
52 -
 53
53 -
54
-
55
-
56
-
57
-
58
-
59
-
60
-
61
-
62
-
63
-
64
-
65
-
66
-
67
-
68
-
69
-
70
-
71
-
72
-
73
-
74
-
75
-
76
-
77
-
78
-
79
-
80
-
81
-
82
-
83
-
84
-
85
-
86
-
87
-
88
-
89
-
90
-
91
-
92
-
93
-
94
-
95
-
96
-
97
-
98
-
99
-
100
-
101
-
102
-
103
-
104
-
105
-
106
-
107
-
108
-
109
-
110
-
111
-
112
-
113
-
114
-
115
-
116
-
117
-
118
-
119
-
120
-
121
-
122
-
123
-
124
-
125
-
126
-
127
-
128
-
129
 |
 |