Netgear WN121T WN121T User Manual - Page 30
Apply, Click Save Profile.
 |
UPC - 606449049350
View all Netgear WN121T manuals
Add to My Manuals
Save this manual to your list of manuals |
Page 30 highlights
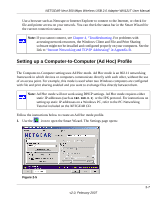
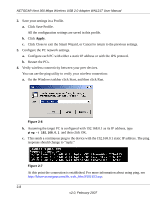
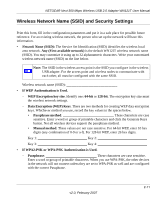
NETGEAR Next 300 Mbps Wireless USB 2.0 Adapter WN121T User Manual 2. Save your settings in a Profile. a. Click Save Profile. All the configuration settings are saved in this profile. b. Click Apply. c. Click Close to exit the Smart Wizard, or Cancel to return to the previous settings. 3. Configure the PC network settings. a. Configure each PC with either a static IP address or with the IPX protocol. b. Restart the PCs. 4. Verify wireless connectivity between your peer devices. You can use the ping utility to verify your wireless connection: a. On the Windows taskbar click Start, and then click Run. Figure 2-6 b. Assuming the target PC is configured with 192.168.0.1 as its IP address, type ping -t 192.168.0.1 and then click OK. c. This sends a continuous ping to the device with the 192.168.0.1 static IP address. The ping response should change to "reply." Figure 2-7 At this point the connection is established. For more information about using ping, see http://kbserver.netgear.com/kb_web_files/N101453.asp. 2-8 v2.0, February 2007
-
 1
1 -
2
-
3
-
4
-
5
-
6
-
7
-
8
-
9
-
10
-
11
-
12
-
13
-
14
-
15
-
16
-
17
-
18
-
19
-
20
-
21
-
22
-
23
-
24
-
 25
25 -
 26
26 -
 27
27 -
 28
28 -
 29
29 -
 30
30 -
 31
31 -
 32
32 -
 33
33 -
 34
34 -
 35
35 -
36
-
37
-
38
-
39
-
40
-
41
-
42
-
43
-
44
-
45
-
46
-
47
-
48
-
49
-
50
-
51
-
52
 |
 |
