Netgear WNDAP330 WNDAP330 User Manual - Page 63
Configuring WPA2 with RADIUS
 |
UPC - 606449056464
View all Netgear WNDAP330 manuals
Add to My Manuals
Save this manual to your list of manuals |
Page 63 highlights
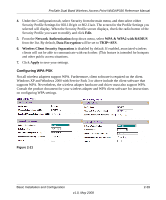
ProSafe Dual Band Wireless Access Point WNDAP330 Reference Manual 5. Choose WPA with RADIUS from the from the Network Authentication drop-down menu. Data Encryption will be set to TKIP by default. 6. Wireless Client Security Separation is disabled by default. If enabled, associated wireless clients will not be able to communicate with each other. (This feature is intended for hotspots and other public access situations. 7. Click Apply to save your settings. Configuring WPA2 with RADIUS Not all wireless adapters support WPA2. Furthermore, client software is required on the client. Make sure your client card supports WPA2. Consult the product document for your wireless adapter and WPA2 client software for instructions on configuring WPA2 settings. Figure 2-19 To configure WPA2 with RADIUS: 1. Under the Configuration tab, select Security on the main menu, select Advanced from the lefthand menu, and then select RADIUS Server Settings. The RADIUS Server Settings screen will display. 2. Enter the RADIUS settings as shown in ""Configuring the RADIUS Server Settings" on page 2-30. 3. Click Apply to save your RADIUS settings. 4. Under the Configuration tab, select Security from the main menu, and then select either Security Profile Settings for 802.11b/g/n or 802.11a/n. The screen for the Profile Settings you selected will display. When the Security Profile screen displays, check the radio button of the Security Profile you want to modify and click Edit. Basic Installation and Configuration v1.0, May 2008 2-37
-
 1
1 -
2
-
3
-
4
-
5
-
6
-
7
-
8
-
9
-
10
-
11
-
12
-
13
-
14
-
15
-
16
-
17
-
18
-
19
-
20
-
21
-
22
-
23
-
24
-
25
-
26
-
27
-
28
-
29
-
30
-
31
-
32
-
33
-
34
-
35
-
36
-
37
-
38
-
39
-
40
-
41
-
42
-
43
-
44
-
45
-
46
-
47
-
48
-
49
-
50
-
51
-
52
-
53
-
54
-
55
-
56
-
57
-
 58
58 -
 59
59 -
 60
60 -
 61
61 -
 62
62 -
 63
63 -
 64
64 -
 65
65 -
 66
66 -
 67
67 -
 68
68 -
69
-
70
-
71
-
72
-
73
-
74
-
75
-
76
-
77
-
78
-
79
-
80
-
81
-
82
-
83
-
84
-
85
-
86
-
87
-
88
-
89
-
90
-
91
-
92
-
93
-
94
-
95
-
96
-
97
-
98
-
99
-
100
-
101
-
102
-
103
-
104
-
105
-
106
-
107
-
108
-
109
-
110
-
111
-
112
-
113
-
114
-
115
-
116
-
117
-
118
-
119
-
120
-
121
-
122
-
123
-
124
-
125
-
126
-
127
-
128
-
129
-
130
-
131
-
132
-
133
-
134
-
135
-
136
-
137
-
138
-
139
-
140
-
141
-
142
 |
 |
