Netgear WPN802v2 WPN802v2 Reference Manual - Page 26
How to Log In to the WPN802 Using Its Default IP Address - default password
 |
View all Netgear WPN802v2 manuals
Add to My Manuals
Save this manual to your list of manuals |
Page 26 highlights
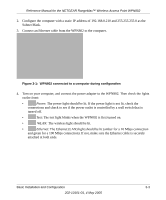
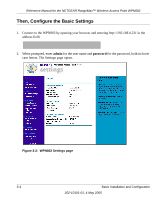
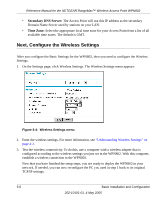
Reference Manual for the NETGEAR RangeMax™ Wireless Access Point WPN802 3. Connect the power adapter to the wireless access point and plug the power adapter in to a power outlet. The Power, WLAN and Ethernet lights should light up. 4. Using a computer with an 802.11g or 802.11b wireless adapter with the correct wireless settings, verify connectivity by using a browser such as Netscape® or Internet Explorer to connect to the Internet, or check for file and printer access on your network. Note: If you are unable to connect, see Chapter 3. 5. Configure the wireless settings for each computer that will use the wireless access point. 6. Implement wireless security according to the instructions in "Understanding Wireless Settings" on page 4-2. How to Log In to the WPN802 Using Its Default IP Address The WPN802 has DHCP client disabled, and the default IP address is 192.168.0.231. Note: The computer that you use to connect to the WPN802 should be configured with an IP address that starts with 102.168.0.x and a Subnet Mask of 255.255.255.0. 1. Connect to the WPN802 by typing http://192.168.0.231 in the address field of your browser, and clicking Enter. For security reasons, the access point has its own user name and password. A login window like the one below opens: Figure 3-7: Login window 2. Enter admin for the user name and password for the password, both in lower case letters. To change the password, see "This page displays both wired and wireless interface network traffic. Click Refresh to update the current statistics." on page 5-6. 3-8 Basic Installation and Configuration 202-10101-01, 4 May 2005
-
 1
1 -
2
-
3
-
4
-
5
-
6
-
7
-
8
-
9
-
10
-
11
-
12
-
13
-
14
-
15
-
16
-
17
-
18
-
19
-
20
-
 21
21 -
 22
22 -
 23
23 -
 24
24 -
 25
25 -
 26
26 -
 27
27 -
 28
28 -
 29
29 -
 30
30 -
 31
31 -
32
-
33
-
34
-
35
-
36
-
37
-
38
-
39
-
40
-
41
-
42
-
43
-
44
-
45
-
46
-
47
-
48
-
49
-
50
-
51
-
52
-
53
-
54
-
55
-
56
-
57
-
58
-
59
-
60
-
61
-
62
-
63
-
64
-
65
-
66
-
67
-
68
-
69
-
70
-
71
-
72
-
73
-
74
-
75
-
76
-
77
-
78
-
79
-
80
-
81
-
82
-
83
-
84
-
85
-
86
-
87
-
88
 |
 |
