Nikon D60 Body Only Black & Gold D60 User's Manual - Page 134
Auto Shooting Info, Wallpaper, Graphic, Image review
 |
UPC - 018208254590
View all Nikon D60 Body Only Black & Gold manuals
Add to My Manuals
Save this manual to your list of manuals |
Page 134 highlights
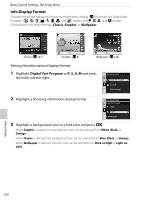
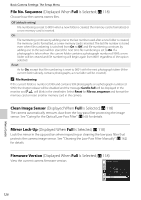
Basic Camera Settings: The Setup Menu Wallpaper The design of the Wallpaper format is the same as the Graphic display except that a user- selected photograph is displayed in the background. The shutter speed and aperture displays, and the graphic display of the shooting mode (A 9) do not appear. Set Set To choose a photograph for the Wallpaper format: 1 Highlight Select wallpaper in the Info display format screen (A 120, step 1) and press the multi selector right. The photographs on the memory card will be displayed. Info display format Select wallpaper 7 8 9 2 Press the multi selector left or right to highlight a photograph. Press and hold K to enlarge display of the selected photograph. 10 Zoom 11 12 OK Info display format Select wallpaper 7 8 9 10 Zoom 11 12 OK 3 Press Q to select the highlighted photograph and return to the setup menu. The camera will record the new wallpaper and use it in the shooting display whenever Wallpaper is selected. Only one image is recorded for wallpaper. Any existing wallpaper (including the default image provided with the camera) is deleted when a new image is selected and cannot be restored. Wallpaper cannot be viewed during playback or copied to a memory card. Auto Shooting Info Select On to automatically display shooting information after the shutter-release button is released. If Custom Setting 7 (Image review) is off, shooting information will also be displayed after a photograph is taken. Turn Auto shooting info on if you find yourself frequently checking camera settings. If Off is selected, the Shooting information display is not shown by pressing the shutterrelease button halfway. Available in Digital Vari-Program (e, f, g, h, i, j, k, and l) modes or a, b, c, and d modes. Note that even if On is selected, the monitor will turn off while the shutterrelease button is pressed. Menu Guide 122
-
 1
1 -
2
-
3
-
4
-
5
-
6
-
7
-
8
-
9
-
10
-
11
-
12
-
13
-
14
-
15
-
16
-
17
-
18
-
19
-
20
-
21
-
22
-
23
-
24
-
25
-
26
-
27
-
28
-
29
-
30
-
31
-
32
-
33
-
34
-
35
-
36
-
37
-
38
-
39
-
40
-
41
-
42
-
43
-
44
-
45
-
46
-
47
-
48
-
49
-
50
-
51
-
52
-
53
-
54
-
55
-
56
-
57
-
58
-
59
-
60
-
61
-
62
-
63
-
64
-
65
-
66
-
67
-
68
-
69
-
70
-
71
-
72
-
73
-
74
-
75
-
76
-
77
-
78
-
79
-
80
-
81
-
82
-
83
-
84
-
85
-
86
-
87
-
88
-
89
-
90
-
91
-
92
-
93
-
94
-
95
-
96
-
97
-
98
-
99
-
100
-
101
-
102
-
103
-
104
-
105
-
106
-
107
-
108
-
109
-
110
-
111
-
112
-
113
-
114
-
115
-
116
-
117
-
118
-
119
-
120
-
121
-
122
-
123
-
124
-
125
-
126
-
127
-
128
-
 129
129 -
 130
130 -
 131
131 -
 132
132 -
 133
133 -
 134
134 -
 135
135 -
 136
136 -
 137
137 -
 138
138 -
 139
139 -
140
-
141
-
142
-
143
-
144
-
145
-
146
-
147
-
148
-
149
-
150
-
151
-
152
-
153
-
154
-
155
-
156
-
157
-
158
-
159
-
160
-
161
-
162
-
163
-
164
-
165
-
166
-
167
-
168
-
169
-
170
-
171
-
172
-
173
-
174
-
175
-
176
-
177
-
178
-
179
-
180
-
181
-
182
-
183
-
184
-
185
-
186
-
187
-
188
-
189
-
190
-
191
-
192
-
193
-
194
-
195
-
196
-
197
-
198
-
199
-
200
-
201
-
202
-
203
-
204
 |
 |
