Nikon D60 Body Only Black & Gold D60 User's Manual - Page 42
Step 2 Frame a Photograph, Hold the camera as shown., Frame a photograph in the viewfinder.
 |
UPC - 018208254590
View all Nikon D60 Body Only Black & Gold manuals
Add to My Manuals
Save this manual to your list of manuals |
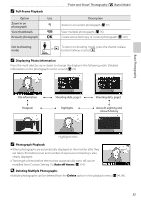
Page 42 highlights
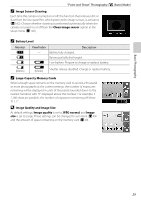
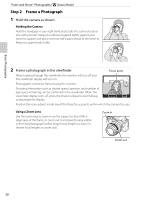
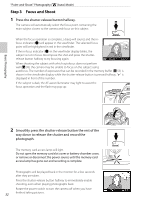
Basic Photography "Point-and-Shoot" Photography (e (Auto) Mode) Step 2 Frame a Photograph 1 Hold the camera as shown. Holding the Camera Hold the handgrip in your right hand and cradle the camera body or lens with your left. Keep your elbows propped lightly against your torso for support and place one foot half a pace ahead of the other to keep you upper body stable. 2 Frame a photograph in the viewfinder. Focus point When looking through the viewfinder, the monitor will turn off and the viewfinder display will turn on. Photographs cannot be framed using the monitor. Shooting information such as shutter speed, aperture, and number of exposures remaining can be confirmed in the viewfinder. When the viewfinder display turns off, press the shutter-release button halfway to reactivate the display. Position the main subject inside any of the three focus points, within which the camera focuses. Using a Zoom Lens Use the zoom ring to zoom in on the subject so that it fills a larger area of the frame, or zoom out to increase the area visible in the final photograph (select longer focal lengths to zoom in, shorter focal lengths to zoom out). Zoom in Zoom out 30
-
 1
1 -
2
-
3
-
4
-
5
-
6
-
7
-
8
-
9
-
10
-
11
-
12
-
13
-
14
-
15
-
16
-
17
-
18
-
19
-
20
-
21
-
22
-
23
-
24
-
25
-
26
-
27
-
28
-
29
-
30
-
31
-
32
-
33
-
34
-
35
-
36
-
 37
37 -
 38
38 -
 39
39 -
 40
40 -
 41
41 -
 42
42 -
 43
43 -
 44
44 -
 45
45 -
 46
46 -
 47
47 -
48
-
49
-
50
-
51
-
52
-
53
-
54
-
55
-
56
-
57
-
58
-
59
-
60
-
61
-
62
-
63
-
64
-
65
-
66
-
67
-
68
-
69
-
70
-
71
-
72
-
73
-
74
-
75
-
76
-
77
-
78
-
79
-
80
-
81
-
82
-
83
-
84
-
85
-
86
-
87
-
88
-
89
-
90
-
91
-
92
-
93
-
94
-
95
-
96
-
97
-
98
-
99
-
100
-
101
-
102
-
103
-
104
-
105
-
106
-
107
-
108
-
109
-
110
-
111
-
112
-
113
-
114
-
115
-
116
-
117
-
118
-
119
-
120
-
121
-
122
-
123
-
124
-
125
-
126
-
127
-
128
-
129
-
130
-
131
-
132
-
133
-
134
-
135
-
136
-
137
-
138
-
139
-
140
-
141
-
142
-
143
-
144
-
145
-
146
-
147
-
148
-
149
-
150
-
151
-
152
-
153
-
154
-
155
-
156
-
157
-
158
-
159
-
160
-
161
-
162
-
163
-
164
-
165
-
166
-
167
-
168
-
169
-
170
-
171
-
172
-
173
-
174
-
175
-
176
-
177
-
178
-
179
-
180
-
181
-
182
-
183
-
184
-
185
-
186
-
187
-
188
-
189
-
190
-
191
-
192
-
193
-
194
-
195
-
196
-
197
-
198
-
199
-
200
-
201
-
202
-
203
-
204
 |
 |
