| Section |
Page |
| Nokia 6360 |
1 |
| User Guide |
2 |
| Contents |
4 |
| 1 FOR YOUR SAFETY |
12 |
| SWITCH OFF WHERE PROHIBITED |
12 |
| ROAD SAFETY COMES FIRST |
12 |
| INTERFERENCE |
12 |
| SWITCH OFF IN HOSPITALS |
12 |
| SWITCH OFF IN AIRCRAFT |
12 |
| SWITCH OFF WHEN REFUELING |
12 |
| SWITCH OFF NEAR BLASTING |
12 |
| USE SENSIBLY |
13 |
| OBSERVE INFRARED PRECAUTIONS |
13 |
| QUALIFIED SERVICE |
13 |
| ACCESSORIES AND BATTERIES |
13 |
| WATER-RESISTANCE |
13 |
| BACKUP COPIES |
13 |
| CONNECTING TO OTHER DEVICES |
13 |
| FUSE REPLACEMENT |
13 |
| CALLING |
14 |
| EMERGENCY CALLS |
14 |
| 2 Welcome |
15 |
| • Get the most out of this guide |
15 |
| Understand the terms |
15 |
| • Quick guide to functions |
16 |
| • Menu Shortcuts |
17 |
| 01 -1 Write message |
17 |
| 01 -2 Write e-mail |
17 |
| 01 -3 Chat |
17 |
| 01 -4 Inbox |
17 |
| 01 -5 Outbox |
17 |
| 01 -6 Archive |
17 |
| 01 -7 Templates |
17 |
| 01 -8 Erase messages |
17 |
| 01 -9 Voice messages |
17 |
| 01 -10 Message settings |
17 |
| 2 -1 Missed calls |
17 |
| 2 -2 Received calls |
17 |
| 2 -3 Dialed numbers |
17 |
| 2 -4 Clear call lists |
17 |
| 2 -5 Call timers |
17 |
| 3 -1 Normal |
17 |
| 3 -2 Silent |
17 |
| 3 -3 Meeting |
17 |
| 3 -4 Outdoor |
17 |
| 3 -5 Pager |
17 |
| 4 -1 Tone settings |
17 |
| 4 -2 Time settings |
17 |
| 4 -3 Call settings |
17 |
| 4 -4 Phone settings |
17 |
| 4 -5 Accessory settings |
17 |
| 4 -6 Network services |
17 |
| 4 -7 Security settings |
17 |
| 4 -8 Restore factory settings |
17 |
| 5 -1 Voice recorder |
17 |
| 5 -2 Voice tags |
17 |
| 5 -3 Voice commands |
17 |
| 6 -1 Calendar |
17 |
| 6 -2 To-do list |
17 |
| 7 -1 Calculator |
17 |
| 7 -2 Stopwatch |
17 |
| • Names (Phone book) |
17 |
| 1 Find |
17 |
| 2 Add entry |
17 |
| 3 Edit name |
17 |
| 4 Erase |
17 |
| 5 Add number |
17 |
| 6 Settings |
17 |
| 7 1-touch dialing |
17 |
| 8 Voice tags |
17 |
| 9 Caller groups |
17 |
| Observe text conventions |
18 |
| Follow graphic clues |
18 |
| Look for updates |
19 |
| Sign up with a service provider |
19 |
| Note differences among service providers |
19 |
| • Contact Nokia |
19 |
| Have the right information available |
19 |
| Your phone’s label |
20 |
| • Contact your service provider |
20 |
| 3 Review the basics |
21 |
| An illustrated view of the 6360 phone |
21 |
| • About the antenna |
22 |
| • About the battery |
22 |
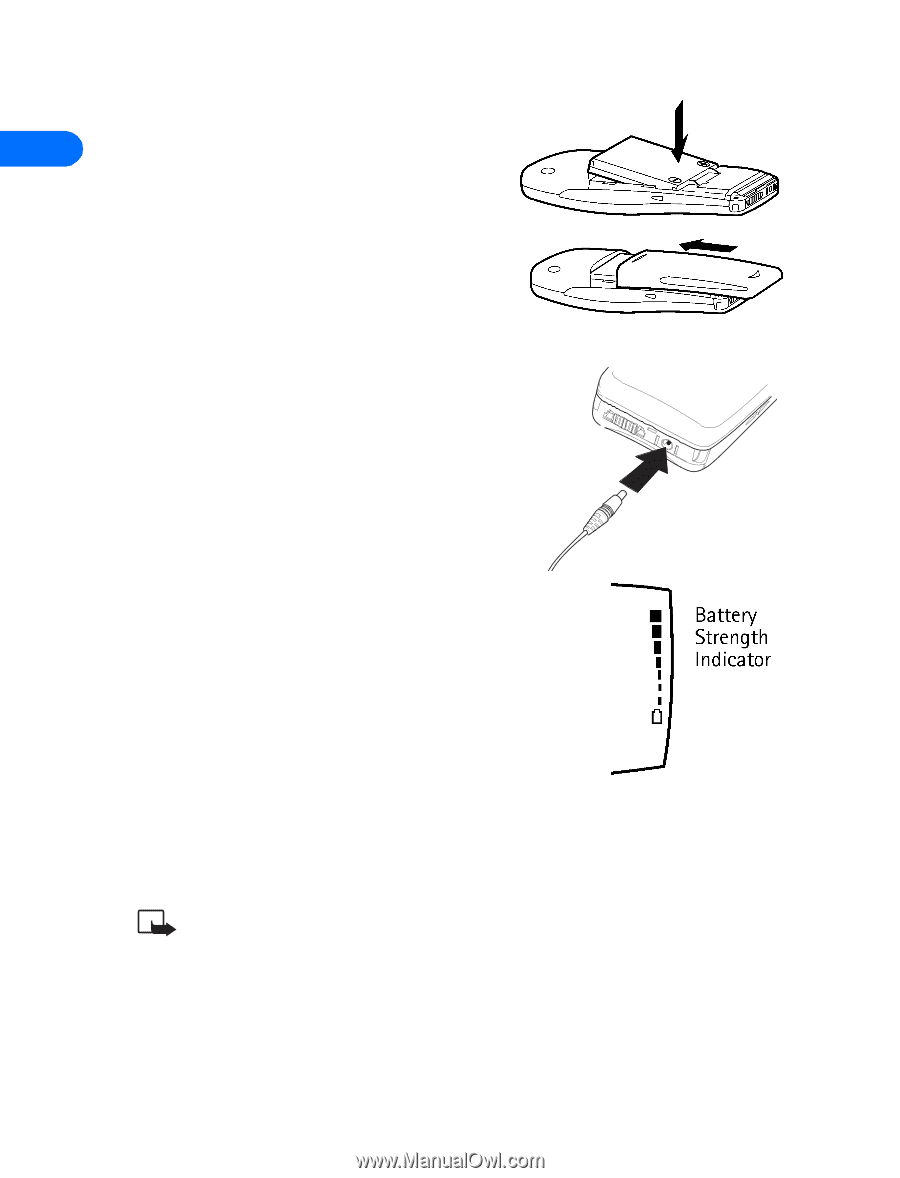
| Install the battery |
22 |
| 1 If cover is already on phone, remove the back cover of the phone by gripping the bottom with on... |
22 |
| 2 Place the battery in the compartment with the label side facing up and the golden contact area ... |
22 |
| 3 Make sure the bottom of the battery makes contact with the prongs in the lower end of the space... |
23 |
| 4 Replace the cover by sliding it upward until you hear a click. |
23 |
| Charge the battery |
23 |
| 1 With your phone turned off, connect the lead from the charger to the bottom of the phone. Conne... |
23 |
| 2 Disconnect the charger from the phone and AC outlet when the battery is fully charged. After th... |
23 |
| • Remove the battery |
24 |
| 1 Remove the back cover of the phone by gripping the bottom with one thumb and pressing downward ... |
24 |
| 2 Place your index finger in the space at the top of the battery, and lift out of phone. |
24 |
| 3 Take out the battery. |
24 |
| • Important battery information |
24 |
| • Switch on your phone |
25 |
| • Check the Start screen |
25 |
| Return to the Start screen |
25 |
| tour the Start screen |
26 |
| 4 Set up your phone |
27 |
| • Set up your headset |
27 |
| Connect the headset |
27 |
| 1 Plug the headset jack into the bottom of your phone. |
27 |
| 2 Put the round ear plug into one ear. |
27 |
| Use the headset |
27 |
| • Adjust the volume |
27 |
| • Adjust screen contrast |
28 |
| 1 Press Menu 4-4-5 (Settings > Phone settings > Display contrast). |
28 |
| 2 Press to increase the contrast, and to decrease it. |
28 |
| 3 Select OK to confirm your changes, or select Back to leave the contrast at its current level. |
28 |
| • Set equalizer |
28 |
| 1 Press Menu 4-3-4 (Settings > Call settings > Equalizer). |
28 |
| 2 Choose from one of the following options from Equalizer’s menu: |
28 |
| • Lock keypad (keyguard) |
29 |
| Accept incoming calls |
29 |
| • Learn the keys |
29 |
| • Make and answer calls |
30 |
| 1 Press number keys to enter a number, including area code if needed. |
31 |
| 2 Press . |
31 |
| 3 Hold the phone as you would any other telephone, with the earpiece over your ear. Or, connect a... |
31 |
| Check the menu number and scroll bar |
31 |
| • Review phone symbols |
31 |
| • Use the selection keys |
33 |
| • Check in-phone help |
34 |
| 1 Scroll to a menu or submenu option. |
34 |
| 2 Wait about 10 seconds. |
34 |
| 3 Use and to scroll down through the longer descriptions. |
34 |
| • Browse phone menus |
34 |
| Scroll through menus |
34 |
| 1 At the Start screen, press Menu, and then scroll through the menus using the and keys. |
34 |
| 2 Press Options, Select, or OK, by pressing the selection key for the option you want. |
34 |
| 3 Use the scroll and selection keys to navigate the submenus; press to return to the Start screen. |
34 |
| Use a shortcut |
35 |
| • Shortcuts |
35 |
| • Names menu |
39 |
| 5 Add information |
40 |
| • About entering letters and numbers |
40 |
| • ABC and 123 methods |
41 |
| Enter letters |
41 |
| 1 Find the key with the letter you want to enter. |
41 |
| 2 Press the key repeatedly until the letter appears on the screen. |
41 |
| 3 Wait for the blinking cursor to reappear before you enter another letter, unless the letter is ... |
41 |
| a) Press e |
41 |
| a) Press r |
41 |
| a) Press t |
41 |
| Enter numbers |
41 |
| Enter punctuation and other characters |
42 |
| Enter spaces and punctuation |
42 |
| Erase mistakes |
43 |
| Change letter case |
43 |
| Use special characters in names and phone numbers |
43 |
| . |
43 |
| ? |
43 |
| ! |
43 |
| @ |
43 |
| ‘ |
43 |
| - |
43 |
| _ |
43 |
| ( |
43 |
| ) |
43 |
| , |
43 |
| : |
43 |
| ; |
43 |
| & |
43 |
| / |
43 |
| ~ |
43 |
| \\ |
43 |
| % |
43 |
| * |
43 |
| # |
43 |
| + |
43 |
| < |
43 |
| = |
43 |
| > |
43 |
| “ |
43 |
| £ |
43 |
| $ |
43 |
| ¥ |
43 |
| § |
43 |
| ¡ |
43 |
| ¿ |
43 |
| In ABC |
43 |
| 1 Press . |
43 |
| 2 A screen appears with the available symbols. |
43 |
| 3 Use and to move to the character you want, then select Insert. |
43 |
| In 123 |
44 |
| • Write with predictive text |
44 |
| Turn on predictive text input |
45 |
| 1 Press Menu, and then press Select. |
45 |
| 2 When Write message appears, press Select. |
45 |
| 3 Enter a character using the keypad. |
46 |
| 4 Press Options, scroll to Predictive text and press Select. |
46 |
| 5 Scroll to the dictionary you want (for example, English). |
46 |
| 6 Press Select. |
46 |
| Turn off predictive text input |
46 |
| 1 Repeat steps 1 through 5 in the section immediately above. |
46 |
| 2 Scroll to Prediction off and press OK. |
46 |
| Tips for predictive text |
46 |
| quick activation or deactivation of predictive text |
46 |
| Add a symbol |
46 |
| 1 Press and hold . |
46 |
| 2 Scroll to the symbol you want and select Insert. |
46 |
| Check a word |
46 |
| Add a word to the dictionary |
47 |
| 1 Select Spell and enter the word(s) using standard text entry. |
47 |
| 2 Select Save to save the word(s). |
47 |
| Insert numbers |
47 |
| 1 To add a number to the message, press and hold until appears on the screen. |
47 |
| 2 Enter the numbers you want, and then press and hold to return to the method. |
47 |
| Insert symbols |
47 |
| 1 To put a symbol in the message, press Options and scroll to Insert symbol (or press and scroll ... |
47 |
| 2 Select the symbol you want (use the scroll keys to move through the symbols) and press Insert. |
47 |
| Write compound words |
48 |
| 1 Write the first part of the word and press to accept that part. |
48 |
| 2 Write the last part of the compound word and press to enter. |
48 |
| 6 Use the phone book |
49 |
| • Open the phone book |
49 |
| • Save names and numbers |
49 |
| Quickly save a number and name |
49 |
| 1 Enter the phone number using the keypad. |
49 |
| 2 Press Options, and then press Save. |
49 |
| 3 Enter a name and press OK. |
49 |
| 4 Press Done to return to the Start screen. |
49 |
| Save an entry using the names menu |
50 |
| 1 Press Names to enter the phone book. |
50 |
| 2 Scroll to Add entry and press Select. |
50 |
| 3 Enter a name and press OK. |
50 |
| 4 Enter a number and press OK. |
50 |
| 5 Press Done to return to the Start screen. |
50 |
| • Save a text entry with a name |
50 |
| 1 Find the name or number to which you want to add text. |
50 |
| 2 Press Details, and then press Options. |
50 |
| 3 Scroll to Add info, press Select, then scroll to the text type you would like to add (E-mail, S... |
50 |
| 4 Press Select, add your text, and press OK. |
50 |
| 5 Press to return to the Start screen. |
50 |
| • Retrieve information |
50 |
| Retrieve numbers from the phone book |
50 |
| 1 At the Start screen, press Names. |
50 |
| 2 Select Find and enter the desired name. |
50 |
| 3 Press Find, and then press to call the number. |
50 |
| Retrieve information with shortcuts |
51 |
| • Use phone book menus |
51 |
| Change phone book views |
52 |
| 1 Press Names. |
52 |
| 2 Select Settings. |
52 |
| 3 Select Phone book view. |
52 |
| 4 Scroll to the view you want and press OK. |
52 |
| • Edit a name or number |
52 |
| 1 Retrieve the name or number you wish to edit. |
52 |
| 2 Press Details, and then press Options. |
52 |
| 3 Scroll to Edit number or Edit name and press Select. |
53 |
| 4 Edit the name or number and press OK. |
53 |
| • Erase stored names and numbers |
53 |
| 1 Retrieve the phone book entry you want to erase. |
53 |
| 2 Press Details, and then press Options. |
53 |
| 3 Scroll to Erase, and press Select. |
53 |
| 4 Press OK. |
53 |
| 1 Press Names, scroll to Erase and press Select. |
53 |
| 2 Scroll to One by one and press Select. |
53 |
| 3 Scroll to the entry you want to delete and press Erase. |
53 |
| 4 When the message Erase all details? appears, press OK. |
53 |
| • Erase the entire phone book |
53 |
| 1 Press Names, scroll to Erase, and press Select. |
53 |
| 2 Scroll to Erase all and press Select. |
53 |
| 3 When you see the message Are you sure?, press OK. |
53 |
| 4 Enter your security code. |
53 |
| • Add a second number to a name |
54 |
| From the phone book |
54 |
| 1 Press Names, scroll to Add number, and press Select. |
54 |
| 2 Scroll to the name to which you want to add the number and press Add no. |
54 |
| 3 Scroll to the type of number you are adding (General, Mobile, Home, Work or Fax), and press Sel... |
54 |
| From the Start screen |
54 |
| 1 Enter the phone number using the keypad. |
54 |
| 2 Press Options. |
54 |
| 3 Scroll to Add to name and press Select. |
54 |
| 4 Scroll to the name to which you want to add the number and press Add no. |
54 |
| 5 Scroll to the desired number type and press Select. |
54 |
| By retrieving the name |
54 |
| 1 Retrieve the name to which you would like to add a second number. |
54 |
| 2 Press Details, and then press Options. |
54 |
| 3 Scroll to Add number, and then press Select. |
54 |
| 4 Scroll to the desired number type and press Select. |
54 |
| 5 Enter the number and press OK. |
54 |
| Change the number type |
55 |
| 1 Retrieve the name from the phone book. |
55 |
| 2 Press Details, and then scroll to the number you want to change. |
55 |
| 3 Press Options, scroll to Change type, and press Select. |
55 |
| 4 Scroll to the number type you would like and press Select. |
55 |
| Specify a primary number |
55 |
| 1 Retrieve the name for which you want to select a primary number. |
55 |
| 2 Press Details, and then scroll to the number you want to set as the primary number. |
55 |
| 3 Press Options, scroll to As primary no., and press Select. |
55 |
| • Create caller groups |
55 |
| Adding a name and phone number to a caller group |
55 |
| 1 Once you have retrieved the desired name and number from the phone book, press Details, then se... |
55 |
| 2 Scroll to Caller groups, and press Select. |
56 |
| 3 Scroll to the desired caller group (for example Family), and press Select. |
56 |
| Setting a ringing tone and graphic for a caller group |
56 |
| 1 Press Names. |
56 |
| 2 Scroll to Caller groups and press Select. |
56 |
| 3 Scroll to one of the caller groups and press Select. |
56 |
| 4 Scroll to one of the following functions and press Select. |
56 |
| • Check memory status |
56 |
| 1 Press Names and scroll to Settings. |
56 |
| 2 Scroll to Memory status and press Select. |
56 |
| 7 Check call history |
57 |
| • Check missed, received, or dialed calls |
57 |
| 1 Press Menu 2 (Call log) select Call log. |
57 |
| 2 Use and to move to Missed calls, Received calls, Dialed numbers, Clear call lists, and Call tim... |
57 |
| 3 Press Select at the submenu you want. |
57 |
| 4 For missed, received, and dialed numbers, a phone number (or the name associated with a number ... |
57 |
| 5 Use and to scroll to the number or name you want, and then press Options. |
57 |
| 6 When you see the option you want, press Select. |
57 |
| Missed calls |
58 |
| Dialed calls, received calls |
58 |
| • Clear call lists |
58 |
| 1 Press Menu 2-4 (Call log > Clear call lists) |
59 |
| 2 Use or to scroll through the options list. |
59 |
| 3 Stop at the appropriate option and press Select. |
59 |
| • Check call timers |
59 |
| 1 Press Menu 2-5 (Call log > Call timers) |
59 |
| 2 Use or to scroll through the options described in the following list. |
59 |
| • Turn on a current call timer |
60 |
| 1 Press Menu 4-3-3 (Settings > Call settings > Show call time on display) |
60 |
| 2 Scroll to On and press OK. |
60 |
| 3 After a call has ended, press any key on your phone to clear the current call time from the scr... |
60 |
| • Clear call timers |
60 |
| 1 Press Menu 2-5-6 (Call log > Call timers > Clear timers) |
60 |
| 2 Enter your security code and press OK. |
60 |
| 8 Use advanced calling features |
61 |
| • Set in-call options |
61 |
| • Use call waiting |
62 |
| Store the call waiting feature code |
62 |
| 1 Press Menu 4-6-2 (Settings > Network services > Network feature setting) |
62 |
| 2 Enter the feature code your service provider gave you and press OK. |
62 |
| 3 Scroll to Call waiting and press Select. |
62 |
| 4 Make sure that Activate is highlighted and press Select. |
62 |
| Activate call waiting |
62 |
| 1 Press Menu 4-6 (Settings > Network services) |
62 |
| 2 Select Call waiting, then select Activate. |
62 |
| Manage calls |
62 |
| Make a conference call |
63 |
| 1 While in a call, you can either dial the number you want to conference in and press . |
63 |
| 2 When the third party answers, press to connect all three parties. |
63 |
| 3 To place one of the parties on hold, press again. |
63 |
| 4 To drop all parties, press . |
63 |
| Look up a number during a conference call |
63 |
| 1 During the call, press Options. |
63 |
| 2 Scroll to Phonebook and press Select. |
63 |
| 3 Press Select at Find. |
63 |
| 4 Enter a name and press Find, or scroll through the phone book. |
63 |
| 5 Press Details. |
63 |
| • Use call forwarding |
64 |
| Store the call forwarding feature code |
64 |
| 1 Press Menu 4-6-2 (Settings > Network services > Network feature setting) |
64 |
| 2 Enter the feature code your service provider gave you and press OK. |
64 |
| 3 Use or to scroll to Call forwarding and press Select. |
64 |
| 4 Scroll to each Call forwarding option you want, and select each one, then scroll to Activate, a... |
64 |
| Activate call forwarding |
64 |
| 1 Press Menu 4-6-2 (Settings > Network services > Network feature setting). |
64 |
| 2 Scroll to the desired call forwarding option, as described in the following list, and press Sel... |
64 |
| 3 Highlight Activate and press Select. |
65 |
| 4 In the Number field, either enter the number to which you want your calls forwarded or press Fi... |
65 |
| 5 Press OK. |
65 |
| • Redial automatically |
65 |
| 1 Press Menu 4-3-1 (Settings > Call settings > Automatic redial) |
65 |
| 2 Scroll to On. |
66 |
| 3 Press Select. |
66 |
| • Use a calling card |
66 |
| Save calling card information (step 1) |
66 |
| 1 Press Menu 4-3-2 (Settings > Call settings > Calling card). Enter your security code, when prom... |
66 |
| 2 Scroll to card A, B, C, or D and press Options. |
66 |
| 3 Scroll to Edit and press OK. |
66 |
| 4 The Dialing sequence field appears. |
66 |
| 5 Press Select. |
66 |
| 6 Use or to scroll through the list of dialing sequences, as described in the following list. |
66 |
| 7 Press Select. |
66 |
| Save calling card information (step 2) |
67 |
| 1 When prompted for the calling card’s access number, enter the number and press OK. |
67 |
| 2 When prompted to enter a calling card number (usually shown on the front of the calling card) a... |
67 |
| 3 Press OK again when the Save changes? message appears. |
67 |
| 4 Use or to scroll to Card name, press Select, and enter the card name using your phone’s keypad. |
67 |
| 5 Press OK. |
67 |
| Choose a calling card to use |
67 |
| 1 Press Menu 4-3-2 (Settings > Call settings > Calling card). Enter your security code when promp... |
67 |
| 2 Scroll to the desired card and press Options. |
67 |
| 3 Press or to highlight Select and press OK. |
67 |
| 4 Enter your security code and press OK. |
67 |
| Make a calling card call |
67 |
| 5 Enter the phone number, including any prefix (such as 0 or 1) your calling card might require w... |
67 |
| 6 Press and hold until your phone displays the message Card call and then Wait for tone, then pre... |
67 |
| 7 When you hear the tone from your calling card service, press OK. |
68 |
| 8 After the tone, your phone displays the message Wait for tone, press OK again. Press OK. |
68 |
| • Voice dialing |
68 |
| Assigning a voice tag to a phone number |
68 |
| Assigning a voice tag to an entry |
68 |
| 1 At the Start screen, scroll to the name you want to give a voice tag. |
68 |
| 2 Press Details, then Options, and scroll to Add voice tag. |
68 |
| 3 Press Select. The phone displays Press Start, then speak after tone. |
68 |
| 4 Press Start. |
68 |
| 5 Speak clearly into the microphone. |
68 |
| Dial a number using voice dialing |
69 |
| 1 Press and hold the Names selection key or the side volume key. |
69 |
| 2 Pronounce the voice tag clearly into the microphone. When the phone finds the voice tag, Found ... |
70 |
| Work with an existing voice tag |
70 |
| Play back a voice tag |
70 |
| 1 Press Names and scroll to Voice tags. |
70 |
| 2 Press Select, then scroll to the name with the voice tag you want to hear. |
70 |
| 3 Press Options, select Playback, and press OK. |
70 |
| Change a voice tag |
70 |
| 1 Press Names and scroll to Voice tags. |
70 |
| 2 Press Select, then scroll to the name with the voice tag you want to change. |
70 |
| 3 Press Options, scroll to Change, and press OK. |
70 |
| 4 The phone displays Press Start, then speak after tone. |
70 |
| 5 Press Start. |
70 |
| 6 The phone repeats your voice tag, and Voice tag saved appears. |
70 |
| Erase a voice tag |
70 |
| 1 Press Names and scroll to Voice tags. |
70 |
| 2 Press Select, then scroll to the name with the voice tag you want to erase. |
70 |
| 3 Press Options, scroll to Erase, and press Select. |
71 |
| 4 Press Select to erase the voice tag. |
71 |
| • Voice recorder |
71 |
| Record speech or sound |
71 |
| 1 Press Menu 5-1-1 (Voice > Recorder > Record) |
71 |
| 2 After the Recorder start tone is heard, begin recording speech or sound. |
71 |
| 3 When you finish recording, select the Stop option. |
71 |
| 4 Enter the title you wish to assign to the recording. |
71 |
| Record while in a call |
71 |
| 1 While in a call, press Options, then select Record. |
71 |
| 2 After the Recorder start tone is heard, the recorder begins recording the phone conversation. A... |
71 |
| 3 When recording is done, select the Stop option. |
71 |
| View recording list and play recordings |
72 |
| 1 You can view your saved recordings by selecting the Recording list option. Press Menu 5-1-2 (Vo... |
72 |
| 2 Once in you are in the Recording list, select the recording you would like to play, and then se... |
72 |
| Erase a recording |
72 |
| Edit a recording title |
72 |
| Setting the voice memo alarm |
72 |
| • Voice commands |
72 |
| View available functions |
72 |
| Add a voice tag for the command |
73 |
| 1 Press Menu 5-3 (Voice > Voice commands) |
73 |
| 2 Scroll to the phone function you wish to tag, then press Select. |
73 |
| 3 Press Options, then select Add command. |
73 |
| 4 Press Start, then speak the voice tag clearly into the microphone. |
73 |
| Activate a voice command |
73 |
| 1 If you have the optional headset attached, press and hold the headset button. OR |
73 |
| • Press and hold Names. OR |
73 |
| • Press and hold the volume down key. |
73 |
| 2 When Please speak now appears, pronounce the voice tag clearly into the microphone. When the ph... |
74 |
| Work with an existing voice command tag |
74 |
| • Listen to the tag |
74 |
| • Change the tag |
74 |
| • Erase the tag |
74 |
| • Send your own number in caller ID |
74 |
| Store the feature code |
74 |
| 1 Press Menu 4-6-2 (Settings > Network services > Network feature setting). |
74 |
| 2 Enter the feature code your service provider gave you and press OK. |
74 |
| 3 Use or to scroll to Send own caller ID and press Select. |
75 |
| 4 Highlight Yes and press Select. The phone then displays Feature code saved in menu. |
75 |
| Set whether or not your number will appear |
75 |
| 1 Press Menu 4-6-5 (Settings > Network services > Send own caller ID when calling) |
75 |
| 2 Scroll to Yes if you want to show your number. |
75 |
| 3 Press Select. |
75 |
| 4 Enter the number you wish to call (or press Find to retrieve the number from the phone book), a... |
75 |
| • Select a phone number |
75 |
| Select the phone number |
75 |
| 1 Press Menu 4-6-6 (Settings > Network services > Own number selection) |
75 |
| 2 Scroll to the phone number you want to use and press OK. |
75 |
| Select digital or analog |
76 |
| • Set touch tones |
76 |
| Set manual touch tones |
76 |
| 1 Press Menu 4-4-2-1 (Settings > Phone settings > Touch tones > Manual touch tones) |
76 |
| 2 Select one of the following options, and then press Select: |
76 |
| Set fixed touch tone length |
77 |
| 1 Press Menu 4-4-2-2 (Settings > Phone settings > Touch tones > Touch tone length) |
77 |
| 2 Use or to scroll to Short or Long. Short sets the tone length to 0.1 second. Long sets the tone... |
77 |
| 3 Press Select. |
77 |
| Store touch tone sequences (strings) |
77 |
| Store touch tone strings with phone numbers |
77 |
| 1 Enter the phone number that you want associated with a touch tone. |
77 |
| 2 Press then select w or p where needed. |
77 |
| 3 Enter the touch tone string. |
77 |
| 4 Store the number as you normally would. |
77 |
| Send a touch tone string |
77 |
| 1 Press Menu 4-4-2-1 (Settings > Phone settings > Touch tones > Manual touch tones) |
77 |
| 2 Make sure that the setting is not set to Off. |
78 |
| 3 Then, during your call, press Options, scroll to Touch tones and press Select. |
78 |
| 4 Enter the touch tone string or retrieve the string from the phone book, and press Tones. |
78 |
| 9 Use voice mail |
79 |
| • Check for messages |
79 |
| • Set up your voice mailbox |
79 |
| 1 Press Menu 01-9 (Messages > Voice messages) then select Voice mailbox number. |
79 |
| 2 Enter your voice mailbox phone number. |
79 |
| 3 Press OK. |
79 |
| • Set greetings |
80 |
| • Listen to your voice messages |
80 |
| 1 When your phone alerts you to new voice messages, press Listen and follow the instructions give... |
80 |
| 2 If you’d rather listen to your messages later, press Exit. |
80 |
| 3 To listen to your voice messages: |
80 |
| 10 Personalize rings and tones |
81 |
| • What is a profile? |
81 |
| • Select a different profile |
81 |
| 1 Quickly tap the Power key or use this shortcut: Menu 3. |
81 |
| 2 Use and to move to the profile you want to use. |
81 |
| 3 Press Select to select a profile. |
81 |
| • Customize a profile |
82 |
| 1 Press Menu 3 (Profiles) |
82 |
| 2 Scroll to the desired profile in the list. |
82 |
| 3 Press Select to view the options for the selected profile. |
82 |
| Set ring options |
82 |
| 1 Press Menu 3 (Profiles) |
82 |
| 2 Use or to scroll to the desired profile in the list for which you want to set the ringing optio... |
82 |
| 3 Scroll to Customize and press Select. |
82 |
| 4 Scroll to Ringing options and press Select. |
82 |
| 5 Scroll to one of the ringing options, as described below, and press Select. |
83 |
| Set the ring volume |
83 |
| 1 Press Menu 3 (Profiles) |
83 |
| 2 Use or to scroll to the profile for which you want to set the ringing volume, and press Select. |
83 |
| 3 Highlight Customize and press Select. |
83 |
| 4 Scroll to Ringing volume and press Select. |
83 |
| 5 Scroll through the options. When you hear the volume level you wish to use, press Select. |
83 |
| Set the ringing tone |
83 |
| 1 Press Menu 3 (Profiles) |
84 |
| 2 Use or to scroll to the profile for which you want to set the ringing tones. |
84 |
| 3 Press Select. |
84 |
| 4 Scroll to Customize and press Select. |
84 |
| 5 Scroll to Ringing tone and press Select. |
84 |
| 6 Scroll through the options, and when you hear the tone you want to use, press Select. |
84 |
| Set a vibrating alert |
84 |
| 1 Press Menu 3 (Profiles) |
84 |
| 2 Use or to scroll to the profile for which you want to set the vibrating alert, and press Select. |
84 |
| 3 Select Customize and press Select. |
84 |
| 4 Scroll to Vibrating alert and press Select again. |
84 |
| 5 Use or to scroll to On and press Select. |
84 |
| Set keypad tones |
84 |
| 1 Press Menu 3 (Profiles) |
84 |
| 2 Use or to scroll to the profile for which you want to set the keypad tones, and press Select. |
84 |
| 3 Select Customize and press Select. |
84 |
| 4 Scroll to Keypad tones and press Select. |
85 |
| 5 Use or to scroll to one of the levels and press OK. |
85 |
| Set warning tones |
85 |
| 1 Press Menu 3 (Profiles) |
85 |
| 2 Use or to scroll to the profile for which you want to set the warning tones, and press Select. |
85 |
| 3 Scroll Customize. |
85 |
| 4 Select Warning tones. |
85 |
| 5 Scroll to On and press Select. |
85 |
| Set the message alert tone |
85 |
| 1 Press Menu 3 (Profiles) |
85 |
| 2 Use or to scroll to the profile for which you want to set the message alert tone, and press Sel... |
85 |
| 3 Select Customize and press Select. |
85 |
| 4 Scroll to Message alert tone, and then press Select. |
85 |
| 5 Use or to scroll through your choices. |
86 |
| 6 Select the tone you want. |
86 |
| • Rename profiles |
86 |
| 1 Press Menu 3 (Profiles) |
86 |
| 2 Use or to scroll to the desired profile and press Select. |
86 |
| 3 Select Customize, scroll to Profile name and press Select. |
86 |
| 4 Enter the new name and press Select. |
86 |
| 11 Personalize phone settings |
87 |
| • Set the language |
87 |
| 1 Press Menu 4-4-1 (Settings > Phone settings > Language). |
87 |
| 2 Use or to scroll to the language you want to use and press Select. |
87 |
| • Set and display the clock |
87 |
| Set the clock |
87 |
| 1 Press Menu 4-2-2 (Settings > Time settings > Clock). |
87 |
| 2 Use or to scroll to Set the time and press Select. |
87 |
| 3 Enter the time using an 00:00 format and press OK. |
87 |
| Show the clock on the Start screen |
88 |
| 1 Press Menu 4-2-2-1 (Settings > Time settings > Clock > Show/Hide clock) |
88 |
| 2 To show the clock, scroll to Show clock and press Select. |
88 |
| Select the 12- or 24-hour format |
88 |
| 1 Press Menu 4-2-2 (Settings > Time settings > Clock) |
88 |
| 2 Use or to scroll to Time format and press Select. |
88 |
| 3 Use or to scroll to either 12-hour or 24-hour and press OK. |
88 |
| • Set the clock to be updated by the network |
88 |
| Turn on the network date and time update |
88 |
| 1 Press Menu 4-2-3 (Settings > Time settings > Auto update of date and time) |
88 |
| 2 Scroll to On or Confirm first, and then press Select. |
88 |
| Turn off the network date and time update |
88 |
| 1 Press Menu 4-2-3 (Settings > Time settings > Auto update of date and time), and then press Select. |
88 |
| 2 Scroll to Off, and then press Select. |
89 |
| • Add a welcome note |
89 |
| 1 Press Menu 4-4-3 (Settings > Phone settings > Welcome note) |
89 |
| 2 Enter the text of the welcome note. |
89 |
| 3 Press Options. |
89 |
| 4 Scroll to Save and press Select. |
89 |
| • Use speed dialing |
89 |
| Set up a speed-dial key |
90 |
| 1 Press Names and scroll to 1-touch dialing. |
90 |
| 2 Press Select. |
90 |
| 3 Use or to scroll to the first number that includes the message (empty) and press Assign. |
90 |
| 4 Use or to scroll to the name and number to which you want to assign this key and press Select. |
90 |
| 5 To call a number using speed dialing, press and hold the appropriate key for a few seconds. |
90 |
| Change speed dialing numbers |
90 |
| 1 Press Names, scroll to 1-touch dialing, and press Select. |
90 |
| 2 Scroll to the key you want to change and press Options. |
90 |
| 3 Scroll to Change and press Select. |
90 |
| 4 Enter the new number or retrieve a number from the phone book. |
90 |
| 5 When you’ve entered the number, press OK. |
90 |
| Erase speed dialing numbers |
90 |
| 1 Press Names. |
90 |
| 2 Use or to scroll to 1-touch dialing and press Select. |
90 |
| 3 Scroll to the key you want to erase and press Options. |
91 |
| 4 Scroll to Erase and press Select. |
91 |
| 5 Press OK. |
91 |
| • Set your phone to answer automatically |
91 |
| 1 Press Menu 4-5-1-2 (Settings > Accessory settings > Headset > Automatic answer). You must selec... |
91 |
| 2 Press Select. |
91 |
| 3 Use or to scroll to either On or Off and press Select. |
91 |
| • Set the lights (car kit only) |
91 |
| 1 Press Menu 4-5 (Settings > Accessory settings) scroll to Handsfree, then select Lights. |
91 |
| 2 Scroll through your choices in the list below, and press OK. |
91 |
| • Restore the factory settings |
92 |
| 1 Press Menu 4-8 (Settings > Restore factory settings) |
92 |
| 2 Enter your security code and press OK. |
92 |
| • Learn about accessibility solutions |
92 |
| Alternate format user guides |
92 |
| LPS-1 Mobile Inductive Loopset |
93 |
| How the Loopset works |
93 |
| Accessible features |
93 |
| TTY/TDD capable |
94 |
| Equipment you’ll need |
94 |
| Connect to the TTY/TDD device |
94 |
| 1 Connect the cable to the TTY machine |
94 |
| 2 Connect the cable to the adapter |
94 |
| 3 Connect the adapter to the phone |
94 |
| Make a call with TTY/TDD |
94 |
| 1 At the Start screen, press Menu 4-5 (Settings > Accessory settings). Select TTY/TDD. Select Use... |
94 |
| 2 Dial the number on the phone. Then press . |
94 |
| 3 When the receiving party answers, you can begin typing text on the TTY/TDD. |
94 |
| Receiving a TTY/TDD call |
94 |
| 1 Ensure that the TTY/TDD and phone are powered on and are connected, and ensure TTY/TDD setting ... |
94 |
| 2 Once contacted by the other party, type responses on the TTY/TDD. |
95 |
| End a TTY/TDD call |
95 |
| 12 Manage phone security |
96 |
| Tips: |
96 |
| • Change your security code |
96 |
| 1 Press Menu 4-7-2-1 (Settings > Security settings > Access codes > Change security code) |
96 |
| 2 Enter the default security code and press OK. |
96 |
| 3 At the message Enter new security code, enter your new security code and press OK. |
96 |
| 4 At the message Verify new security code, enter your new security code again and press OK. |
96 |
| • Restrict calls |
97 |
| Add a number to the call restriction list |
97 |
| 1 Press Menu 4-7-1 (Settings > Security settings > Call restrictions) |
97 |
| 2 Press Select, enter your security code, and press OK. |
97 |
| 3 Scroll to Restrict outgoing calls or Restrict incoming calls, and then press Select. |
97 |
| 4 Scroll to Add restriction, and then press Select. |
97 |
| 5 Enter the number you want to restrict, or retrieve the number from the phone book, and then pre... |
97 |
| 6 Enter a name for the restriction, and then press OK. |
97 |
| Restrict outgoing calls |
98 |
| 1 Press Menu 4-7-1 (Settings > Security settings > Call restrictions) |
98 |
| 2 Press Select, enter your security code, and press OK. |
98 |
| 3 Scroll to Restrict outgoing calls and press Select. |
98 |
| 4 Scroll to Select to choose from your list of call restrictions. |
98 |
| 5 Scroll to the restriction you want to activate and press Mark. |
98 |
| 6 Press Done. The message Save changes? appears. |
98 |
| 7 Press Yes. |
98 |
| Restrict incoming calls |
98 |
| 1 Press Menu 4-7-1 (Settings > Security settings > Call restrictions) |
98 |
| 2 Press Select, enter your security code, and press OK. |
98 |
| 3 Scroll to Restrict incoming calls, and then press Select. |
98 |
| 4 Scroll to Select and press Select to choose from your list of call restrictions. |
98 |
| 5 Scroll to the restriction you want to activate and press Mark. |
98 |
| Turn off call restrictions |
99 |
| 13 Your personal digital assistant |
100 |
| • Calendar |
100 |
| Open the Calendar / enter the Day list |
100 |
| Use four-way scrolling in the calendar |
100 |
| Calendar options in day view |
100 |
| Option 1: View day |
100 |
| Option 2: Make a calendar note |
101 |
| Option 3: Go to date |
101 |
| option 4: Send note |
101 |
| Send a calendar note to another device via infrared |
101 |
| 1 Scroll to the note you wish to send and press Options. |
101 |
| 2 Scroll to Send note, then press Select. |
101 |
| 3 Point the infrared ports at each other. |
102 |
| 4 Scroll to Send via IR and press Select to start data transfer. |
102 |
| Option 5: Settings |
102 |
| • To-do list |
102 |
| Adding a task |
102 |
| 1 Press Menu 6-2 (Organizer > To-do list). After selecting To-do list, press Options, and select ... |
102 |
| 2 Enter the subject of the To-do list and press Options, then Save. (For information about enteri... |
102 |
| 3 Then scroll to the desired priority (1, 2, or 3) and press Select. You can change the priority ... |
102 |
| • Use the calculator |
102 |
| 1 Press Menu 7-1 (Tools > Calculator) |
103 |
| 2 Enter the first number in the calculation. |
103 |
| 3 Based on the type of calculation that you need to perform, use one of the following actions: |
103 |
| 4 Enter the second number in the calculation. |
103 |
| 5 Press Options, use or to scroll to Equals, and press Select. |
103 |
| Convert currency |
103 |
| Set the exchange rate |
104 |
| 1 Press Menu 7-1 (Tools > Calculator), and then press Options. |
104 |
| 2 Use or to scroll to Exchange rate and press Select. |
104 |
| 3 Select the exchange rate: Foreign units converted to home units or Home units converted to fore... |
104 |
| 4 Enter the appropriate number and press OK. |
104 |
| 5 Press OK. |
104 |
| Calculate currency using the exchange rate |
104 |
| 1 Press Menu 7-1 (Tools > Calculator) |
104 |
| 2 Enter the number of units for the exchange rate. |
104 |
| 3 Press Options and scroll to To home or To foreign. |
104 |
| 4 Press OK. |
104 |
| • Stopwatch |
104 |
| Measure time |
105 |
| 1 Press Menu 7-2 (Tools > Stopwatch) |
105 |
| 2 Scroll to Split timing, then press Select. |
105 |
| 3 Press Start. |
105 |
| Measure split time |
105 |
| 1 Press Menu 7-2 (Tools > Stopwatch) |
105 |
| 2 Scroll to Split timing, then press Select. Press Start. |
105 |
| 3 Take an intermediate time by pressing Split. |
105 |
| Measure lap time |
105 |
| 1 Press Menu 7-2 (Tools > Stopwatch) |
105 |
| 2 Scroll to Lap timing, then press Select. |
105 |
| 3 Press Start. |
105 |
| 4 Take a lap time by pressing Lap. |
105 |
| Save the time |
106 |
| 1 While the clock is running, press Stop, then press Options. |
106 |
| 2 Scroll to Save, enter a title for the measurement, then press OK. If a title is not entered, th... |
106 |
| Choose other stopwatch options |
106 |
| 1 Press Menu 7-2 (Tools > Stopwatch), scroll to Continue. |
106 |
| 2 Press Select. |
106 |
| 14 Use prepaid services |
107 |
| • Manage prepaid service |
107 |
| Activate prepaid |
107 |
| Deactivate prepaid |
107 |
| Use the menu |
107 |
| • Save your access numbers |
107 |
| 1 Press Menu 11-3 (Prepaid > Save access phone numbers) |
107 |
| 2 At Save access phone numbers, press Select. |
108 |
| 3 Scroll to Replenish phone number, enter the access number you got from your service provider, a... |
108 |
| 4 Scroll to Balance phone number, enter the balance number you got from your service provider, an... |
108 |
| • Add money to your account |
108 |
| 1 Press Menu 11-2 (Prepaid > Add money to account) |
108 |
| 2 At Card number, enter your prepaid card number and press OK. |
108 |
| 3 When you see the message Add money to account, press OK. |
108 |
| 4 When you see the message Listen for prompt then press OK, press OK. |
108 |
| 5 When you see the message Wait for prompt, then press OK, press OK. |
108 |
| • Check your prepaid balance |
108 |
| 15 Set network services features |
109 |
| • Set up how your phone selects a network |
109 |
| Search for a network |
109 |
| • Use your phone while traveling |
110 |
| 16 Communicate with text messages |
111 |
| • About text messages |
111 |
| • Use folders for text messages |
111 |
| • Write and send a text message |
112 |
| 1 Press Menu 01-1 (Messages > Write message) |
112 |
| 2 Enter a message of up to 160 characters. |
112 |
| 3 When you’ve finished writing, press Options, then select Send. |
112 |
| 4 Enter or retrieve the recipient’s phone number, and then press OK. |
112 |
| Options when writing a text message |
113 |
| • Resend a message from the outbox |
113 |
| 1 Scroll to the message, and then press Select. |
114 |
| 2 Press Options. |
114 |
| 3 Scroll to Send, and press Select. |
114 |
| 4 Enter or find the number to which you want to send the message, and press Send. |
114 |
| • Receive a text message |
114 |
| • Read a text message |
114 |
| 1 Press Show. |
114 |
| 2 Press Select to read the message. |
114 |
| 3 Press Options for a list of choices you have while reading the message (see the list at the end... |
114 |
| 4 Press Select when the option you want is highlighted. |
115 |
| options for a message |
115 |
| • Save a message in the archive folder |
115 |
| Save a message |
115 |
| 1 Highlight the message you wish to save and press Select. |
115 |
| 2 Press Options. |
116 |
| 3 Scroll to Save, and then press Select. |
116 |
| • Customize message settings |
116 |
| • When your phone’s memory is full |
116 |
| • Erase messages |
116 |
| Erase a message |
116 |
| 1 While reading a message, press Options. |
116 |
| 2 Scroll to Erase, and then press Select. |
116 |
| 3 Press OK. |
116 |
| Erase messages from folders |
117 |
| 1 Press Menu 01-8 (Messages > Erase messages). You will have the following options: All read, Inb... |
117 |
| 2 Scroll to the folder from which you want to empty all messages and press Select. |
117 |
| 3 Enter your security code and press OK. The message All messages erased appears. |
117 |
| • Reply to a message |
117 |
| 1 After reading a message, press Options. |
117 |
| 2 Scroll to Reply, press Select, and choose one of the following reply options: |
117 |
| 3 Edit your reply, and then press Options. |
117 |
| 4 Scroll to Send, and then press Select. |
117 |
| 5 Edit the number if needed, and then press OK. |
117 |
| • Forward a message |
118 |
| 1 While reading a message in the Inbox, press Options. |
118 |
| 2 Scroll to Forward, press Select, and choose whether your message should be sent as a text messa... |
118 |
| 3 Press Options, or edit the message and press Options. |
118 |
| 4 Scroll to Send, and then press Select. |
118 |
| 5 Enter or retrieve the recipient’s phone number, and then press OK. |
118 |
| • Send and receive e-mail messages |
118 |
| Send an e-mail message |
118 |
| 1 Press Menu, select Messages, then select Write e-mail |
118 |
| 2 The e-mail address box opens. |
118 |
| 3 Enter the e-mail address, or press Find. |
118 |
| 4 Enter a subject and press OK. |
119 |
| 5 When the message screen appears, enter your message. |
119 |
| 6 When you’ve finished the message, press Options, select Send. |
119 |
| • Reply to or forward an e-mail message |
119 |
| 1 If the message is not on the screen, press Menu 01-4 (Messages > Inbox). |
119 |
| 2 Select the message you received and press Select. |
119 |
| 3 Press Options, scroll to Forward or Reply, and press OK. |
119 |
| 4 Scroll to As e-mail and press Select. |
119 |
| 5 Follow steps 3 through 6 in “Send an e-mail message.” |
119 |
| • Receive an e-mail message |
119 |
| • Use templates |
120 |
| Work with templates |
120 |
| 1 Press Menu 01-7 (Messages > Templates) |
120 |
| 2 Scroll to the template you want and press Select. |
120 |
| 3 Press Options to view the menu list: |
120 |
| Insert a template when writing a new message |
120 |
| 1 Press Menu 01-1 (Messages > Write message) |
120 |
| 2 Press Options, scroll to Use template, and press Select. |
120 |
| 3 Scroll to the template you want and press Select. |
120 |
| 4 Continue as you would when sending a new text message. |
120 |
| • Picture messages |
120 |
| Send picture messages |
121 |
| 1 Press Menu 01-1 (Messages > Write message). Select Options, then scroll to Attach picture and p... |
121 |
| 2 Scroll to the picture you want to send, then press View Select. The picture appears. To choose ... |
121 |
| 3 Press Options and scroll to Send. |
121 |
| 4 Retrieve from your phonebook or enter the phone number to which you want to send the picture me... |
121 |
| 5 Press OK. |
121 |
| Send picture messages with text |
121 |
| 1 Press Menu 01-1 (Messages > Write message). Write your text message, then select Options. |
121 |
| 2 Scroll to the picture you want to send, press View. The picture appears. To choose a different ... |
121 |
| 3 Select Attach. Press Options, then select Send. |
121 |
| 4 Enter the phone number to which you want to send the picture message and press OK. |
121 |
| Receive picture messages |
122 |
| 1 When your phone displays Message received, press View, then the message appears. |
122 |
| 2 If the picture has a text message with it, scroll up or down to see the entire message. |
122 |
| 3 Press Save to keep the picture message, or select Back and Exit to delete it. |
122 |
| Other picture message options |
122 |
| • Chat with other phone users |
122 |
| Start a chat session |
122 |
| 1 Press Menu 01-3 (Messages > Chat) |
122 |
| 2 Enter the other party’s phone number or retrieve it from the phone book and press OK. |
122 |
| 3 At Your chat name:, enter a name for the chat session and press OK. |
122 |
| 4 Write your chat message, press Options, and then press Send. |
122 |
| 5 Press OK to clear the screen and reply to the message. |
122 |
| 6 To view the previous message or edit your chat name, press Options and select Chat history or C... |
122 |
| Use predictive text for quick replies |
123 |
| 1 Press Menu 01-3 (Messages > Chat) |
123 |
| 2 From the message screen press Options. |
123 |
| 3 Scroll to Dictionary, then press OK. |
123 |
| 4 Scroll to the language you want, then press OK. |
123 |
| View chat history |
123 |
| 1 From the message screen press Options. |
123 |
| 2 Scroll to Chat history and press Select. |
123 |
| Change your chat name |
123 |
| 1 From the message screen press Options. |
123 |
| 2 Scroll to Chat name, press Select, then enter new nickname. |
123 |
| End your chat session |
123 |
| 17 Use special features |
124 |
| • Send and receive business cards |
124 |
| Send a business card |
124 |
| 1 Find the name in your phone book. |
124 |
| 2 Press Details. |
124 |
| 3 Press Options and scroll to Send bus. card. |
124 |
| 4 Press Select. |
124 |
| 5 Choose SMS or Infrared. |
124 |
| 6 Choose Primary no. or All details, and then press Select. |
124 |
| 7 Enter or retrieve the phone number to which you want to send the business card, and press OK. |
124 |
| View a received business card |
124 |
| 1 When your phone shows Business card received, press Show. |
125 |
| 2 Scroll through the available information. |
125 |
| Save a viewed business card |
125 |
| 1 While viewing the business card, press Options. |
125 |
| 2 Scroll to Save, and then press OK. |
125 |
| Delete a viewed business card |
125 |
| • Download ringing tones |
125 |
| Receive a ringing tone |
125 |
| 1 Press Options. |
125 |
| 2 Choose between Playback, Save tone, and Discard. |
125 |
| Save a received ringing tone |
125 |
| 1 If you want to save a ringing tone after you’ve listened to it, press Back. |
125 |
| 2 Scroll to Save tone, and then press Select. |
125 |
| 3 Choose the ringing tone you want to replace—either an empty personal placeholder, if any are re... |
125 |
| 4 Press OK. |
126 |
| Discard received ringing tones |
126 |
| • Set the alarm clock |
126 |
| Set the alarm clock |
126 |
| 1 Press Menu 4-2-1 (Settings > Time settings > Alarm clock) |
126 |
| 2 Enter the time for the alarm and press OK. |
127 |
| 3 Select either am or pm. |
127 |
| 4 Press OK. |
127 |
| Turn off the alarm clock when it sounds |
127 |
| Turn off the alarm clock altogether |
127 |
| 1 Press Menu 4-2 (Settings > Time settings) |
127 |
| 2 Press Select, scroll to Off, and press OK. |
127 |
| 18 Your phone and other devices |
128 |
| • Infrared basics |
128 |
| Enable infrared communications |
128 |
| 1 Make sure that the IR ports of the two devices are pointing at each other. |
128 |
| 2 Press Menu 9-1 (Connectivity > Infrared). |
128 |
| 3 Have the user of the sending device select the desired IR function to start data transfer. If d... |
128 |
| Check the status of an IR connection |
129 |
| • Send and receive information |
129 |
| Send a business card to another device |
129 |
| 1 Retrieve the phone book entry you would like to send by IR. |
129 |
| 2 Press twice (Details > Options). |
129 |
| 3 Scroll to Send bus. card and press Select. |
129 |
| 4 Point the two IR ports at each other. |
129 |
| 5 Scroll to Via infrared, and then press Select. |
129 |
| Receive a business card from another device |
130 |
| 1 Point the two IR ports at each other. |
130 |
| 2 Press Menu 9 (Infrared) |
130 |
| 3 When you see the message Business card received, press Show. |
130 |
| 4 Press Options to select Save or Discard, and press Select. |
130 |
| Send calendar notes |
130 |
| To-do notes |
130 |
| Send a to-do note to another device |
130 |
| 1 Scroll to the to-do note you wish to send and press . |
130 |
| 2 Scroll to Save to cal, and then press , and select a date. |
130 |
| 3 In Calendar, go to the selected date, press Options, select View day, then scroll to the note a... |
130 |
| 4 Scroll to Send via IR and press to start data transfer. |
130 |
| • PC Connectivity |
131 |
| Download software |
131 |
| Nokia PC Suite |
131 |
| Modem Setup |
131 |
| 19 Connect to the Internet |
132 |
| Service provider’s role |
132 |
| • Set up for browsing |
133 |
| • Sign on to the Internet |
133 |
| 1 At the Start screen, press Menu 10 (Services). |
133 |
| 2 Choose Home, then press Select. |
133 |
| • Use browser options (Services Menu) |
134 |
| • Sign off the Internet |
134 |
| Edit a data entry field |
134 |
| 1 Scroll to highlight the data entry field and press Options, and then select Edit. |
134 |
| 2 Use the phone’s keypad to enter the text in the data entry field (for example, Miami), and pres... |
134 |
| 3 Scroll to the link you want (for example, Get forecast?) and press Options, and select Open link. |
134 |
| Choose browser options (while connected) |
135 |
| • Use bookmarks |
135 |
| Save an address as a bookmark |
136 |
| 1 Navigate to the site you want to bookmark and press Options. |
136 |
| 2 Scroll to Add Bookmark and press Select. |
136 |
| Enter a bookmark manually |
136 |
| 1 At the Services menu, press Select. |
136 |
| 2 Scroll to Bookmarks and press Select. |
136 |
| 3 Press Options. |
136 |
| 4 Highlight New bookmark and press Select. |
136 |
| 5 Enter the site’s address (example: my.yahoo.com) and press OK. |
136 |
| 6 Enter a name for the new bookmark and press OK. |
136 |
| Return to a bookmarked site |
136 |
| 1 At the Services menu, press Options. |
136 |
| 2 Scroll to Bookmarks and press Select. |
136 |
| 3 Scroll to the bookmark you want and press OK. |
136 |
| 20 Play games |
137 |
| Snake 2 |
137 |
| Space Impact |
137 |
| Pass ‘n rush |
137 |
| Pairs 2 |
137 |
| Racket |
137 |
| Start a new game |
137 |
| 1 Scroll to the Games menu, and press Select. |
137 |
| 2 Highlight Select game, and press Select. |
137 |
| 3 Scroll to the desired game, and press Select. |
137 |
| 4 Select New game, and press Select. |
137 |
| Game settings |
137 |
| 21 Frequently asked questions (FAQ) |
138 |
| 22 Glossary |
141 |
| 23 Reference information |
143 |
| • Batteries and chargers |
143 |
| • Important safety information |
144 |
| Traffic safety |
144 |
| Operating environment |
145 |
| Electronic devices |
145 |
| Pacemakers |
145 |
| Hearing aids |
145 |
| Other Medical devices |
146 |
| Vehicles |
146 |
| Posted facilities |
146 |
| Potentially explosive atmospheres |
146 |
| Vehicles |
147 |
| • Emergency calls |
147 |
| Important |
147 |
| Make an emergency call |
148 |
| 1 If the phone is not on, switch it on. |
148 |
| 2 Enter the emergency number for your present location (for example, 911 or any other official em... |
148 |
| 3 Press . |
148 |
| Certification information (SAR) |
148 |
| Care and maintenance |
150 |
| • Accessories |
151 |
| • Batteries |
151 |
| Charging times |
152 |
| Standby and talk times |
152 |
| • Chargers and other accessories |
153 |
| When a charger is not in use |
153 |
| Standard Travel Charger (ACP-7U) |
153 |
| Rapid Travel Charger (ACP-8U) |
153 |
| Mobile Charger (LCH-9) |
154 |
| Desktop Charging Stand (DCH-8) |
154 |
| Headset (HDC-9P) |
155 |
| • Troubleshooting |
155 |
| • Technical Information |
156 |
| 24 Nokia One-Year Limited Warranty |
158 |
| 1 The limited warranty for the Product extends for ONE (1) year beginning on the date of the purc... |
158 |
| 2 The limited warranty extends only to the original purchaser (“Consumer”) of the Product and is ... |
158 |
| 3 The limited warranty extends only to Consumers who purchase the Product in the United States of... |
158 |
| 4 During the limited warranty period, Nokia will repair, or replace, at Nokia’s sole option, any ... |
158 |
| 5 Upon request from Nokia, the Consumer must prove the date of the original purchase of the Produ... |
159 |
| 6 The Consumer shall bear the cost of shipping the Product to Nokia in Melbourne, Florida. Nokia ... |
159 |
| 7 The Consumer shall have no coverage or benefits under this limited warranty if any of the follo... |
159 |
| a) The Product has been subjected to abnormal use, abnormal conditions, improper storage, exposur... |
159 |
| b) The Product has been damaged from external causes such as collision with an object, or from fi... |
159 |
| c) Nokia was not advised in writing by the Consumer of the alleged defect or malfunction of the P... |
159 |
| d) The Product serial number plate or the accessory data code has been removed, defaced or altered. |
159 |
| e) The defect or damage was caused by the defective function of the cellular system or by inadequ... |
159 |
| 8 Nokia does not warrant uninterrupted or error-free operation of the Product. If a problem devel... |
160 |
| a) The Consumer shall return the Product to the place of purchase for repair or replacement proce... |
160 |
| b) If “a” is not convenient because of distance (more than 50 miles) or for other good cause, the... |
160 |
| c) The Consumer shall include a return address, daytime phone number and/or fax number, complete ... |
160 |
| d) The Consumer will be billed for any parts or labor charges not covered by this limited warrant... |
160 |
| e) Nokia will repair the Product under the limited warranty within 30 days after receipt of the P... |
160 |
| f) If the Product is returned during the limited warranty period, but the problem with the Produc... |
161 |
| 9 You (the consumer) understand that the product may consist of refurbished equipment that contai... |
161 |
| 10 ANY IMPLIED WARRANTY OF MERCHANTABILITY, OR FITNESS FOR A PARTICULAR PURPOSE OR USE, SHALL BE ... |
161 |
| 11 Some states do not allow limitation of how long an implied warranty lasts, so the one year war... |
162 |
| 12 Nokia neither assumes nor authorizes any authorized service center or any other person or enti... |
162 |
| 13 This is the entire warranty between the Nokia and the Consumer, and supersedes all prior and c... |
162 |
| 14 This limited warranty allocates the risk of failure of the Product between the Consumer and No... |
162 |
| 15 Any action or lawsuit for breach of warranty must be commenced within eighteen (18) months fol... |
162 |
| 16 Questions concerning this limited warranty may be directed to: Nokia Inc. Attn: Customer Servi... |
162 |
| 17 The limited warranty period for Nokia supplied attachments and accessories is specifically def... |
162 |
| Index |
163 |
| A |
163 |
| B |
163 |
| C |
164 |
| D |
164 |
| E |
164 |
| F |
165 |
| G |
165 |
| H |
165 |
| I |
166 |
| K |
166 |
| L |
166 |
| M |
166 |
| N |
166 |
| O |
167 |
| P |
167 |
| Q |
168 |
| R |
168 |
| S |
168 |
| T |
169 |
| U |
170 |
| V |
170 |
 1
1 18
18 19
19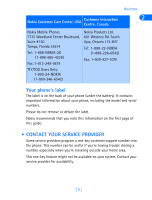 20
20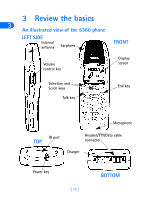 21
21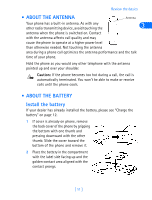 22
22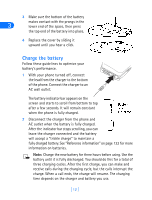 23
23 24
24 25
25 26
26 27
27 28
28