Nokia 9000il Nokia 9000il User Guide in English - Page 49
SMS directory
 |
View all Nokia 9000il manuals
Add to My Manuals
Save this manual to your list of manuals |
Page 49 highlights
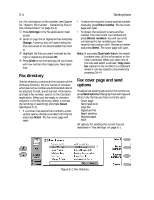
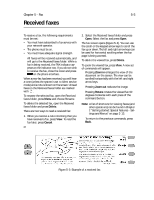
6-4 Sending messages The short message in the editor resembles a postcard. A character counter indicating the number of characters typed and number still available (see Figure 6-1) appears at the top of the editor. In a received SMS message, the time and date the message was sent are shown below the sender's name or number. When the message is ready to be sent, press Recipient. The Short Message directory opens. . SMS directory The SMS directory contains all the contacts in the Contacts directory, but the names of contacts who have no Tel(GSM) number are dimmed and cannot be selected. To edit stored contact information and add a Tel(GSM) number, switch to the Contacts application. To select a recipient (three options): 1. Select a contact from the SMS directory by scrolling or searching and press Select. The contact must have a phone number in the Tel (GSM) contact card field. or 2. Enter the phone number manually. Press Enter number to display the sending view. Enter the destination number. or 3. Press Recent numbers to see a list of recent short message numbers (sent and received). Scroll down to a contact and press Select. You may use multi-select (Ctrl+space bar) to send a message to more than one person at once, see Chapter 2 "Getting started: Special features Multi-select function" on page 2-13. Once your recipient is entered, press Send. Note: In the Recent numbers view, Clear both lists deletes all information from the lists. When you open one of the lists and select a contact, Copy number copies the GSM number to a clipboard where it can be copied to documents by pressing Ctrl+V. When the message is ready to be sent, press Send. If the message is longer than 160 characters, it will be sent as two or more short messages. The message goes to the Document outbox that sends the message as soon as possible (see Chapter 12 "Document outbox" on page 12-1). To adjust the sending options for the current message, press Send options. Press Change to set a new value for the current message. The send options (Reply via same SMSC, Validity period, Message conversion and Request delivery report) are the same as the SMS settings, see "SMS settings" on page 6-2. To send previously created documents: • Go to the SMS application main view. , Select the Own texts folder, and press Open. The display will show all of the documents in the Own texts folder. ƒ Select Open to open a document or a folder. You may edit the note freely. „ When the message is ready to be sent, press Recipient. The SMS directory will open. ... You may Select your recipient from the SMS directory, enter the number manually (press Enter number), or view the numbers available from the Recent numbers lists. † After having selected the recipient, press Send. To forward a received message: • Select the Received messages folder and press Open. , Select a message and press Open. With the message opened, press Menu and select the Forward option. ƒ When the message is ready to be sent, press Recipient. The SMS directory will open. „ You may Select your recipient from the SMS directory, enter the number manually (press Enter number), or view the numbers available from the Recent numbers lists. , Once your recipient is entered, press Send. To reply to a received message: • Select the Received messages folder and press Open. , Select a document and press Open, then Reply. ƒ When the message is ready, press Send.
-
 1
1 -
2
-
3
-
4
-
5
-
6
-
7
-
8
-
9
-
10
-
11
-
12
-
13
-
14
-
15
-
16
-
17
-
18
-
19
-
20
-
21
-
22
-
23
-
24
-
25
-
26
-
27
-
28
-
29
-
30
-
31
-
32
-
33
-
34
-
35
-
36
-
37
-
38
-
39
-
40
-
41
-
42
-
43
-
 44
44 -
 45
45 -
 46
46 -
 47
47 -
 48
48 -
 49
49 -
 50
50 -
 51
51 -
 52
52 -
 53
53 -
 54
54 -
55
-
56
-
57
-
58
-
59
-
60
-
61
-
62
-
63
-
64
-
65
-
66
-
67
-
68
-
69
-
70
-
71
-
72
-
73
-
74
-
75
-
76
-
77
-
78
-
79
-
80
-
81
-
82
-
83
-
84
-
85
-
86
-
87
-
88
-
89
-
90
-
91
-
92
-
93
-
94
-
95
-
96
-
97
-
98
-
99
-
100
-
101
-
102
-
103
-
104
-
105
-
106
-
107
-
108
-
109
-
110
-
111
-
112
-
113
-
114
-
115
-
116
-
117
-
118
-
119
-
120
-
121
-
122
-
123
-
124
-
125
-
126
-
127
-
128
-
129
-
130
 |
 |