Nokia Car Kit CK-100 User Guide - Page 25
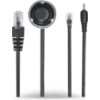
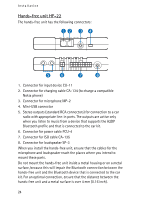
Input device CU-11, Microphone MP-2, the quality of voice transmission.
 |
View all Nokia Car Kit CK-100 manuals
Add to My Manuals
Save this manual to your list of manuals |
Page 25 highlights
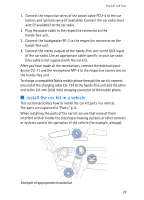
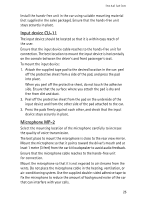
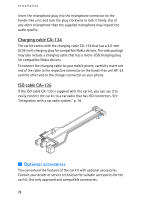
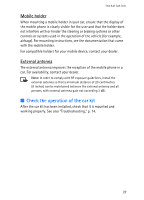
Installation Install the hands-free unit in the car using suitable mounting material (not supplied in the sales package). Ensure that the hands-free unit stays securely in place. Input device CU-11 The input device should be located so that it is within easy reach of the user. Ensure that the input device cable reaches to the hands-free unit for connection. The best location to mount the input device is horizontally on the console between the driver's and front passenger's seat. To mount the input device: 1. Attach the supplied tape pad to the desired location in the car: peel off the protective sheet from a side of the pad, and press the pad into place. When you peel off the protective sheet, do not touch the adhesive side. Ensure that the surface where you attach the pad is dry and free from dirt and dust. 2. Peel off the protective sheet from the pad on the underside of the input device and from the other side of the pad attached to the car. 3. Press the pads firmly against each other, and check that the input device stays securely in place. Microphone MP-2 Select the mounting location of the microphone carefully to increase the quality of voice transmission. The best place to mount the microphone is close to the rear view mirror. Mount the microphone so that it points toward the driver's mouth and at least 1 metre (3 feet) from the car kit loudspeaker to avoid audio feedback. Ensure that the microphone cable reaches to the hands-free unit for connection. Mount the microphone so that it is not exposed to air streams from the vents. Do not place the microphone cable in the heating, ventilation, or air-conditioning system. Use the supplied double-sided adhesive tape to fix the microphone to reduce the amount of background noise of the car that can interfere with your calls. 25
-
 1
1 -
2
-
3
-
4
-
5
-
6
-
7
-
8
-
9
-
10
-
11
-
12
-
13
-
14
-
15
-
16
-
17
-
18
-
19
-
 20
20 -
 21
21 -
 22
22 -
 23
23 -
 24
24 -
 25
25 -
 26
26 -
 27
27 -
 28
28 -
 29
29
 |
 |