NordicTrack Ellipse 950 English Manual - Page 5
Assembly
 |
View all NordicTrack Ellipse 950 manuals
Add to My Manuals
Save this manual to your list of manuals |
Page 5 highlights
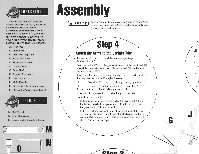
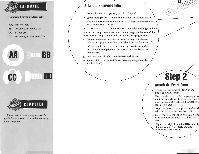
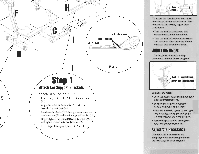
Assembly AS UNPACKING Unpack your ' machine where you intend to use it, and retain all packing materials. When assembling your exerciser, place it near a wall outlet on a flat, level sur- face with a protective covering for your door For your convenience, the hardware shown below is actual size, A. Rear Base A • IMPORTANT Follow these instructicms carefully and in order. Atter completing these instructions, check all assembly points for loose parts and tighten. Step 4 B. Front Base C. Left Arm/Leg Tube Attach the Arms to the Upright Tube 0. I D. Right Arm Tube a. Locate the pivot shaft and the hardware package F,. Electronic Console labeled "Step 4." E Upright Tube G. Pivot Shaft b. Snap one e-clip (CO into the groove at the end of the pivot shaft (G), then slide one washer (AA) down the pivot shaft ( ) until it rests against the e-clip (CC). H. Support Brackets (2) I. Left dandle c Insert the pivot shaft (0 through the right arm tDI and handle (I). (I) Be sure that the handle angles forward. J. Right Handle d. Slide the pivot shaft (G) completely through the upright tube (A. K. Information Pack (not shown) I.. Electronics Package (not shown) e. Slide the lett handle (I) and ann (C) onto the pivot shaft t(i). Be sure that the left handle III angles forward. f. Place a washer (AA) onto the end of the pivot shaft (Cf. IS'LL TOOLS g. Look at the pivot shatt (C): • If there is no extra space on the end of the pivot shaft (C), use the flat wrench (K) to snap an c-clip (CC) into the groove on the pivot shaft (0. Continue to step 5. NI. Flat Wrench N. 5mm Hex Wrench O. Square Sucker Handle & Socket • If there is extra space on the end of the pivot shaft (Q. place a second washer (AA) onto the pivot shaft (C} and use the flat wrench (K) to snap an e-ciip (CC) into Ow groost on the pivot shaft (Q. Continue to step 5. /Th. full m N C heri MS
-
 1
1 -
 2
2 -
 3
3 -
 4
4 -
 5
5 -
 6
6 -
 7
7 -
 8
8
 |
 |
