NordicTrack Pt3 With Freemotion Technology English Manual - Page 9
Warning
 |
View all NordicTrack Pt3 With Freemotion Technology manuals
Add to My Manuals
Save this manual to your list of manuals |
Page 9 highlights
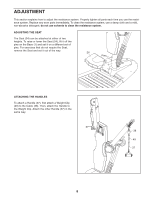
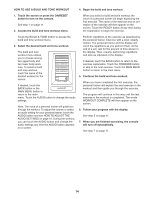
ADJUSTING THE RESISTANCE To increase the resistance, first squeeze the Adjustment Handle (12). Next, lift the end of the Adjustment Handle and move it away from the Backrest (23). When the Adjustment Handle is in the desired position, release it. Push the Adjustment Handle forward or backward slightly to make sure that it is fully engaged. To decrease the resistance, first squeeze the Adjustment Handle (12). Next, push down on the end of the Adjustment Handle and move it toward the Backrest (23). When the Adjustment Handle is in the desired position, release it. Push the Adjustment Handle forward or backward slightly to make sure that it is fully engaged. 23 12 ADJUSTING THE ARMS To adjust the Left or Right Arm (6 or 7), first hold the Arm with one hand and pull the Adjustment Knob (34). Move the Arm to the desired position, and reengage the Adjustment Knob into the Adjustment Plate (11). WARNING: Make sure that the Adjustment Knob (34) is fully engaged in the Adjustment Plate (11) before you exercise. 7 6 34 TIGHTENING THE CABLE To tighten the Cable (38), first move the Left Arm (6) and the Right Arm (not shown) to the highest position. Next, adjust the resistance to 220 pounds. Locate the end of the Cable that has cable clamps, and pull that end of the Cable until you feel resistance. Measure the distance between the cable cover and the Left Arm. Next, adjust the resistance to the minimum setting. Have a second person pull the Cable (38) and hold it. Slide the cable cover off the cable clamps, and loosen the two screws in the cable clamps. Next, pull the Cable through the indicated link and the cable clamps to shorten the Cable by the measured amount. Then, tighten the two screws and slide the cable cover onto the cable clamps. WARNING: Fully tighten the two screws before you exercise. 11 6 38 Measure Cable Distance Cover 38 Cable Cover Screws Cable Clamp Link Cable Clamp 9
-
 1
1 -
2
-
3
-
 4
4 -
 5
5 -
 6
6 -
 7
7 -
 8
8 -
 9
9 -
 10
10 -
 11
11 -
 12
12 -
 13
13 -
 14
14 -
15
-
16
-
17
-
18
-
19
-
20
 |
 |
