Oki LE810DTUPS LE810DT User Guide (English) - Page 40
Advanced Mode
 |
View all Oki LE810DTUPS manuals
Add to My Manuals
Save this manual to your list of manuals |
Page 40 highlights
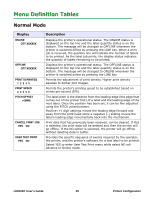
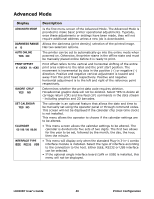
Advanced Mode Display Description ADVANCED MODE Is the first menu screen of the Advanced Mode. The Advanced Mode is provided to make basic printer operational adjustments. Typically, once these adjustments or settings have been made, they will not require additional address unless a new job is downloaded. DARKNESS RANGE A B AUTO ONLINE YES NO PRINT OFFSET V: +XXXX H: +XXX Allows the darkness (print density) selection of the printed image. Has two selection options. The printer can be set to automatically go into the online mode when powered on. Otherwise, theprinter starts in the offline state and must be manually placed online before it is ready to print. Print offset refers to the vertical and horizontal shifting of the entire print area relative to the label and the print start position. The movement is incremental by dots in the positive (+) or negative (-) direction. Positive and negative vertical adjustment is toward and away from the print head respectively. Positive and negative horizontal adjustment is to the left and right of the reference point respectively. IGNORE CR/LF YES NO SET CALENDAR YES NO Determines whether the print data code requires deletion. Hexadecimal graphic data will not be deleted. Select YES to delete all carriage return (CR) and line feed (LF) commands in the data stream - including graphics and 2D barcodes. The calendar is an optional feature that allows the date and time to be manually set using the operator panel or through command codes. This screen will not be displayed if the calendar chip (real-time clock) is not installed. This menu allows the operator to choose if the calendar settings are to be altered. CALENDAR 00 / 00 / 00 00:00 • This menu screen allows the calendar settings to be altered. The calendar is divided into five sets of two digits. The first two allows for the year to be set, followed by the month, the day, the hour, then the minute. INTERFACE TYPE IEEE RE232 USB • This menu will display only when the standard Plug-in 3-in-1 combo interface module is installed. Select the type of interface according to the connection to the host. Either IEEE, RS232 or USB interface can be selected. • If the optional single interface board (LAN or USB) is installed, this menu will not be displayed. LE810DT User's Guide 40 Printer Configuration
-
 1
1 -
2
-
3
-
4
-
5
-
6
-
7
-
8
-
9
-
10
-
11
-
12
-
13
-
14
-
15
-
16
-
17
-
18
-
19
-
20
-
21
-
22
-
23
-
24
-
25
-
26
-
27
-
28
-
29
-
30
-
31
-
32
-
33
-
34
-
 35
35 -
 36
36 -
 37
37 -
 38
38 -
 39
39 -
 40
40 -
 41
41 -
 42
42 -
 43
43 -
 44
44 -
 45
45 -
46
-
47
-
48
-
49
-
50
-
51
-
52
-
53
 |
 |