Oki MPS420b MPS420b User Guide (English) - Page 50
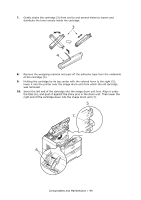
Gently wipe the LED array surface 9 with a soft tissue.
 |
View all Oki MPS420b manuals
Add to My Manuals
Save this manual to your list of manuals |
Page 50 highlights
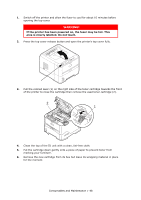
11. Pressing gently down on the cartridge to ensure that it is firmly seated, push the colored lever towards the rear of the printer (8). Push the lever all the way forward until the pointers on the drum and the toner are aligned (8a). This will lock the cartridge into place and release toner into the image drum unit. 8 8a 12. Gently wipe the LED array surface (9) with a soft tissue. 9 13. Close the top cover and press it down to latch it closed. Consumables and Maintenance > 50
-
 1
1 -
2
-
3
-
4
-
5
-
6
-
7
-
8
-
9
-
10
-
11
-
12
-
13
-
14
-
15
-
16
-
17
-
18
-
19
-
20
-
21
-
22
-
23
-
24
-
25
-
26
-
27
-
28
-
29
-
30
-
31
-
32
-
33
-
34
-
35
-
36
-
37
-
38
-
39
-
40
-
41
-
42
-
43
-
44
-
 45
45 -
 46
46 -
 47
47 -
 48
48 -
 49
49 -
 50
50 -
 51
51 -
 52
52 -
 53
53 -
 54
54 -
 55
55 -
56
-
57
-
58
-
59
-
60
-
61
-
62
-
63
-
64
-
65
-
66
-
67
-
68
-
69
-
70
-
71
-
72
-
73
-
74
 |
 |

Consumables and Maintenance > 50
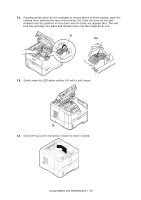
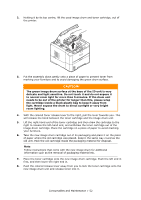
11.
Pressing gently down on the cartridge to ensure that it is firmly seated, push the
colored lever towards the rear of the printer (8). Push the lever all the way
forward until the pointers on the drum and the toner are aligned (8a). This will
lock the cartridge into place and release toner into the image drum unit.
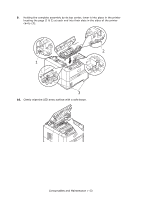
12.
Gently wipe the LED array surface (9) with a soft tissue.
13.
Close the top cover and press it down to latch it closed.
8
8a
9