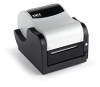
Oki X400 X400 User's Guide - English - Page 25
OKIPOS X400 Software
 |
View all Oki X400 manuals
Add to My Manuals
Save this manual to your list of manuals |
Page 25 highlights
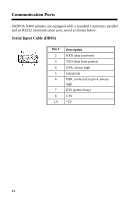
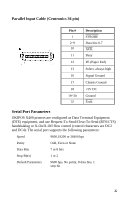
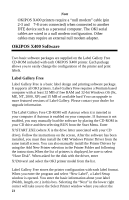
Note OKIPOS X400 printers require a "null modem" cable (pin 2-3 and 7-8 cross connected) when connected to another DTE device such as a personal computer. The OKI serial cables are wired in a null modem configuration. Other cables may require an external null modem adapter. OKIPOS X400 Software Two basic software packages are supplied on the Label Gallery Free CD-ROM included with each OKIPOS X400 printer. Each package allows you to easily change the configuration of the printer and print labels. Label Gallery Free Label Gallery Free is a basic label design and printing software package. It supports all OKI printers. Label Gallery Free requires a Pentium based computer with at least 32 MB of free RAM and 32-bit Windows OS (9x, ME, NT, 2000, XP) and 15 MB of available hard You can upgrade to more featured versions of Label Gallery. Please contact your dealer for upgrade information. The Label Gallery Free CD-ROM will Autorun when it is inserted in your computer if Autorun is enabled on your computer. If Autorun is not enabled, you may manually load the software by placing the CD-ROM in your CD drive and then selecting RUN from the Start Menu. Enter X:\START.EXE (where X is the drive letter associated with your CD drive). Follow the instructions on the screen, After the software has been installed, you must then install the OKI Windows Printer Driver from the same install screen. You can also manually install the Printer Drivers by using the Add New Printer selection in the Printer Folder and following the instructions.When the list of printers is displayed, be sure to select "Have Disk". When asked for the disk with the driver, enter X:\Drivers\ and select the OKI printer model from the list. Label Gallery Free stores the printer configuration with each label format. When you enter the program and select "New Label", a Label Setup window is opened. You enter the basic information about your label (Width, length, etc.) in this box. Selecting the "Next" in the lower right corner will take you to the Select Printer window where you select the 23
-
 1
1 -
2
-
3
-
4
-
5
-
6
-
7
-
8
-
9
-
10
-
11
-
12
-
13
-
14
-
15
-
16
-
17
-
18
-
19
-
 20
20 -
 21
21 -
 22
22 -
 23
23 -
 24
24 -
 25
25 -
 26
26 -
 27
27
 |
 |