Olympus 225690 Stylus 600 Advanced Manual (English) - Page 85
Registering the startup screen (SCREEN SETUP), Select [OFF], [1] or [2], and press, Press
 |
UPC - 050332155565
View all Olympus 225690 manuals
Add to My Manuals
Save this manual to your list of manuals |
Page 85 highlights
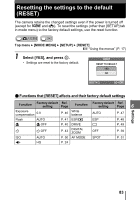
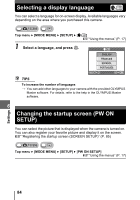
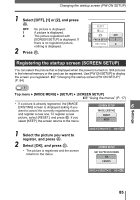
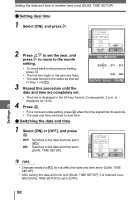
Changing the startup screen (PW ON SETUP) 1 Select [OFF], [1] or [2], and press Z. OFF No picture is displayed. 1 A picture is displayed. 2 The picture registered with [SCREEN SETUP] is displayed. If there is no registered picture, nothing is displayed. 2 Press Z. SETUP MEM CAM RESET OFF PW ON SETUP 1 REC VIEW 2 Registering the startup screen (SCREEN SETUP) You can select the picture that is displayed when the power is turned on. Still pictures in the internal memory or the card can be registered. Use [PW ON SETUP] to display the screen you registered. g"Changing the startup screen (PW ON SETUP)" (P. 84) Top menu [MODE MENU] [SETUP] [SCREEN SETUP] g"Using the menus" (P. 17) • If a picture is already registered, the [IMAGE EXISTING] screen is displayed asking if you want to cancel the currently registered picture and register a new one. To register a new picture, select [RESET], and press Z. If you select [KEEP], the screen returns to the menu. SCREEN SETUP 6 IMAGE EXISTING RESET KEEP 1 Select the picture you want to register, and press Z. 2 Select [OK], and press Z. • The picture is registered and the screen returns to the menu. CANCEL SELECT GO OK SCREEN SETUP SET AS PW ON SCREEN OK CANCEL CANCEL SELECT GO OK Settings 85
-
 1
1 -
2
-
3
-
4
-
5
-
6
-
7
-
8
-
9
-
10
-
11
-
12
-
13
-
14
-
15
-
16
-
17
-
18
-
19
-
20
-
21
-
22
-
23
-
24
-
25
-
26
-
27
-
28
-
29
-
30
-
31
-
32
-
33
-
34
-
35
-
36
-
37
-
38
-
39
-
40
-
41
-
42
-
43
-
44
-
45
-
46
-
47
-
48
-
49
-
50
-
51
-
52
-
53
-
54
-
55
-
56
-
57
-
58
-
59
-
60
-
61
-
62
-
63
-
64
-
65
-
66
-
67
-
68
-
69
-
70
-
71
-
72
-
73
-
74
-
75
-
76
-
77
-
78
-
79
-
 80
80 -
 81
81 -
 82
82 -
 83
83 -
 84
84 -
 85
85 -
 86
86 -
 87
87 -
 88
88 -
 89
89 -
 90
90 -
91
-
92
-
93
-
94
-
95
-
96
-
97
-
98
-
99
-
100
-
101
-
102
-
103
-
104
-
105
-
106
-
107
-
108
-
109
-
110
-
111
-
112
-
113
-
114
-
115
-
116
-
117
-
118
-
119
-
120
-
121
-
122
-
123
-
124
-
125
-
126
-
127
-
128
-
129
-
130
-
131
-
132
-
133
-
134
-
135
-
136
-
137
-
138
-
139
-
140
-
141
-
142
-
143
-
144
-
145
-
146
-
147
-
148
-
149
-
150
-
151
-
152
-
153
-
154
-
155
-
156
-
157
 |
 |
