Olympus DM-20 DM-20 Online Instructions (English) - Page 13
Changing the Time/Date
 |
View all Olympus DM-20 manuals
Add to My Manuals
Save this manual to your list of manuals |
Page 13 highlights
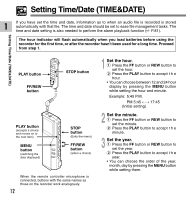
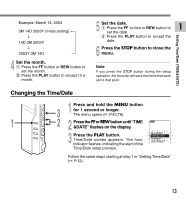
Setting Time/Date (TIME&DATE) Example: March 14, 2003 3M 14D 2003Y (Initial setting) ↓ 14D 3M 2003Y ↓ 2003Y 3M 14D 4 Set the month. 1 Press the FF button or REW button to set the month. 2 Press the PLAY button to accept t h e month. 5 Set the date. 1 Press the FF button or REW button to 1 set the date. 2 Press the PLAY button to accept the date. 6 Press the STOP button to close the menu. Note If you press the STOP button during the setup operation, the recorder will save the items that were set to that point. Changing the Time/Date 3 1 Press and hold the MENU button for 1 second or longer. The menu opens ( P.43,76). 1 2 2 Press the FFor REW button until "TIME &DATE" flashes on the display. 3 Press the PLAY button. Time/Date screen appears. The hour indicator flashes, indicating the start of the Time/Date setup process. Follow the same steps starting at step 1 in "Setting Time/Date" ( P.12). 13
-
 1
1 -
2
-
3
-
4
-
5
-
6
-
7
-
 8
8 -
 9
9 -
 10
10 -
 11
11 -
 12
12 -
 13
13 -
 14
14 -
 15
15 -
 16
16 -
 17
17 -
 18
18 -
19
-
20
-
21
-
22
-
23
-
24
-
25
-
26
-
27
-
28
-
29
-
30
-
31
-
32
-
33
-
34
-
35
-
36
-
37
-
38
-
39
-
40
-
41
-
42
-
43
-
44
-
45
-
46
-
47
-
48
-
49
-
50
-
51
-
52
-
53
-
54
-
55
-
56
-
57
-
58
-
59
-
60
-
61
-
62
-
63
-
64
-
65
-
66
-
67
-
68
-
69
-
70
-
71
-
72
-
73
-
74
-
75
-
76
-
77
-
78
-
79
-
80
-
81
-
82
-
83
-
84
-
85
-
86
-
87
-
88
-
89
-
90
-
91
-
92
-
93
-
94
-
95
-
96
-
97
-
98
-
99
-
100
-
101
 |
 |
