Olympus FE 190 FE-190 Advanced Manual (English) - Page 52
Taking pictures without blurring, The picture is too grainy
 |
UPC - 050332158672
View all Olympus FE 190 manuals
Add to My Manuals
Save this manual to your list of manuals |
Page 52 highlights
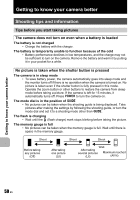
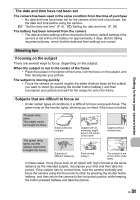
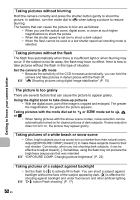
Getting to know your camera better Taking pictures without blurring Hold the camera correctly and press the shutter button gently to shoot the picture. In addition, turn the mode dial to h when taking a picture to reduce blurring. The factors that can cause the picture to blur are as follows: • When you use the optical zoom, digital zoom, or zoom at such higher magnifications to shoot the picture • When the shutter speed is set low to shoot a dark subject • When the flash cannot be used or a low shutter speed set shooting mode is selected. Taking pictures without the flash The flash fires automatically when there is insufficient light or when blurring may occur. If the subject is too far away, the flash may have no effect. Here is how to take pictures without the flash in this type of situation. Set the camera to h mode • Because the sensitivity of the CCD increases automatically, you can hold the camera and take pictures in darker places with the flash off. g "h Shooting pictures using digital image stabilization" (P. 15) The picture is too grainy There are several factors that can cause the picture to appear grainy. Using the digital zoom to take close-up pictures • With the digital zoom, part of the image is cropped and enlarged. The greater the magnification, the grainier the picture appears. Taking pictures with the mode dial set to M or f mode set to W, S or X • When taking pictures with the above scene modes, noise reduction can be automatically turned on for clearer pictures of dark subjects. If noise reduction does not turn on, the picture may appear grainy. Taking pictures of a white beach or snow scene • Often, bright subjects (such as snow) turn out darker than their natural colors. Adjust [EXPOSURE COMP.] toward [+] to make these subjects closer to their real shades. Conversely, when you are shooting dark subjects, it can be effective to adjust toward [-]. Sometimes, using the flash may not produce the brightness (exposure) that was intended. g "EXPOSURE COMP. Changing picture brightness" (P. 23) Taking pictures of a subject against backlight • Set the flash to [#] to activate fill-in-flash. You can shoot a subject against backlight without the face of the subject appearing dark. [#] is effective for shooting against backlight and under fluorescent and other artificial lighting. g "Y# button Flash shooting" (P. 17) 52 EN
-
 1
1 -
2
-
3
-
4
-
5
-
6
-
7
-
8
-
9
-
10
-
11
-
12
-
13
-
14
-
15
-
16
-
17
-
18
-
19
-
20
-
21
-
22
-
23
-
24
-
25
-
26
-
27
-
28
-
29
-
30
-
31
-
32
-
33
-
34
-
35
-
36
-
37
-
38
-
39
-
40
-
41
-
42
-
43
-
44
-
45
-
46
-
 47
47 -
 48
48 -
 49
49 -
 50
50 -
 51
51 -
 52
52 -
 53
53 -
 54
54 -
 55
55 -
 56
56 -
 57
57 -
58
-
59
-
60
-
61
-
62
-
63
-
64
-
65
-
66
-
67
-
68
-
69
-
70
-
71
-
72
-
73
-
74
-
75
-
76
-
77
-
78
-
79
-
80
 |
 |