Olympus SP 700 SP-700 Advanced Manual (English) - Page 59
Creating labels for combined LABEL (LABEL SHOT
 |
UPC - 050332154292
View all Olympus SP 700 manuals
Add to My Manuals
Save this manual to your list of manuals |
Page 59 highlights
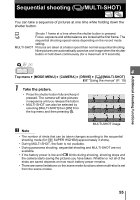
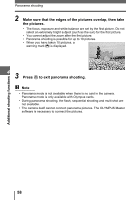
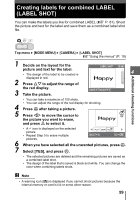
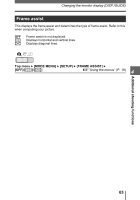
Creating labels for combined LABEL (LABEL SHOT) You can make the labels you like for combined LABEL (g P. 81). Shoot the picture and text for the label and save them as a combined label shot file. Additional shooting functions Top menu [MODE MENU] [CAMERA] [LABEL SHOT] g"Using the menus" (P. 19) 1 Decide on the layout for the picture and text for the label. • The design of the label to be created is LABEL SHOT 4 displayed in red. 2 Press ON to adjust the range of the red display. 3 Take the picture. CANCEL ADJUST • You can take a maximum of 100 shots. • You can adjust the range of the red display for shooting. 4 Press Z after taking a picture. 5 Press XY to move the cursor to the picture you want to erase, and press O to select it. • A 9 icon is displayed on the selected picture. • Repeat Step 5 to erase multiple SELECT GO OK pictures. 6 When you have selected all the unwanted pictures, press Z. 7 Select [YES], and press Z. • The selected pictures are deleted and the remaining pictures are saved as a combined label shot. • The design of the label that is saved is black and white. You can change the color when combining labels shots. Note • A warning icon (g) is displayed if you cannot shoot pictures because the internal memory or card is full or some other reason. 59
-
 1
1 -
2
-
3
-
4
-
5
-
6
-
7
-
8
-
9
-
10
-
11
-
12
-
13
-
14
-
15
-
16
-
17
-
18
-
19
-
20
-
21
-
22
-
23
-
24
-
25
-
26
-
27
-
28
-
29
-
30
-
31
-
32
-
33
-
34
-
35
-
36
-
37
-
38
-
39
-
40
-
41
-
42
-
43
-
44
-
45
-
46
-
47
-
48
-
49
-
50
-
51
-
52
-
53
-
 54
54 -
 55
55 -
 56
56 -
 57
57 -
 58
58 -
 59
59 -
 60
60 -
 61
61 -
 62
62 -
 63
63 -
 64
64 -
65
-
66
-
67
-
68
-
69
-
70
-
71
-
72
-
73
-
74
-
75
-
76
-
77
-
78
-
79
-
80
-
81
-
82
-
83
-
84
-
85
-
86
-
87
-
88
-
89
-
90
-
91
-
92
-
93
-
94
-
95
-
96
-
97
-
98
-
99
-
100
-
101
-
102
-
103
-
104
-
105
-
106
-
107
-
108
-
109
-
110
-
111
-
112
-
113
-
114
-
115
-
116
-
117
-
118
-
119
-
120
-
121
-
122
-
123
-
124
-
125
-
126
-
127
-
128
-
129
-
130
-
131
-
132
-
133
-
134
-
135
-
136
-
137
-
138
-
139
-
140
-
141
-
142
-
143
-
144
-
145
-
146
-
147
-
148
-
149
-
150
-
151
-
152
-
153
-
154
-
155
-
156
-
157
-
158
-
159
-
160
-
161
-
162
-
163
-
164
-
165
-
166
-
167
-
168
-
169
-
170
-
171
-
172
-
173
-
174
-
175
-
176
-
177
-
178
-
179
-
180
-
181
-
182
-
183
-
184
-
185
-
186
-
187
 |
 |
