Olympus SZ-20 SZ-20 Instruction Manual (English) - Page 14
Windows, Connecting the camera, Register your Olympus product. - cable
 |
View all Olympus SZ-20 manuals
Add to My Manuals
Save this manual to your list of manuals |
Page 14 highlights
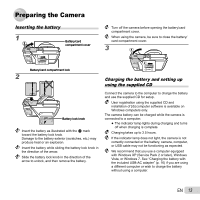
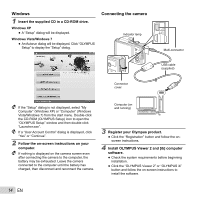
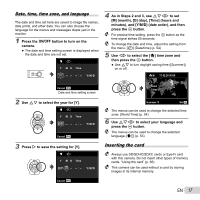
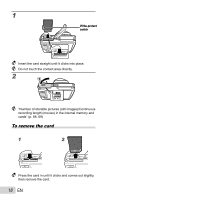
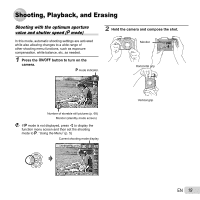
Windows 1 Insert the supplied CD in a CD-ROM drive. Windows XP ● A "Setup" dialog will be displayed. Windows Vista/Windows 7 ● An Autorun dialog will be displayed. Click "OLYMPUS Setup" to display the "Setup" dialog. Connecting the camera Indicator lamp Connector cover Multi-connector USB cable (supplied) If the "Setup" dialog is not displayed, select "My Computer" (Windows XP) or "Computer" (Windows Vista/Windows 7) from the start menu. Double-click the CD-ROM (OLYMPUS Setup) icon to open the "OLYMPUS Setup" window and then double-click "Launcher.exe". If a "User Account Control" dialog is displayed, click "Yes" or "Continue". 2 Follow the on-screen instructions on your computer. If nothing is displayed on the camera screen even after connecting the camera to the computer, the battery may be exhausted. Leave the camera connected to the computer until the battery has charged, then disconnect and reconnect the camera. Computer (on and running) 3 Register your Olympus product. ● Click the "Registration" button and follow the onscreen instructions. 4 Install OLYMPUS Viewer 2 and [ib] computer software. ● Check the system requirements before beginning installation. ● Click the "OLYMPUS Viewer 2" or "OLYMPUS ib" button and follow the on-screen instructions to install the software. 14 EN
-
 1
1 -
2
-
3
-
4
-
5
-
6
-
7
-
8
-
 9
9 -
 10
10 -
 11
11 -
 12
12 -
 13
13 -
 14
14 -
 15
15 -
 16
16 -
 17
17 -
 18
18 -
 19
19 -
20
-
21
-
22
-
23
-
24
-
25
-
26
-
27
-
28
-
29
-
30
-
31
-
32
-
33
-
34
-
35
-
36
-
37
-
38
-
39
-
40
-
41
-
42
-
43
-
44
-
45
-
46
-
47
-
48
-
49
-
50
-
51
-
52
-
53
-
54
-
55
-
56
-
57
-
58
-
59
-
60
-
61
-
62
-
63
-
64
-
65
-
66
-
67
-
68
-
69
-
70
-
71
-
72
-
73
-
74
-
75
-
76
-
77
-
78
-
79
-
80
-
81
-
82
-
83
-
84
 |
 |
