Olympus SZ-20 SZ-20 Instruction Manual (English) - Page 30
To shoot with [Auto] SZ-20 - user guide
 |
View all Olympus SZ-20 manuals
Add to My Manuals
Save this manual to your list of manuals |
Page 30 highlights
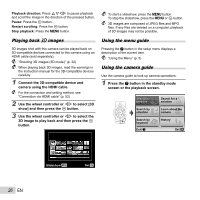
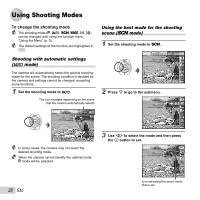
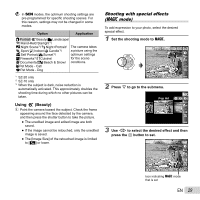
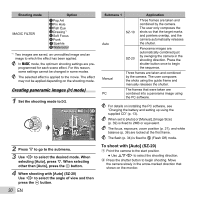
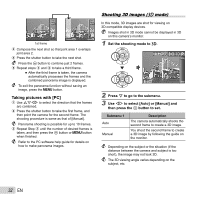
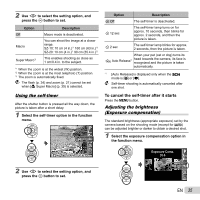
Shooting mode MAGIC FILTER Option 1 Pop Art 2 Pin Hole 3 Fish Eye 4 Drawing*1 5 Soft Focus 6 Punk X Sparkle Y Watercolor *1 Two images are saved, an unmodified image and an image to which the effect has been applied. In P mode, the optimum shooting settings are preprogrammed for each scene effect. For this reason, some settings cannot be changed in some modes. The selected effect is applied to the movie. The effect may not be applied depending on the shooting mode. Creating panoramic images (p mode) 1 Set the shooting mode to p. Panorama 3D AUTO 0.0 WB AUTO 4 14M MENU 2 Press G to go to the submenu. 3 Use HI to select the desired mode. When selecting [Auto], press G. When selecting other than [Auto], press the A button. 4 When shooting with [Auto] (SZ-20) Use HI to select the angle of view and then press the A button. 30 EN Submenu 1 Auto Manual PC Application SZ-10 Three frames are taken and combined by the camera. The user only composes the shots so that the target marks and pointers overlap, and the camera automatically releases the shutter. SZ-20 Panorama images are automatically combined just by swinging the camera in the shooting direction. Press the shutter button once to begin the sequence. Three frames are taken and combined by the camera. The user composes the shots using the guide frame and manually releases the shutter. The frames that were taken are combined into a panorama image using the PC software. For details on installing the PC software, see "Charging the battery and setting up using the supplied CD" (p. 13). When set to [Auto] or [Manual], [Image Size] (p. 39) is fixed to 2MB or equivalent. The focus, exposure, zoom position (p. 21), and white balance (p. 36) are locked at the first frame. The flash (p. 34) is fixed to $ (Flash Off) mode. To shoot with [Auto] (SZ-20) 1 Point the camera to the start position. ● Use FGHI to select the shooting direction. 2 Press the shutter button to begin shooting. Move the camera slowly in the arrow-marked direction that shown on the monitor.
-
 1
1 -
2
-
3
-
4
-
5
-
6
-
7
-
8
-
9
-
10
-
11
-
12
-
13
-
14
-
15
-
16
-
17
-
18
-
19
-
20
-
21
-
22
-
23
-
24
-
 25
25 -
 26
26 -
 27
27 -
 28
28 -
 29
29 -
 30
30 -
 31
31 -
 32
32 -
 33
33 -
 34
34 -
 35
35 -
36
-
37
-
38
-
39
-
40
-
41
-
42
-
43
-
44
-
45
-
46
-
47
-
48
-
49
-
50
-
51
-
52
-
53
-
54
-
55
-
56
-
57
-
58
-
59
-
60
-
61
-
62
-
63
-
64
-
65
-
66
-
67
-
68
-
69
-
70
-
71
-
72
-
73
-
74
-
75
-
76
-
77
-
78
-
79
-
80
-
81
-
82
-
83
-
84
 |
 |
