Olympus Stylus 1050 SW Stylus 1050 SW Instruction Manual (English) - Page 23
Set [LED ILLUMINATOR] p. 47 to, Press and hold the, button down, until the LED illuminator lights up
 |
UPC - 050332166554
View all Olympus Stylus 1050 SW manuals
Add to My Manuals
Save this manual to your list of manuals |
Page 23 highlights
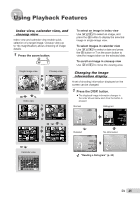
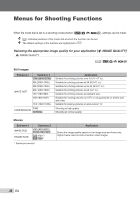
Using the LED illuminator In a dark location, the LED illuminator can be used as an auxiliary light to see things or compose shots. 1 Set [LED ILLUMINATOR] (p. 47) to [ON]. 2 Press and hold the Y button down until the LED illuminator lights up. ● If you perform an operation when the LED illuminator is on, it will illuminate up to approx. 90 seconds. LED illuminator Changing the shooting information display The display of the screen information can be changed to best match the situation, such as for the need of clear view of the screen or for making a precise composition by using the grid display. 1 Press the g button. ● The displayed shooting information changes in the order shown below each time the button is pressed. "Shooting mode display" (p. 8) Normal P ISO 1600 Histogram P ISO 1600 10M NORM +2.0 IN 4 10M NORM +2.0 IN 4 The LED illuminator turns off if no operation No information Grid is performed for approx. 30 seconds. P Even when the camera's power is turned ISO 1600 off, if the lens barrier is opened, the LED illuminator lights for 30 seconds. 10M To turn the LED illuminator off NORM +2.0 IN 4 Press and hold the Y button down, until the LED illuminator turns off. Reading a histogram If the peak fills too much of the frame, the image will appear mostly white. If the peak fills too much of the frame, the image will appear mostly black. The green section shows the luminance distribution in the center area of the monitor. EN 23
-
 1
1 -
2
-
3
-
4
-
5
-
6
-
7
-
8
-
9
-
10
-
11
-
12
-
13
-
14
-
15
-
16
-
17
-
 18
18 -
 19
19 -
 20
20 -
 21
21 -
 22
22 -
 23
23 -
 24
24 -
 25
25 -
 26
26 -
 27
27 -
 28
28 -
29
-
30
-
31
-
32
-
33
-
34
-
35
-
36
-
37
-
38
-
39
-
40
-
41
-
42
-
43
-
44
-
45
-
46
-
47
-
48
-
49
-
50
-
51
-
52
-
53
-
54
-
55
-
56
-
57
-
58
-
59
-
60
-
61
-
62
-
63
-
64
-
65
-
66
-
67
-
68
-
69
-
70
-
71
-
72
-
73
-
74
-
75
-
76
-
77
-
78
-
79
-
80
-
81
-
82
-
83
-
84
-
85
-
86
 |
 |
