Olympus Stylus 1050 SW Stylus 1050 SW Instruction Manual (English) - Page 37
Changing the image size, Cropping a picture, Changing the color tone of image, COLOR EDIT]
 |
UPC - 050332166554
View all Olympus Stylus 1050 SW manuals
Add to My Manuals
Save this manual to your list of manuals |
Page 37 highlights
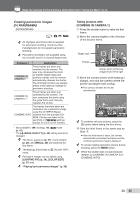
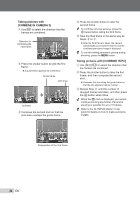
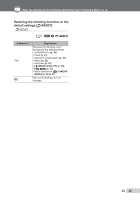
Make the settings for the functions while referring to "Using the Menu" (p. 3). Registered pictures cannot be erased even by formatting the internal memory. Registered My Favorite images cannot be edited, printed, backed up to a card, transferred to a computer, or played back on a computer. Changing the image size [Q] E EDIT X Q Submenu 2 C 640 × 480 E 320 × 240 Application This saves a high-resolution image as a separate image with a smaller size for use in e-mail attachments and other applications. 1 Use 34 to select an image, and press the o button. 2 Use 12 to select an image size and press the o button. ● The image with the selected size is saved as a separate image. Changing the color tone of image [COLOR EDIT] E EDIT X COLOR EDIT Submenu 2 Application Black & white This changes the image to black and white. Sepia This changes the image to a sepia tone. Saturation (hard) This increases the color saturation of the image. Saturation (soft) This slightly increases the color saturation of the image. Sepia COLOR EDIT Black & white Saturation (hard) Cropping a picture [P] E EDIT X P 1 Use 34 to select an image, and press the o button. 2 Use the zoom button to select the size of the cropping frame, and use 1234 to move the frame. Saturation (soft) 1 Use 34 to select an image, and press the o button. 2 Use 1234 to select the desired color, and press the o button. ● The image with the selected color is saved as a separate image. Cropping frame WT SET OK 3 Press the o button. ● The edited image is saved as a separate image. EN 37
-
 1
1 -
2
-
3
-
4
-
5
-
6
-
7
-
8
-
9
-
10
-
11
-
12
-
13
-
14
-
15
-
16
-
17
-
18
-
19
-
20
-
21
-
22
-
23
-
24
-
25
-
26
-
27
-
28
-
29
-
30
-
31
-
 32
32 -
 33
33 -
 34
34 -
 35
35 -
 36
36 -
 37
37 -
 38
38 -
 39
39 -
 40
40 -
 41
41 -
 42
42 -
43
-
44
-
45
-
46
-
47
-
48
-
49
-
50
-
51
-
52
-
53
-
54
-
55
-
56
-
57
-
58
-
59
-
60
-
61
-
62
-
63
-
64
-
65
-
66
-
67
-
68
-
69
-
70
-
71
-
72
-
73
-
74
-
75
-
76
-
77
-
78
-
79
-
80
-
81
-
82
-
83
-
84
-
85
-
86
 |
 |
