Onkyo TX-NR515 Owner Manual - Page 23
Playback, Playing the Connected Component - av receiver
 |
View all Onkyo TX-NR515 manuals
Add to My Manuals
Save this manual to your list of manuals |
Page 23 highlights
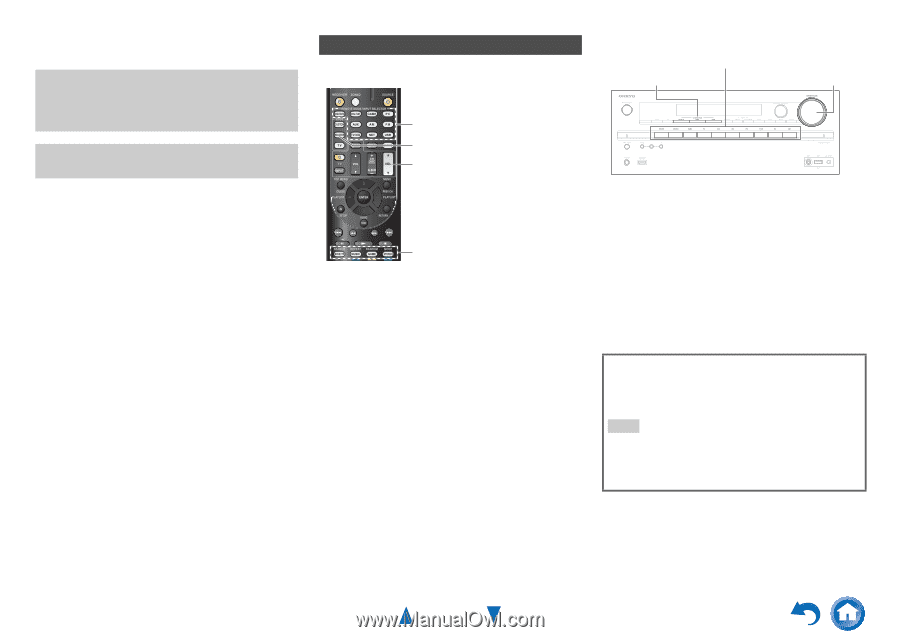
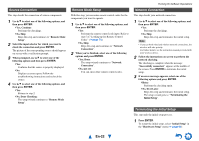
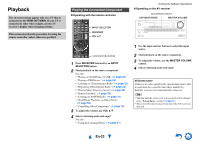
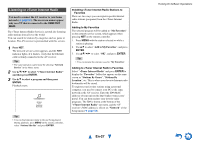
Playback The on-screen menus appear only on a TV that is connected to the HDMI OUT MAIN. If your TV is connected to other video outputs, use the AV receiver's display when changing settings. This section describes the procedure for using the remote controller, unless otherwise specified. Playing the Connected Component ■ Operating with the remote controller Turning On & Basic Operations ■ Operating on the AV receiver Input selector buttons LISTENING MODE MASTER VOLUME INPUT SELECTOR RECEIVER VOL R/X Listening mode buttons 1 Press RECEIVER followed by an INPUT SELECTOR button. 2 Start playback on the source component. See also: • "Playing an iPod/iPhone via USB" (➔ page 25) • "Playing a USB Device" (➔ page 26) • "Listening to vTuner Internet Radio" (➔ page 27) • "Registering Other Internet Radio" (➔ page 28) • "Playing Music Files on a Server" (➔ page 29) • "Remote Playback" (➔ page 30) • "Listening to AM/FM Radio" (➔ page 31) • "iPod/iPhone Playback via Onkyo Dock" (➔ page 68) • "Controlling Other Components" (➔ page 70) 3 To adjust the volume, use VOL R/X. 4 Select a listening mode and enjoy! See also: • "Using the Listening Modes" (➔ page 37) 1 Use the input selector buttons to select the input source. 2 Start playback on the source component. 3 To adjust the volume, use the MASTER VOLUME control. 4 Select a listening mode and enjoy! ■ Screen saver If there is no video signal on the current input source and no operation for a specific time (three minutes by default), a screen saver automatically comes on. Tip • The time until the screen saver activates itself can be changed in the "Screen Saver" setting (➔ page 61). • The screen will return to its previous state if the AV receiver is operated. En-23
-
 1
1 -
2
-
3
-
4
-
5
-
6
-
7
-
8
-
9
-
10
-
11
-
12
-
13
-
14
-
15
-
16
-
17
-
 18
18 -
 19
19 -
 20
20 -
 21
21 -
 22
22 -
 23
23 -
 24
24 -
 25
25 -
 26
26 -
 27
27 -
 28
28 -
29
-
30
-
31
-
32
-
33
-
34
-
35
-
36
-
37
-
38
-
39
-
40
-
41
-
42
-
43
-
44
-
45
-
46
-
47
-
48
-
49
-
50
-
51
-
52
-
53
-
54
-
55
-
56
-
57
-
58
-
59
-
60
-
61
-
62
-
63
-
64
-
65
-
66
-
67
-
68
-
69
-
70
-
71
-
72
-
73
-
74
-
75
-
76
-
77
-
78
-
79
-
80
-
81
-
82
-
83
-
84
-
85
-
86
-
87
-
88
-
89
-
90
-
91
-
92
-
93
-
94
-
95
-
96
-
97
-
98
-
99
-
100
-
101
-
102
-
103
-
104
-
105
-
106
-
107
-
108
-
109
-
110
-
111
-
112
-
113
-
114
-
115
-
116
-
117
-
118
-
119
-
120
-
121
-
122
-
123
-
124
-
125
-
126
-
127
-
128
-
129
-
130
-
131
-
132
-
133
-
134
-
135
-
136
-
137
-
138
-
139
-
140
 |
 |