Onkyo TX-NR555 User Manual - Page 53
Enable: Notify updates, Step European
 |
View all Onkyo TX-NR555 manuals
Add to My Manuals
Save this manual to your list of manuals |
Page 53 highlights
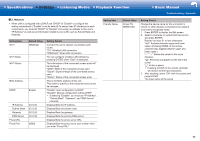
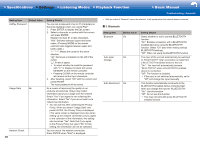
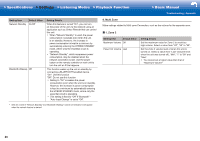
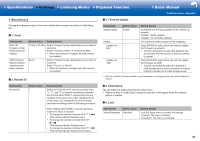
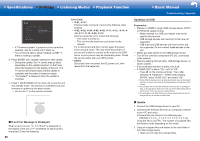
>>Specifications >>Settings >>Listening Modes >>Playback Function >>Basic Manual Troubleshooting | Appendix 7� Miscellaneous Change the frequency step for the tuner, update the firmware, and perform Initial Setup, etc. ˙ 1� Tuner Setting Item AM / FM Frequency Step (North American models) AM Frequency Step (European, Australian and Asian models) Default Value Setting Details 10 kHz / 0.2 MHz Select a frequency step depending on your area of residence. Select "10 kHz/0.2 MHz" or "9 kHz/0.05 MHz". • When this setting is changed, all radio presets are deleted. 9 kHz Select a frequency step depending on your area of residence. Select "10 kHz" or "9 kHz". • When this setting is changed, all radio presets are deleted. ˙ 2� Remote ID ˙ 3� Firmware Update Setting Item Update Notice Version Update via NET Update via USB Default Value Enable ‐ ‐ ‐ Setting Details Availability of a firmware update will be notified via network. "Enable": Notify updates "Disable": Do not notify updates The current firmware version will be displayed. Press ENTER to select when you want to update the firmware via network. • You will not be able to select this setting if you do not have Internet access or there is nothing to update. Press ENTER to select when you want to update the firmware via USB. • You will not be able to select this setting if a USB storage device is not connected or there is nothing to update in the USB storage device. • Wait for a while if "Firmware Update" cannot be selected. It will appear when the network feature is started. Setting Item Remote ID Default Value 1 Setting Details Select an ID for the unit's remote controller from "1", "2", and "3" to prevent interference between the unit and other ONKYO components that are installed in the same room. After changing the ID on the main unit, change the ID on the remote controller accordingly with the following procedure. While holding down MODE, press the following buttons for about 3 seconds. • To change the remote controller ID to "1": (The remote indicator flashes once.) • To change the remote controller ID to "2": (The remote indicator flashes twice.) • To change the remote controller ID to "3": (The remote indicator flashes three times.) ˙ 4� Initial Setup You can make the initial setup from the setup menu. • Wait for a while if "Initial Setup" cannot be selected. It will appear when the network feature is started. ˙ 5� Lock Setting Item Default Value Setup Parameter Unlocked Setting Details Lock the Setup menu to protect the settings. "Locked": The menu is locked. "Unlocked": The menu is unlocked. 21
-
 1
1 -
2
-
3
-
4
-
5
-
6
-
7
-
8
-
9
-
10
-
11
-
12
-
13
-
14
-
15
-
16
-
17
-
18
-
19
-
20
-
21
-
22
-
23
-
24
-
25
-
26
-
27
-
28
-
29
-
30
-
31
-
32
-
33
-
34
-
35
-
36
-
37
-
38
-
39
-
40
-
41
-
42
-
43
-
44
-
45
-
46
-
47
-
 48
48 -
 49
49 -
 50
50 -
 51
51 -
 52
52 -
 53
53 -
 54
54 -
 55
55 -
 56
56 -
 57
57 -
 58
58 -
59
-
60
-
61
-
62
-
63
-
64
-
65
-
66
-
67
-
68
-
69
-
70
-
71
-
72
-
73
-
74
-
75
-
76
-
77
-
78
-
79
-
80
-
81
-
82
-
83
-
84
-
85
-
86
-
87
-
88
-
89
-
90
-
91
-
92
 |
 |
