Onkyo TX-NR801 Owner Manual - Page 71
Connecting the TX-NR801, TX-NR801E to Your Ethernet Network - tx user manual
 |
UPC - 751398005411
View all Onkyo TX-NR801 manuals
Add to My Manuals
Save this manual to your list of manuals |
Page 71 highlights
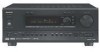
Enjoying Net Audio-Continued • You may have to set up a proxy server to listen to Internet radio, depending on the ISP you choose. If your PC is configured to use a proxy server for Internet access, theTX-NR801/TX-NR801E must also be configured the same way. For more information, see "Proxy Setup Sub-menu" (See page 73). • The TX-NR801/TX-NR801E is designed to take advantage of the DHCP and AutoIP functionality, thereby automatically configuring the network settings. If you opt not to use the DHCP and AutoIP functionality, you should manually configure the network settings. For more information, see "a. DHCP/ AUTO IP" (See page 73). • To enjoy music on Internet Radio, it is assumed that you have a broadband Internet connection on which you can successfully run a web browser. If you have any problem in connecting to the Internet, consult with your ISP. Connecting the TX-NR801/ TX-NR801E to Your Ethernet Network Plug one end of an Ethernet CAT-5 cable into the port on the backside of the TX-NR801/TX-NR801E and the other end into the gateway. TX-NR801/TX-NR801E DIGITAL IN COAX 1 PRE OUT R L FRONT ANTENNA AUDIO VIDEO S VIDEO MONITOR OUT 2 3 OPT 1 SUB SURR SURR BACK / R ZONE 2 FRONT 2 R SUB 3 DIGITAL OUT OPT 1 2 SURR R SURR BACK GND CENTER AM OUT ZONE 2 R L L FM 75 MULTI CH INPUT L AUDIO R L CENTER PHONO IN CD IN L OUT TAPE IN R L AUDIO IN DVD OUT IN VIDEO 1 OUT IN VIDEO 2 IN VIDEO 3 R L AUDIO IN VIDEO 4 VIDEO S VIDEO COMPONENT VIDEO OUTPUT Y FRONT SPEAKERS R L PB PR INPUT 1 Y PB ETHERNET (Net-Tune) CENTER SPEAKER PR INPUT 2 Y PB PR CAUTION: SPEAKER IMPEDANCE 4 OHMS MIN. OR 6 OHMS MIN. / SPEAKER SEE INSTRUCTION MANUAL FOR CORRECT SETTINGS. I R IN OUT SURR SPEAKERS R L AC OUTLETS AC 120V 60 Hz SWITCHED TOTAL 120W 1A MAX. SURR BACK/ ZONE 2 SPEAKERS R L VOLTAGE SELECTOR 120V REMOTE CONTROL AV RECEIVER MODEL NO. TX-NR 801 220-230V Internet ETHERNET (Net -Tune) Hint: Connecting more than one TX-NR801/TX-NR801E unit to a router enables several users to listen to Internet radio at different stations or different music pieces contained in the same library on the PC. Internet radio PC Modem To the WAN side Router To the LAN side port To the LAN side port To the LAN side port Room 1 Room 2 Modem To the WAN side Router To the LAN side port To the LAN side port PC LAN port/ Ethernet, etc. 71
-
 1
1 -
2
-
3
-
4
-
5
-
6
-
7
-
8
-
9
-
10
-
11
-
12
-
13
-
14
-
15
-
16
-
17
-
18
-
19
-
20
-
21
-
22
-
23
-
24
-
25
-
26
-
27
-
28
-
29
-
30
-
31
-
32
-
33
-
34
-
35
-
36
-
37
-
38
-
39
-
40
-
41
-
42
-
43
-
44
-
45
-
46
-
47
-
48
-
49
-
50
-
51
-
52
-
53
-
54
-
55
-
56
-
57
-
58
-
59
-
60
-
61
-
62
-
63
-
64
-
65
-
 66
66 -
 67
67 -
 68
68 -
 69
69 -
 70
70 -
 71
71 -
 72
72 -
 73
73 -
 74
74 -
 75
75 -
 76
76 -
77
-
78
-
79
-
80
-
81
-
82
-
83
-
84
-
85
-
86
-
87
-
88
-
89
-
90
-
91
-
92
-
93
-
94
-
95
-
96
-
97
-
98
 |
 |
