Onkyo TX-SR308 Owner Manual - Page 28
Advanced Operations, Advanced Setup, On-screen Setup Menus, Common Procedures in Setup Menu - dimensions
 |
View all Onkyo TX-SR308 manuals
Add to My Manuals
Save this manual to your list of manuals |
Page 28 highlights
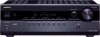
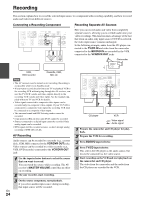
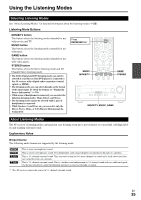
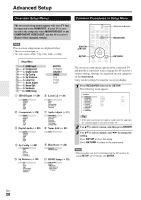
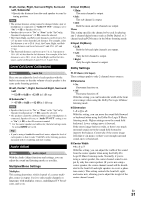
Advanced Setup On-screen Setup Menus Common Procedures in Setup Menu The on-screen setup menus appear only on a TV that is connected to the HDMI OUT. If your TV is connected to the composite video MONITOR OUT or the COMPONENT VIDEO OUT, use the AV receiver's display when changing settings. Note The on-screen setup menus are displayed when: • There is no video input, or • The video input is 480p, 576p, 720p, 1080i, or 1080p. Setup Menu B 1. HDMI Input C 2. Component D 3. Digital Audio E 4. Sp Config F 5. Sp Distance G 6. Level Cal H 7. Audio Adjust I 8. Name Edit J 9. Hardware K 10. HDMI Setup B HDMI Input (➔ 29) BD/DVD VCR/DVR CBL/SAT GAME AUX TV/CD PORT C Component (➔ 29) BD/DVD VCR/DVR CBL/SAT GAME AUX TV/CD PORT D Digital Audio (➔ 29) BD/DVD VCR/DVR CBL/SAT GAME AUX TV/CD PORT E Sp Config (➔ 30) Subwoofer Front Center Surround Crossover Double Bass F Sp Distance (➔ 30) Unit Left Center Right Surround Right Surround Left Subwoofer BD/DVD VCR/DVR CBL/SAT GAME AUX TV/CD PORT G Level Cal (➔ 31) Left Center Right Surround Right Surround Left Subwoofer H Audio Adjust (➔ 31) Input Ch(Mux) Input Ch(Mono) Panorama Dimension Center Width Center Image Listening Angle I Name Edit (➔ 32) Name J Hardware (➔ 32) Remote ID FM/AM Freq Step K HDMI Setup (➔ 32) Audio TV OUT LipSync HDMI Control Audio Return Ch Power Control TV Control Remote indicator ENTER R/X/F/S SETUP RECEIVER RETURN The on-screen setup menus appear on the connected TV and provide a convenient way to change the AV receiver's various settings. Settings are organized into ten categories on the main menu. Carry out the settings by using the on-screen display. 1 Press RECEIVER followed by SETUP. The following menu appears. Setup Menu 1. HDMI Input 2. Component 3. Digital Audio 4. Sp Config 5. Sp Distance 6. Level Cal 7. Audio Adjust 8. Name Edit 9. Hardware 10. HDMI Setup BD/DVD VCR/DVR CBL/SAT GAME AUX TV/CD PORT HDMI1 - - - - - HDMI2 HDMI3 Tip • If the main menu doesn't appear, make sure the appropriate external input is selected on your TV. 2 Use R/X to select a menu, and then press ENTER. 3 Use R/X to select a target, and F/S to change the setting. Press SETUP to close the menu. Press RETURN to return to the main menu. Note • This procedure can also be performed on the AV receiver by using SETUP, arrow buttons, and ENTER. En 28
-
 1
1 -
2
-
3
-
4
-
5
-
6
-
7
-
8
-
9
-
10
-
11
-
12
-
13
-
14
-
15
-
16
-
17
-
18
-
19
-
20
-
21
-
22
-
 23
23 -
 24
24 -
 25
25 -
 26
26 -
 27
27 -
 28
28 -
 29
29 -
 30
30 -
 31
31 -
 32
32 -
 33
33 -
34
-
35
-
36
-
37
-
38
-
39
-
40
-
41
-
42
-
43
-
44
-
45
-
46
-
47
-
48
-
49
-
50
-
51
-
52
 |
 |