Onkyo TX-SR308 Owner Manual - Page 32
Name Edit, Hardware, HDMI Setup, DTS Setting, Theater-Dimensional Setting, Remote Control Settings - ps3
 |
View all Onkyo TX-SR308 manuals
Add to My Manuals
Save this manual to your list of manuals |
Page 32 highlights
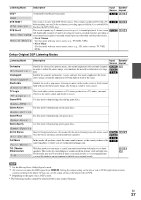
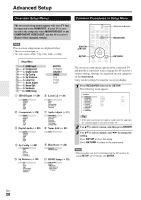
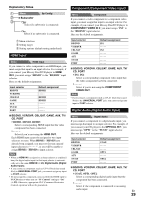
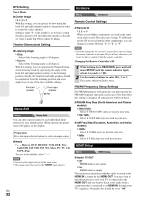
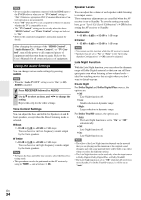
DTS Setting Neo:6 Music ■ Center Image ` 0 to 2 to 5 With this setting, you can specify by how much the front left and right channel output is attenuated in order to create the center channel. Setting a value "0" in the middle is set to hear a sound. Sound is spread in left and right (the outside) so that the set value is made big. Please adjust by liking. Theater-Dimensional Setting ■ Listening Angle ` Wide: Select if the listening angle is 40 degrees. ` Narrow: Select if the listening angle is 20 degrees. With this setting, you can optimize the Theater-Dimensional listening mode by specifying the angle of the front left and right speakers relative to the listening position. Ideally, the front left and right speakers should be equidistant from the listening position and at an angle close to one of the two available settings. Front left speaker Front right speaker 20°/40° Name Edit Menu Name Edit You can enter a preset name for each individual input selector for easy identification. When entered, the preset name will appear on the display. Preparation Press the input selector buttons to select an input source. ■ Name ` - - -, Blu-ray, DVD, HD DVD, VCR, DVR, Tivo, CableSTB, SAT STB, PS3, Wii, Xbox, PC, TV, CD, TAPE, iPod: To reset to the default, select "- - -". Note • Can not set the input selector by the same name. • This menu cannot be used for the TUNER input selector. En 32 Hardware Menu Hardware Remote Control Settings ■ Remote ID ` 1, 2, or 3 When several Onkyo components are used in the same room, their remote ID codes may overlap. To differentiate the AV receiver from the other components, you can change its remote ID from "1", to "2" or "3". Note • If you do change the AV receiver's remote ID, be sure to change the remote controller to the same ID (see below), otherwise, you won't be able to control it with the remote controller. Changing the Remote Controller's ID 1 While holding down RECEIVER, press and hold down SETUP until the remote indicator lights (about 3 seconds) (➔ 28). 2 Use the number buttons to enter ID 1, 2, or 3. The remote indicator flashes twice. FM/AM Frequency Setup Settings For FM/AM tuning to work properly, you must specify the FM/AM frequency step used in your area. Note that when this setting is changed, all radio presets will be deleted. ■ FM/AM Freq Step (North American and Taiwan models) ` 200k/10kHz: Select if 200 k/10 kHz steps are used in your area. ` 50k/ 9kHz: Select if 50 k/9 kHz steps are used in your area. ■ AM Freq Step (European, Australian, and Asian models) ` 10kHz: Select if 10 kHz steps are used in your area. ` 9kHz: Select if 9 kHz steps are used in your area. HDMI Setup Menu HDMI Setup ■ Audio TV OUT ` Off: HDMI audio is not output. ` On: HDMI audio is output. This preference determines whether audio received at the HDMI IN is output by the HDMI OUT. You may want to turn this preference on if your TV is connected to the HDMI OUT and you want to listen to the audio from a component that's connected to an HDMI IN, through your TV's speakers. Normally, this should be set to "Off".
-
 1
1 -
2
-
3
-
4
-
5
-
6
-
7
-
8
-
9
-
10
-
11
-
12
-
13
-
14
-
15
-
16
-
17
-
18
-
19
-
20
-
21
-
22
-
23
-
24
-
25
-
26
-
 27
27 -
 28
28 -
 29
29 -
 30
30 -
 31
31 -
 32
32 -
 33
33 -
 34
34 -
 35
35 -
 36
36 -
 37
37 -
38
-
39
-
40
-
41
-
42
-
43
-
44
-
45
-
46
-
47
-
48
-
49
-
50
-
51
-
52
 |
 |
