Optoma EH505 User Guide - Page 16
Installing or Removing the Optional Lens, Removing the Existing Lens From the Projector, Caution
 |
View all Optoma EH505 manuals
Add to My Manuals
Save this manual to your list of manuals |
Page 16 highlights
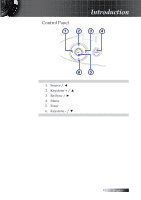
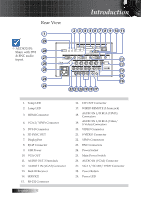
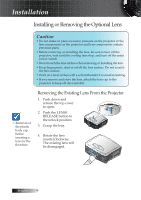
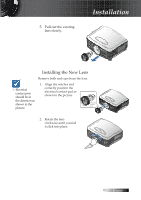
Installation Installing or Removing the Optional Lens Caution • Do not shake or place excessive pressure on the projector or the lens components as the projector and lens components contain precision parts. • Before removing or installing the lens, be sure to turn off the projector, wait until the cooling fans stop, and turn off the main power switch. • Do not touch the lens surface when removing or installing the lens. • Keep fingerprints, dust or oil off the lens surface. Do not scratch the lens surface. • Work on a level surface with a soft cloth under it to avoid scratching. • If you remove and store the lens, attach the lens cap to the projector to keep off dust and dirt. v Removal of the plastic body cap before inserting a lens for the first time. Removing the Existing Lens From the Projector 1. Push down and release the top cover to open. 2. Push the LENSE RELEASE button to the unlock position. 3. Grasp the lens. 4. Rotate the lens counterclockwise. The existing lens will be disengaged. English 16
-
 1
1 -
2
-
3
-
4
-
5
-
6
-
7
-
8
-
9
-
10
-
 11
11 -
 12
12 -
 13
13 -
 14
14 -
 15
15 -
 16
16 -
 17
17 -
 18
18 -
 19
19 -
 20
20 -
 21
21 -
22
-
23
-
24
-
25
-
26
-
27
-
28
-
29
-
30
-
31
-
32
-
33
-
34
-
35
-
36
-
37
-
38
-
39
-
40
-
41
-
42
-
43
-
44
-
45
-
46
-
47
-
48
-
49
-
50
-
51
-
52
-
53
-
54
-
55
-
56
-
57
-
58
-
59
-
60
-
61
-
62
-
63
-
64
-
65
-
66
-
67
-
68
-
69
-
70
-
71
-
72
-
73
-
74
-
75
-
76
-
77
-
78
-
79
-
80
-
81
-
82
-
83
-
84
-
85
-
86
-
87
-
88
-
89
-
90
-
91
-
92
-
93
-
94
-
95
-
96
-
97
-
98
-
99
-
100
-
101
 |
 |