Optoma EH615T EH615T User Manual - Page 32
Image Advanced menu, Color, Reset, BrilliantColor, Gamma
 |
View all Optoma EH615T manuals
Add to My Manuals
Save this manual to your list of manuals |
Page 32 highlights
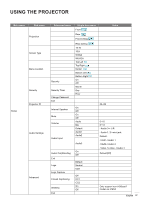
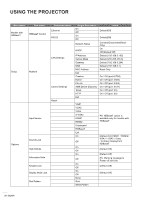
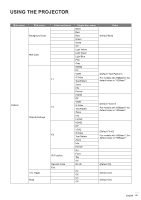
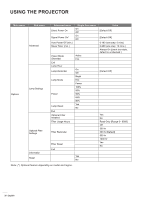
USING THE PROJECTOR Color Adjust a video image from black and white to fully saturated color. ‡‡ Press the to decrease the amount of saturation in the image. ‡‡ Tint Press the to increase the amount of saturation in the image. Adjust the color balance of red and green. ‡‡ Press the to increase the amount of green in the image. ‡‡ Reset Press the to increase the amount of red in the image. Choose "Yes" to return the factory default settings for "IMAGE". Image Advanced menu IMAGE Advanced BrilliantColorTM Gamma Color Temp. Color Space RGB Gain/Bias Color Matching Signal Film Warm Auto Exit BrilliantColorTM This adjustable item utilizes a new color-processing algorithm and enhancements to enable higher brightness while providing true, more vibrant colors in picture. ‡‡ Press the to stronger enhance the image. ‡‡ Gamma Press the to less enhance the image. This allows you to set up gamma curve type. After the initial setup and fine tuning is completed, utilize the Gamma Adjustment steps to optimize your image output. ‡‡ Film: for home theater. ‡‡ Graphics: for PC / Photo source. ‡‡ 1.8 / 2.0 / 2.2 / 2.6: for specific PC / Photo source. ‡‡ Blackboard: This mode should be selected to achieve optimum color settings when projecting onto a blackboard (green). ‡‡ DICOM: This mode can project a monochrome medical image such as an X ray radiography, MRI, etc. ‡‡ Press the or to select the mode. 32 English
-
 1
1 -
2
-
3
-
4
-
5
-
6
-
7
-
8
-
9
-
10
-
11
-
12
-
13
-
14
-
15
-
16
-
17
-
18
-
19
-
20
-
21
-
22
-
23
-
24
-
25
-
26
-
 27
27 -
 28
28 -
 29
29 -
 30
30 -
 31
31 -
 32
32 -
 33
33 -
 34
34 -
 35
35 -
 36
36 -
 37
37 -
38
-
39
-
40
-
41
-
42
-
43
-
44
-
45
-
46
-
47
-
48
-
49
-
50
-
51
-
52
-
53
-
54
-
55
-
56
-
57
-
58
-
59
-
60
-
61
-
62
-
63
-
64
-
65
-
66
-
67
-
68
-
69
-
70
-
71
-
72
-
73
-
74
-
75
-
76
-
77
-
78
-
79
-
80
-
81
-
82
-
83
-
84
-
85
-
86
-
87
-
88
-
89
-
90
-
91
-
92
-
93
-
94
-
95
 |
 |
