Optoma EP710 User Manual - Page 12
Power On/Off the Projection Display
 |
View all Optoma EP710 manuals
Add to My Manuals
Save this manual to your list of manuals |
Page 12 highlights
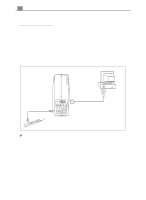
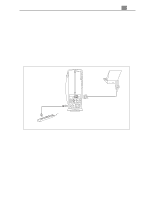
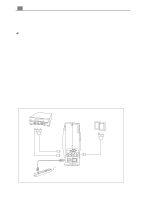
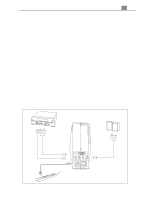
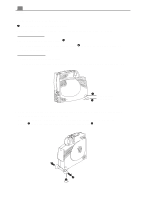
12 English Power On/Off the Projection Display u Powering On the Projection Display 1. Remove the lens cap.Œ 2. Ensure that the power cord and signal cable are securely connected. 3. Turn on the main power switch on the back of the projector and allow the projector to warm up for 1-2 minutes. 4. Turn on the lamp by pressing "Power/Standby" button on the Panel Control.Ž The startup screen will display for 30 seconds and the Power/Standby indicator will light solid green. 5. Turn on your source (computer, notebook, or video player ,etc.). The projector will detect your source automatically. * If the screen displays "No Signal" , please make sure the signal cables are securely connected. * If you connect multiple sources at the same time, use the "Source" button on the Remote Control or Panel Control to switch. Power/ Standby Ž Lens cap Œ Power Switch
-
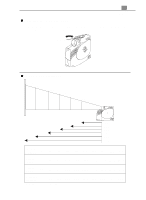
 1
1 -
2
-
3
-
4
-
5
-
6
-
 7
7 -
 8
8 -
 9
9 -
 10
10 -
 11
11 -
 12
12 -
 13
13 -
 14
14 -
 15
15 -
 16
16 -
 17
17 -
18
-
19
-
20
-
21
-
22
-
23
-
24
-
25
-
26
-
27
 |
 |
