Oregon Scientific WMR200 User Manual - Page 10
To Disable Sleep Mode On Computer Windows Xp - software
 |
View all Oregon Scientific WMR200 manuals
Add to My Manuals
Save this manual to your list of manuals |
Page 10 highlights
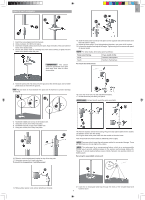
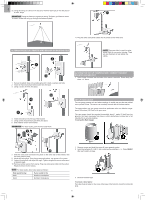
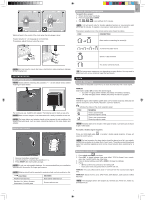
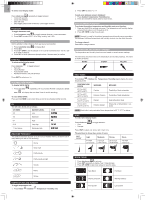
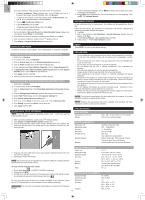
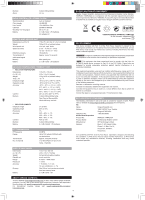
EN If you have Windows Vista and User Account Control is ON (ticked): i. In Select Installation Folder dialogue box, next to Folder text box (C:\ Program Files\Oregon Scientific\Weather OS), click Browse. ii. To select a new location to save the program, select C:\Users\admin. {Or click C: Drive, subfolder Users, subfolder admin.} iii. Click on (Create New Folder) icon. iv. Type OS Weather and click OK. v. In User Account Control dialogue box, click Allow. vi. Continue with installation process. 4. During installation, Microsoft Visual C++ Redistributable Setup dialogue box may appear. Select Repair and click Next. 5. Once Setup has been successfully completed, click Finish, then Close. 6. After successful installation, double click on desktop shortcut. 7. Click Display in Oregon Weather Station dialogue box. DISABLE SLEEP MODE To allow for continuous data updates, ensure Sleep Mode on computer is disabled. TO DISABLE SLEEP MODE ON COMPUTER (WINDOWS XP) 1. Right click on Desktop. 2. In context menu, click on Properties. 3. Click on Screen Saver tab in the Display Properties dialogue box. 4. Click on Power located at the bottom half of dialogue box. 5. In new dialogue box Power Options Properties, click on Power Schemes tab. 6. In Settings for Timers off (Presentation) power scheme section, under System Standby option, choose Never in drop-down list. 7. Click Apply and then click OK. 8. Previous window will return. Click OK to confirm and exit. TO DISABLE SLEEP MODE ON COMPUTER (WINDOWS VISTA) 1. Right click on Desktop. 2. In context menu, click on Personalize. 3. Click on Screen Saver link in the Personalize appearance and sounds dialogue box. 4. Click on Change Power Settings located at the bottom half of window. 5. Select High Performance and click Change plan settings link. 6. Click Change advanced power settings link. 7. Click on next to Sleep, in sub menu, click on next to Hibernate after. 8. Click Setting link and select Never in drop-down list. 9. Click Apply and then OK. UPLOAD DATA TO PC SOFTWARE NOTE The USB is only used for uploading weather data. It cannot be used for charging battery power. 1. After successful installation, double click on desktop shortcut. 2. Click Display in Oregon Weather Station dialogue box. 3. You will be prompted to select model number. Please select your model in the drop-down list and refer to the image next to your selection to confirm it is the correct model. 1. In the PC software homepage, click on MENU located at the top right hand corner of software main webpage. 2. Select HELP from drop-down list. This will redirect you to a new webpage. Click on PC Software Manual. SOFTWARE UPDATES As we continually strive for improvement, the software will be updated from time to time. If there is a new version, the moment PC is connected to the internet, a dialogue box informing of available software will appear. 1. Click OK. 2. After a few moments, File Download - Security Warning dialogue box will appear. Click Run. 3. In the Internet Explorer - Security Warning, click Run. 4. Follow steps 3 - 7 from Install Software section. RESET Press RESET to return to the default settings. PRECAUTIONS • Do not subject the unit to excessive force, shock, dust, temperature or humidity. • Do not cover the ventilation holes with any items such s newspapers, curtains etc. • Do not immerse the unit in water. If you spill liquid over it, dry it immediately with a soft, lint-free cloth. • Do not clean the unit with abrasive or corrosive materials. • Do not tamper with the unit 's internal components. This invalidates the warranty. • Only use fresh batteries. Do not mix new and old batteries. • Images shown in this manual may differ from the actual display. • When disposing of this product, ensure it is collected separately for special treatment. • Placement of this product on certain types of wood may result in damage to its finish for which Oregon Scientific will not be responsible. Consult the furniture manufacturer's care instructions for information. • The contents of this manual may not be reproduced without the permission of the manufacturer. • Do not dispose old batteries as unsorted municipal waste. Collection of such waste separately for special treatment is necessary. • Please note that some units are equipped with a battery safety strip. Remove the strip from the battery compartment before first use. NOTE The technical specifications for this product and the contents of the user manual are subject to change without notice. NOTE Features and accessories will not be available in all countries. For more information, please contact your local retailer. SPECIFICATIONS BASE STATION Dimensions (L x W x H) Weight 149 x 198 x 47 mm (5.9 x 7.8 x 1.9 inches) 510 g (18 oz) without battery INDOOR BAROMETER Barometer unit Measuring range Accuracy Resolution Altitude setting Weather display Memory mb/hPa, inHg and mmHg 700 - 1050mb/hPa +/- 10 mb/hPa 1mb (0.0 inHg) Sea level User setting for compensation Sunny, Clear night, Partly Cloudy, Cloudy, Cloudy at night, Rainy and Snowy Historical data and bar chart for last 24hrs INDOOR TEMPERATURE 4. Plug one end of the USB cable into the base station's USB port and the other end into the PC's USB port. 5. Uploading will start immediately. NOTE This product should be supplied by an identical USB port complying with the requirements of Limited Power Source. To clear records from the base station: Temp. unit Displayed range Operating range Accuracy Comfort Memory Alarm °C / °F 0°C to 50°C (32°F to 122°F) -30°C to 60°C (-4°F to 140°F) 0°C - 40°C: +/- 1°C (+/- 2.0°F) 40°C - 50°C: +/- 2°C (+/- 4.0°F) 20°C to 25°C (68°F to 77°F) Current, Min and Max temp. Dew Point w/ Min and Max Hi / Lo 1. Press clock area until DATA LOGGER is displayed. 2. Press and hold MEM. 3. All LED icons will light up and turn off consecutively (right to left). Delete process is complete and successful after blinking of last icon . INDOOR RELATIVE HUMIDITY Displayed range Operating range 2% to 98% 25% to 90% To learn more about how to utilize the functions available on the software, please refer to PC Software Manual, downloadable from the software webpage. Resolution Accuracy 1% 25% - 40%: +/- 7% IMPORTANT You must first successfully install software to access the PC Software Manual. Comfort 40% - 80%: +/- 5% 80% - 90%: +/- 7% 40% to 70% 10
-
 1
1 -
2
-
3
-
4
-
 5
5 -
 6
6 -
 7
7 -
 8
8 -
 9
9 -
 10
10 -
 11
11
 |
 |