Oregon Scientific WMR200 User Manual - Page 5
Remote Unit Assembly - temperature
 |
View all Oregon Scientific WMR200 manuals
Add to My Manuals
Save this manual to your list of manuals |
Page 5 highlights
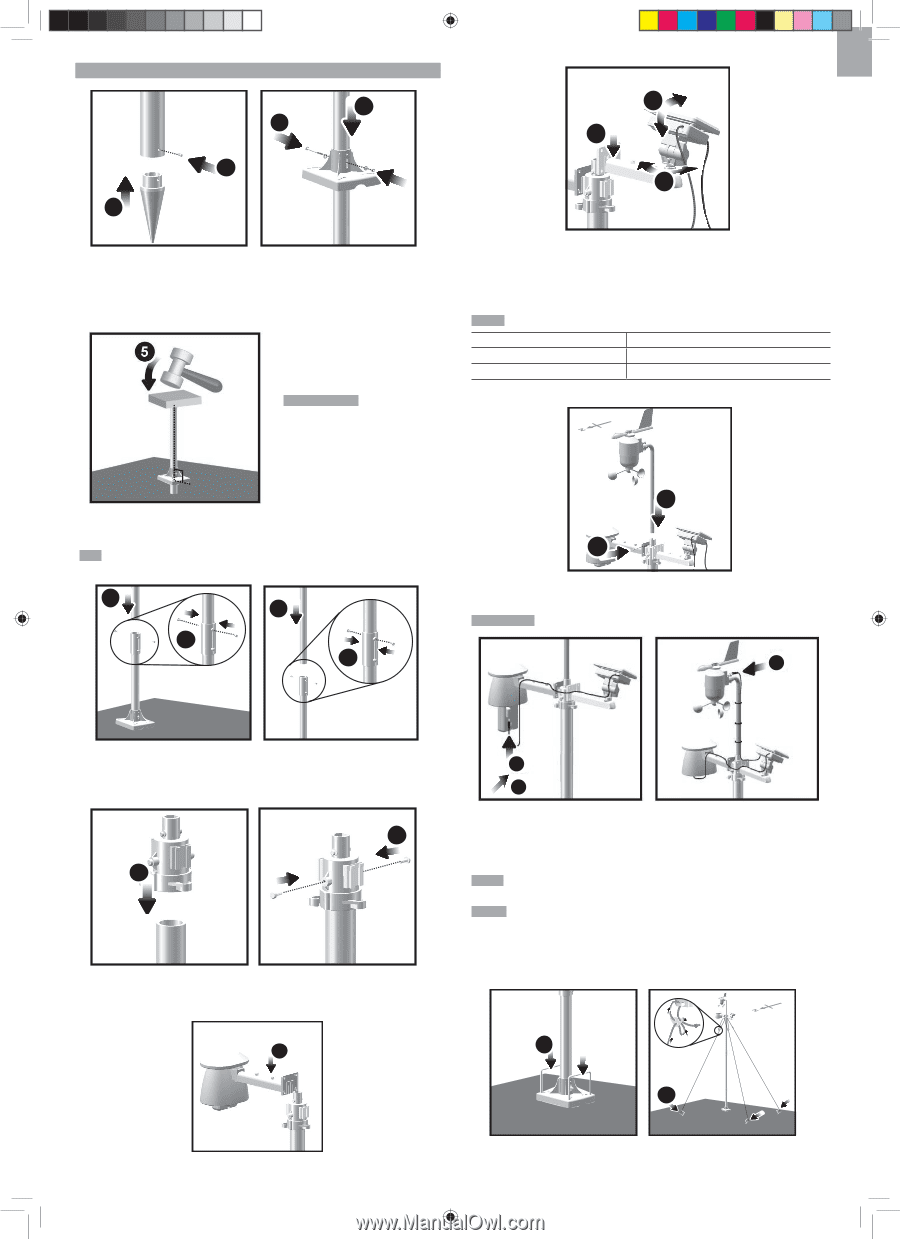
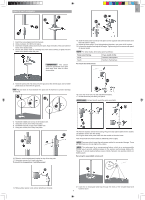
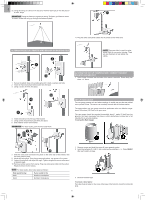
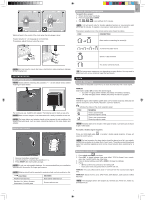
EN REMOTE UNIT ASSEMBLY 3 4 2 1 15 13 14 1. Insert the cone-shaped end into the pole. 2. Using 2 screws, fix it firmly into place. 3. Insert the versatile plastic base into the pole. Align the holes of the pole with the holes of the plastic base. 4. Secure the plastic base by inserting the screw and screwing it tightly into the holes of the plastic base and pole. IMPORTANT The sensor should be positioned in an open area away from trees or other obstructions. 13. Slide the solar panel connector into place on the opposite side of the bracket. Slot the solar panel in place. 14. Adjust the solar panel. Once facing desired direction, use screw to fix in place. 15. Loosen the wing bolt and adjust the angle. Tighten wing bolt to secure solar panel at desired angle. NOTE For best results, direct solar panel as follows: Solar panel facing: North South if you reside in the: Southern Hemisphere Northern Hemisphere To mount the wind sensor: 16 5. Hammer pole (cone end down) into the ground at the desired spot until versatile plastic base is level with the ground. 17 TIP Place a block of wood between the pole and the hammer to prevent damage to the pole. 6 8 16. Insert the wind vane into the attachment bracket. 17. Screw aluminum pole firmly into place. IMPORTANT For best results, point the wind vane North. 7 9 20 6. Assemble middle pole on top of the bottom one. 7. Using two screws, fix it firmly into place. 8. Assemble top pole on top of the middle one. 9. Using two screws, fix it firmly into place. 11 10 10. Slide the vertical attachment bracket on top of the top pole. 11. Using two screws, fix it firmly into place. To mount the temperature / humidity sensor: 12 18 19 18. Remove outdoor sensor from casing. Plug one solar panel cable into the socket. 19. Replace sensor into the casing. 20. Plug the other solar panel cable into the socket on the wind vane. This will provide the sensors with an additional power supply. NOTE There are slots to insert the solar power cables for convenient storage. There are also fasteners to help tighten the cables. NOTE The solar panel is an energy saving feature, which is an environmentally friendly way to provide additional power to the sensors and prolongs battery life. However, it cannot replace battery power entirely. Sensors can operate entirely on battery power. Securing the assembled remote unit: 21 22 12. Slide outdoor sensor onto vertical attachment bracket. 21. Insert the 2 rectangular base legs through the holes of the versatile base and hammer down. 5
-
 1
1 -
 2
2 -
 3
3 -
 4
4 -
 5
5 -
 6
6 -
 7
7 -
 8
8 -
 9
9 -
 10
10 -
 11
11
 |
 |