Palsonic PDP4225HD Owners Manual - Page 23
Picture Adjustment
 |
View all Palsonic PDP4225HD manuals
Add to My Manuals
Save this manual to your list of manuals |
Page 23 highlights
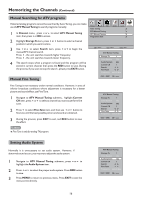
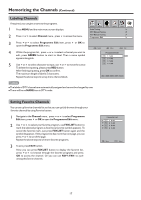
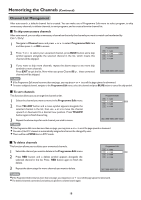
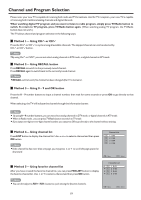
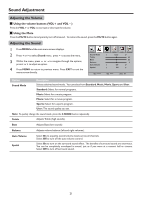
Picture Adjustment Customizing the Picture 1 Press MENU and the main menu screen displays. 2 Press 3 or4 to select Picture menu, press 6 to access the menu. 3 Within the menu, press 5 or 6 to scroll through the page upward or downward, and press 5 ,6 ,3 ,4 to navigate through the options or adjust an option. 4 Press MENU to return to previous menu. Press EXIT to exit the menu screen directly. Picture Sound Time Option Lock Channel Picture Mode Contrast Brightness Color Sharpness Tint User 75 45 50 50 0 Prev Page Next Page Select Move Menu Exit Picture Sound Time Color Temperature Aspect Ratio Noise Reduction Screen Option Cool 16:9 Off Lock Channel Prev Page Next Page Select Move Menu Exit Option Description Picture Mode Selects a desired picture mode. You can select from Standard, Dynamic, Mild and User. Standard: Select for a standard picture. Dynamic: Select for a bright and vivid picture. Mild: Select for a finely detailed picture. User: The picture quality you set. Note: To quickly change the picture mode, press the P.MODE button on the remote control repeatedly. Contrast Adjusts image contrast. Brightness Adjusts screen brightness for easier viewing of dark picture such as night scenes and black hair. Color Adjusts color saturation. Sharpness Adjusts image sharpness and displays a sharp image. Tint Adjusts tint for image. Note: The Tint item is only for NTSC system. Color Temperature Selects one of three automatic color adjustments. Sets to Warm to enhance hotter colors such as red, or set to Cool to see less intense colors with more blue. You can select from Warm, Cool and Normal. Aspect Ratio You can select the aspect ratio (display proportions) according to your video signal type or personal preference. You can select from 16:9, Zoom1, Zoom2 , Auto and 4:3. 16:9: Displays a 16:9 picture. Zoom1: Enlarges the picture to fill the full screen. Zoom2: Enlarges the picture, the top and bottom portions may be cropped. Auto: Displays picture automatically in proper ratio. 4:3: Displays a 4:3 picture. Note: You can press the ZOOM button repeatedly to select a desired aspect ratio. When selecting Zoom1/Zoom2, you may use 5 or 6 to move the picture upward or downward, or press4 or 3 to zoom in or out the picture. For the sake of protecting the screen, please do not display the image in 4:3 mode for extended periods of time. Noise Reduction Select from Low/Middle/High to reduce noise in the picture, commonly called snow. Select Off to turn off this function. 20
-
 1
1 -
2
-
3
-
4
-
5
-
6
-
7
-
8
-
9
-
10
-
11
-
12
-
13
-
14
-
15
-
16
-
17
-
 18
18 -
 19
19 -
 20
20 -
 21
21 -
 22
22 -
 23
23 -
 24
24 -
 25
25 -
 26
26 -
 27
27 -
 28
28 -
29
-
30
-
31
-
32
-
33
-
34
-
35
-
36
-
37
 |
 |
