Panasonic AG-HPX250PJ Operating Instructions - Page 57
Select the menu option LOAD/SAVE/INIT in, Example 2: Save the F1 scene file to
 |
View all Panasonic AG-HPX250PJ manuals
Add to My Manuals
Save this manual to your list of manuals |
Page 57 highlights
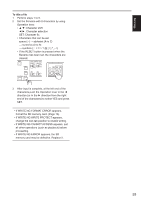
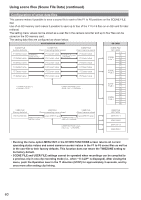
Shooting • Pressing the MENU button fixes the current settings and closes NAME EDIT. • Values that have been fixed are maintained even if the power is switched OFF or the dial is changed. The settings for all items in scene files are also maintained in the same way. ■ Example 2: Save the F1 scene file to the camera-recorder. 1 Select the menu option LOAD/SAVE/INIT in the SCENE FILE screen, then press the SET button on the Operation lever. • Comfirm SCENE FILE F3 display or not. • For details on menu operation, refer to "Using the setup menus" (Page 28 of Vol. 1). SCENE FILE F3: SPARK LOAD SAVE INIT VFR FRAME RATE SYNC SCAN TYPE (SYNCHRO SCAN) DETAIL LEVEL V DETAIL LEVEL DETAIL CORING RETURN LOAD SAVE INITIAL 0 0 0 0 PUSH MENU TO RETURN 2 Select SAVE and press the SET button on the Operation lever. SCENE FILE F3: SPARK LOAD SAVE INIT VFR FRAME RATE SYNC SCAN TYPE (SYNCHRO SCAN) DETAIL LEVEL V DETAIL LEVEL DETAIL CORING RETURN LOAD SAVE INITIAL 0 0 0 0 PUSH MENU TO RETURN 3 Select YES when the screen below is displayed, and press SET on the Operation lever. • To return to the menu level above, press the MENU button. FILE F3: SPARK SAVE ? YES PUSH SET ( ) NO SAVE COMPLETED ! • After changing the scene file settings, to return to the settings to the previously saved values, select LOAD in step 2 and perform the operation described in step 3. • To return the scene file settings to their factory defaults, select INITIAL in step 2 and perform the operation described in step 3. • To save and read user file settings or return them to their factory defaults, open the setting menu OTHER FUNCTIONS screen and run USER FILE in the same way as when handling scene files. • "PROCESSING" appears and the following message is shown when all settings have been completed. 57
-
 1
1 -
2
-
3
-
4
-
5
-
6
-
7
-
8
-
9
-
10
-
11
-
12
-
13
-
14
-
15
-
16
-
17
-
18
-
19
-
20
-
21
-
22
-
23
-
24
-
25
-
26
-
27
-
28
-
29
-
30
-
31
-
32
-
33
-
34
-
35
-
36
-
37
-
38
-
39
-
40
-
41
-
42
-
43
-
44
-
45
-
46
-
47
-
48
-
49
-
50
-
51
-
 52
52 -
 53
53 -
 54
54 -
 55
55 -
 56
56 -
 57
57 -
 58
58 -
 59
59 -
 60
60 -
 61
61 -
 62
62 -
63
-
64
-
65
-
66
-
67
-
68
-
69
-
70
-
71
-
72
-
73
-
74
-
75
-
76
-
77
-
78
-
79
-
80
-
81
-
82
-
83
-
84
-
85
-
86
-
87
-
88
-
89
-
90
-
91
-
92
-
93
-
94
-
95
-
96
-
97
-
98
-
99
-
100
-
101
-
102
-
103
-
104
-
105
-
106
-
107
-
108
-
109
-
110
-
111
-
112
-
113
-
114
-
115
-
116
-
117
-
118
-
119
-
120
-
121
-
122
-
123
-
124
-
125
-
126
-
127
-
128
-
129
-
130
-
131
-
132
-
133
-
134
-
135
-
136
-
137
-
138
-
139
-
140
-
141
-
142
-
143
-
144
-
145
-
146
-
147
-
148
-
149
-
150
-
151
-
152
-
153
-
154
-
155
-
156
-
157
-
158
-
159
-
160
-
161
-
162
-
163
-
164
-
165
-
166
-
167
-
168
-
169
-
170
 |
 |
