Panasonic AG-MDC20GJ / AG-MDR25PJ AG-MDC20 Camera Head Operating Instructions - Page 9
Description of parts
 |
View all Panasonic AG-MDC20GJ / AG-MDR25PJ manuals
Add to My Manuals
Save this manual to your list of manuals |
Page 9 highlights
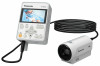
ENGLISH Description of parts 12 4 33 3 5 6 1 Lens 2 Built-in microphone 3 Air inlet 4 Camera head option cable connector 5 Air outlet 6 Tripod mounting hole ≥ There are tripod mounting hole that are compatible with 1/4-20UNC screws. Use the size that matches the diameter of the tripod's fixing screw. ≥ Attaching a tripod with a screw length of 6 mm (0.24 q) or more may damage the unit. ∫ Attaching/removing the lens cap Protect the lens surface with the lens cap while the unit is not used. ≥ Place your fingers in the recesses on the lens cap to hold it when attaching or removing it. 9 (ENG) DVQX1268
-
 1
1 -
2
-
3
-
 4
4 -
 5
5 -
 6
6 -
 7
7 -
 8
8 -
 9
9 -
 10
10 -
 11
11 -
 12
12 -
 13
13 -
 14
14 -
15
-
16
-
17
-
18
-
19
-
20
-
21
-
22
-
23
-
24
-
25
-
26
-
27
-
28
-
29
-
30
-
31
-
32
-
33
-
34
-
35
-
36
-
37
-
38
-
39
-
40
-
41
-
42
-
43
-
44
-
45
-
46
-
47
-
48
-
49
-
50
-
51
-
52
-
53
-
54
-
55
-
56
-
57
-
58
-
59
-
60
-
61
-
62
-
63
-
64
-
65
-
66
-
67
-
68
-
69
-
70
-
71
-
72
 |
 |

9
(ENG) DVQX1268
ENGLISH
1
Lens
2
Built-in microphone
3
Air inlet
4
Camera head option cable connector
5
Air outlet
6
Tripod mounting hole
≥
There are tripod mounting hole that are compatible with 1/4-20UNC screws. Use the size that
matches the diameter of the tripod’s fixing screw.
≥
Attaching a tripod with a screw length of 6 mm (0.24
q
) or more may damage the unit.
∫
Attaching/removing the lens cap
Protect the lens surface with the lens cap while the
unit is not used.
≥
Place your fingers in the recesses on the lens cap
to hold it when attaching or removing it.
Description of parts
1
2
3
3
6
3
4
5