Panasonic AJPCD20P AJPCD20P User Guide - Page 7
Parts and their Functions, Front Panel, Rear Panel
 |
View all Panasonic AJPCD20P manuals
Add to My Manuals
Save this manual to your list of manuals |
Page 7 highlights
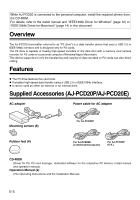
Parts and their Functions Front Panel Rear Panel ENGLISH USB 2.0 IEEE 1394b DC IN 16V DC IN 12V (1) (2) (3) (4) (1)Power Indicator This indicator lights up in green when the P2 drive is running. (2)Status Indicator This indicator lights up in green during access to a P2 card. Do not remove the P2 card during access of the card, otherwise files may be corrupted, or the P2 card may fail. (3)Card Slots The P2 drive's card slots are designed for P2 cards. The P2 drive does not operate with cards other than P2 cards. (4)EJECT Button To remove a P2 card, press this button so that the button pops out, then press it in again. z For Windows 2000 only : Open "My Computer" and use the right button of your mouse to select the drive from which you want to remove a card, then select "EJECT" before operating the EJECT button. z For Macintosh only: To remove a P2 card, drag the icon of the P2 card to "Trash," and then press the EJECT button after confirming that the P2 card icon disappears. (1) (2) (6) (5) (3) (4) The picture shows the rear panel with its cover removed. (1)USB 2.0 connector (Type B) This connects a USB cable. Use a USB cable (shielded) compliant with USB 2.0. The P2 drive supports USB 2.0 only. It does not support personal computers compliant with USB 1.1. For Macintosh, USB 2.0 operations are not guaranteed. (2)IEEE1394b connector This connects an IEEE1394b cable. When cables are connected to both the USB 2.0 connector and IEEE1394b connector, only the interface that was connected first after turning on the power is available. (3)DC IN 16V Socket For external use of the P2 drive, connect an AC adapter to this socket. (4)DC IN 12V Socket To use the P2 drive mounted in a personal computer, connect one of the power supply connectors inside the personal computer to this socket. (See page 10) Do NOT supply power to both the DC IN 12V socket and DC IN 16V socket at the same time. (5)Cable Clamp Use this clamp to secure the AC adapter cable when connecting the P2 drive to a personal computer for external use of the Drive. (6)Antitheft Lock A commercially available antitheft cable can be connected to this lock. E-6
-
 1
1 -
 2
2 -
 3
3 -
 4
4 -
 5
5 -
 6
6 -
 7
7 -
 8
8 -
 9
9 -
 10
10 -
 11
11 -
 12
12 -
13
-
14
-
15
-
16
-
17
-
18
-
19
-
20
-
21
-
22
-
23
-
24
-
25
-
26
-
27
-
28
-
29
-
30
-
31
-
32
-
33
-
34
-
35
-
36
-
37
-
38
-
39
-
40
-
41
-
42
-
43
-
44
-
45
-
46
-
47
-
48
-
49
-
50
-
51
-
52
-
53
-
54
-
55
-
56
-
57
-
58
-
59
-
60
-
61
-
62
-
63
-
64
 |
 |
