Panasonic BL-MS103PK User Guide - Page 202
Adding More Cameras to the System, Viewing Camera Images
 |
View all Panasonic BL-MS103PK manuals
Add to My Manuals
Save this manual to your list of manuals |
Page 202 highlights
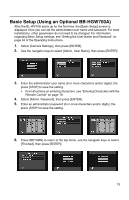
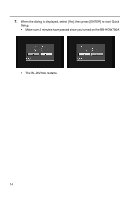
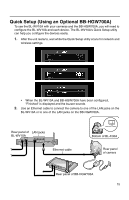
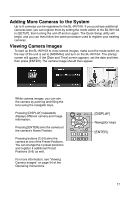
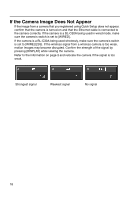
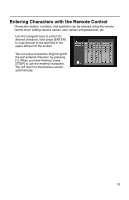
Adding More Cameras to the System Up to 8 cameras can be registered to the BL-WV10A. If you purchase additional cameras later, you can register them by setting the mode switch of the BL-WV10A to [SETUP], then turning the unit off and on again. The Quick Setup utility will begin, and you can then follow the same procedure used to register your existing cameras. Viewing Camera Images To start up the BL-WV10A to view camera images, make sure the mode switch on the rear of the unit is set to [NORMAL] and turn on the BL-WV10A. The startup screen will appear. If the [Date and Time] screen appears, set the date and time, then press [ENTER]. The camera image should then appear. While camera images, you can aim the camera by panning and tilting the lens using the navigator keys. Pressing [DISPLAY] repeatedly displays different camera and image information. Pressing [ENTER] aims the camera at the camera's Home Position. Pressing buttons [1]-[4] aims the camera at one of the Preset Positions. You can change the 4 preset positions and register 4 additional Preset Positions (5-8) as well. For more information, see "Viewing Camera Images" on page 54 of the Operating Instructions. [DISPLAY] Navigator keys [ENTER] 17
-
 1
1 -
2
-
3
-
4
-
5
-
6
-
7
-
8
-
9
-
10
-
11
-
12
-
13
-
14
-
15
-
16
-
17
-
18
-
19
-
20
-
21
-
22
-
23
-
24
-
25
-
26
-
27
-
28
-
29
-
30
-
31
-
32
-
33
-
34
-
35
-
36
-
37
-
38
-
39
-
40
-
41
-
42
-
43
-
44
-
45
-
46
-
47
-
48
-
49
-
50
-
51
-
52
-
53
-
54
-
55
-
56
-
57
-
58
-
59
-
60
-
61
-
62
-
63
-
64
-
65
-
66
-
67
-
68
-
69
-
70
-
71
-
72
-
73
-
74
-
75
-
76
-
77
-
78
-
79
-
80
-
81
-
82
-
83
-
84
-
85
-
86
-
87
-
88
-
89
-
90
-
91
-
92
-
93
-
94
-
95
-
96
-
97
-
98
-
99
-
100
-
101
-
102
-
103
-
104
-
105
-
106
-
107
-
108
-
109
-
110
-
111
-
112
-
113
-
114
-
115
-
116
-
117
-
118
-
119
-
120
-
121
-
122
-
123
-
124
-
125
-
126
-
127
-
128
-
129
-
130
-
131
-
132
-
133
-
134
-
135
-
136
-
137
-
138
-
139
-
140
-
141
-
142
-
143
-
144
-
145
-
146
-
147
-
148
-
149
-
150
-
151
-
152
-
153
-
154
-
155
-
156
-
157
-
158
-
159
-
160
-
161
-
162
-
163
-
164
-
165
-
166
-
167
-
168
-
169
-
170
-
171
-
172
-
173
-
174
-
175
-
176
-
177
-
178
-
179
-
180
-
181
-
182
-
183
-
184
-
185
-
186
-
187
-
188
-
189
-
190
-
191
-
192
-
193
-
194
-
195
-
196
-
 197
197 -
 198
198 -
 199
199 -
 200
200 -
 201
201 -
 202
202 -
 203
203 -
 204
204 -
 205
205
 |
 |
