Panasonic DMC-FX37A Digital Still Camera - Page 44
Taking pictures that matchthe scene being recorded (Scene mode), Scene mode
 |
UPC - 037988988044
View all Panasonic DMC-FX37A manuals
Add to My Manuals
Save this manual to your list of manuals |
Page 44 highlights
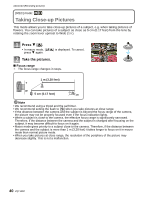
Advanced (Recording pictures) [REC] mode: ¿ Taking pictures that match the scene being recorded (¿: Scene mode) When you select a scene mode to match the subject and recording situation, the camera sets the optimal exposure and hue to obtain the desired picture. 1 Slide the [REC]/[PLAYBACK] selector switch to [!]. 2 Set the mode dial to [¿]. 3 Press 3/4/2/1 to select the scene mode. • You can switch menu screens from any menu item by rotating the zoom lever. 4 Press [MENU/SET] to set. • The menu screen is switched to the recording screen in the selected scene mode. ∫ About the information • If you press [DISPLAY] when selecting a scene mode in step 3, explanations about each scene mode are displayed. (If you press [DISPLAY] again, the screen returns to the scene mode menu.) Note • To change the scene mode, press [MENU/SET] and then press 1, and return to step 3 above. • Refer to P39 for information about the shutter speed. • The scene mode flash setting is reset to the initial setting when the scene mode is changed. • When you take a picture with a scene mode that is not adequate for the purpose, the hue of the picture may differ from the actual scene. • The following items cannot be set in scene mode because the camera automatically adjusts them to the optimal setting. - [INTELLIGENT ISO]/[SENSITIVITY]/[I.EXPOSURE]/[COLOR MODE]/[MIN. SHTR SPEED] • [I.EXPOSURE] is activated automatically in the following scene modes. - [PORTRAIT]/[SOFT SKIN]/[TRANSFORM]/[SELF PORTRAIT]/[SCENERY]/[SPORTS]/ [NIGHT PORTRAIT]/[PARTY]/[CANDLE LIGHT]/[BABY1]/[BABY2]/[SUNSET]/[HIGH SENS.] * [PORTRAIT] When taking pictures of people outdoors during the daytime, this mode allows you to improve the appearance of the persons concerned and make their skin tones look healthier. ∫ Technique for Portrait mode To make this mode more effective: 1 Rotate the zoom lever as far as possible to Tele. 2 Move close to the subject to make this mode more effective. Note • The initial setting for [AF MODE] is [š]. 44 VQT1R87
-
 1
1 -
2
-
3
-
4
-
5
-
6
-
7
-
8
-
9
-
10
-
11
-
12
-
13
-
14
-
15
-
16
-
17
-
18
-
19
-
20
-
21
-
22
-
23
-
24
-
25
-
26
-
27
-
28
-
29
-
30
-
31
-
32
-
33
-
34
-
35
-
36
-
37
-
38
-
 39
39 -
 40
40 -
 41
41 -
 42
42 -
 43
43 -
 44
44 -
 45
45 -
 46
46 -
 47
47 -
 48
48 -
 49
49 -
50
-
51
-
52
-
53
-
54
-
55
-
56
-
57
-
58
-
59
-
60
-
61
-
62
-
63
-
64
-
65
-
66
-
67
-
68
-
69
-
70
-
71
-
72
-
73
-
74
-
75
-
76
-
77
-
78
-
79
-
80
-
81
-
82
-
83
-
84
-
85
-
86
-
87
-
88
-
89
-
90
-
91
-
92
-
93
-
94
-
95
-
96
-
97
-
98
-
99
-
100
-
101
-
102
-
103
-
104
-
105
-
106
-
107
-
108
-
109
-
110
-
111
-
112
-
113
-
114
-
115
-
116
-
117
-
118
-
119
-
120
-
121
-
122
-
123
-
124
-
125
-
126
-
127
-
128
 |
 |
