Panasonic DMPBBT01 DMPBBT01 User Guide - Page 11
STEP 2 : Connecting to a TV, Vertical installation with pedestal
 |
View all Panasonic DMPBBT01 manuals
Add to My Manuals
Save this manual to your list of manuals |
Page 11 highlights
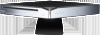
Connections & Settings Vertical installation with pedestal To reattach (> below) Remote control signal sensor 1 Remove the screw at the bottom of the supplied pedestal using a screwdriver (+), and separate the top section and the bottom section of the pedestal. Top section of the pedestal is not used. 2 Align the rear end of the main unit against the rear end of the pedestal, and lower the main unit. Press and secure the main unit into the pedestal. To reattach the pedestal Fit the projecting part (A) into the groove (B). Secure the two sections with the screw. ≥ Do not install in a way other than described above. Also, do not move the unit during playback. It may cause malfunction of the unit or damage the disc. ≥ Do not hold the pedestal to lift up or carry the unit. STEP 2 : Connecting to a TV ≥ Before making any connections, we recommend that you temporarily disconnect all the units from AC power. ≥ Use the High Speed HDMI cables. Non-HDMI-compliant cables cannot be utilized. The HDMI-compliant cable is supplied with this unit. It is recommended that you use Panasonic's HDMI cable. When outputting 1080p signal, please use HDMI cables 5.0 meters (16.4 ft.) or less. Recommended part number (High Speed HDMI Cable): RP-CDHS15 (1.5 m/4.9 ft.), RP-CDHS30 (3.0 m/9.8 ft.), RP-CDHS50 (5.0 m/16.4 ft.), etc. HDMI IN HDMI cable (supplied) 11 VQT3W08
-
 1
1 -
2
-
3
-
4
-
5
-
 6
6 -
 7
7 -
 8
8 -
 9
9 -
 10
10 -
 11
11 -
 12
12 -
 13
13 -
 14
14 -
 15
15 -
 16
16 -
17
-
18
-
19
-
20
-
21
-
22
-
23
-
24
-
25
-
26
-
27
-
28
-
29
-
30
-
31
-
32
-
33
-
34
-
35
-
36
-
37
-
38
-
39
-
40
-
41
-
42
-
43
-
44
-
45
-
46
-
47
-
48
 |
 |
