Panasonic DMPBBT01 DMPBBT01 User Guide - Page 7
Control reference guide, Getting started - remote
 |
View all Panasonic DMPBBT01 manuals
Add to My Manuals
Save this manual to your list of manuals |
Page 7 highlights
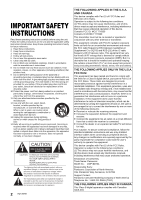
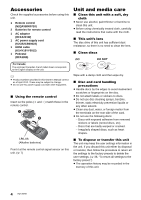
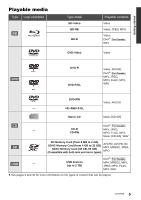
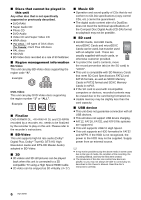
Getting started Control reference guide 1 7 2 INTERNET 8 3 HOME KEYS 9 4 5 OPTION RETURN 10 6 R G B Y 1 Turn the unit on and off 2 Show the Home screen of the VIERA Connect (> 22) 3 Show HOME menu (> 17) 4 Touchpad (> 8) Used for various operation Move the highlight, confirm the selection, etc. 5 Show Option menu (> 25) 6 Colored buttons Used for various purposes depending on the display 7 Show NETFLIX screen (> 22) 8 Start up a video communication (> 22) 9 Show KEYS screen on the screen (> 9) 10 Return to previous screen Indicator LEDs 1 7 8 9 10 11 2 1 Standby/on switch* (Í/I) (> 14) Touch to switch the unit from on to standby mode or vice versa. In standby mode, the unit is still consuming a small amount of power. 2 Disc slot (> 17) 3 Eject the disc*(> 17) 4 Remote control signal sensor One of the two sensors will operate depending on the installation method of the main unit.(> 10) Distance: Within approx. 7 m (23 feet) Angle (Against front of the sensor): Approx. 20e up and down, 30e left and right 5 SD card slot (> 17) 6 USB port (> 17) 7 Status LED (blue/red) ≥ This will light up in blue when the unit is turned on. ≥ Blue and red will light up simultaneously when an error occurs. (> 34) ≥ This will flash in blue when this unit receives incoming call etc. of the video communication. (> 22) 3 5 6 4 Pull to flip down the panel. 8 Standby/on LED (red/green) This indicator lights red in standby mode and lights green when the unit is turned on. It is also possible to set to turn off when the unit is in standby mode. (> 33, "Standby LED") 9 CALL LED (blue) The LED will light up when this unit receives incoming call etc. of the video communication. (> 22) 10 ACCESS LED (amber) This will flash while accessing the SD card or USB device. 11 INFO LED (red) This will light up at the time of error, etc. (> 34) * These switches work just by touching the marks. Be careful not to touch them unintentionally. The volume of operation sound can be adjusted by "Unit Operation Sound". (> 33) 7 VQT3W08
-
 1
1 -
 2
2 -
 3
3 -
 4
4 -
 5
5 -
 6
6 -
 7
7 -
 8
8 -
 9
9 -
 10
10 -
 11
11 -
 12
12 -
13
-
14
-
15
-
16
-
17
-
18
-
19
-
20
-
21
-
22
-
23
-
24
-
25
-
26
-
27
-
28
-
29
-
30
-
31
-
32
-
33
-
34
-
35
-
36
-
37
-
38
-
39
-
40
-
41
-
42
-
43
-
44
-
45
-
46
-
47
-
48
 |
 |
