Panasonic FV08VF2 Installation Instructions - Page 12
Installing
 |
View all Panasonic FV08VF2 manuals
Add to My Manuals
Save this manual to your list of manuals |
Page 12 highlights
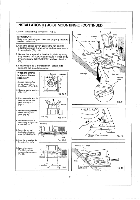
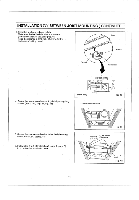
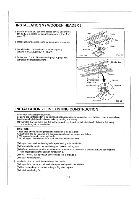
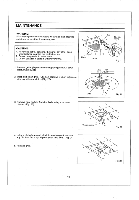
INSTALLATION V ( WOODEN HEADER ) 1. Before installation, open the orifice cover. Secure the fan body to adaptor by using thumb screw. (Fig. 1 of Joist page 6) 2. Install header between joists by using nails or screws. 0 7 (27s 3. Install the fan body and secure it by using long screws (ST4.2X20) (Fig. 19, Fig. 20) 4. Follow step 5 to 9 of installation I (page 7, page 8) to complete the installation work. Fan body inches (mm) Header. Joist 4 3l4 (376) t Adaptor Fig. 19 Circular duct II 38 a I I 8 6 Long screws (ST4.2X20) Junction box 0 Adaptor Conduit Wire nut Lead wires Green wires Fig. 20 INSTALLATION VI ( IN EXISTING CONSTRUCTION ) 1, Installation in existing construction. Installing the ventilating fan in an existing building requires an accessible area (attic or crawl space) above the planning installation location or existing ducting and wiring. (1) To install the ventilating fan, follow the procedures described in Installation II. Take the following precautions before installation. CAUTION: Check area above planning installation location to be sure that: 1. Duct work can be installed and that area is sufficient for proper ventilation. 2. Wiring can be run to planning location. 3. No wiring or other obstructions shall interfere with installation. (2) Inspect duct work and wiring before proceeding with installation. (3) Plan suitable location for ventilating fan. (next to ceiling joist) (4) Before installation, provide inspection and maintenance access at a location that will not interfere with installation work shown in installation II. (5) First, remove ceiling section according to Fig. 6 of page 8. (6) Install ventilating fan. 2. Installation from accessible area above fan location. (1) Inspect duct work and wiring before proceeding with installation. (2) Remove ceiling section according to Fig. 6 of page 8. (3) Install ventilating fan. 12
-
 1
1 -
2
-
3
-
4
-
5
-
6
-
 7
7 -
 8
8 -
 9
9 -
 10
10 -
 11
11 -
 12
12 -
 13
13 -
 14
14 -
 15
15
 |
 |