Panasonic HL-CX667 Operating / Installing Instructions - Page 11
Operations
 |
View all Panasonic HL-CX667 manuals
Add to My Manuals
Save this manual to your list of manuals |
Page 11 highlights
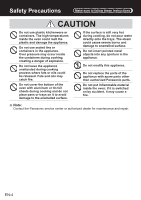
Operations English Clock Setting After connecting the oven to the power supply, the symbol the display. will be visible on 1. Press , and the hour figures will flash. 2. Press or to adjust the hour. (Hour should be within 0 - 23.) 3. Press , and the minutes will flash. 4. Press or to adjust the minutes. (Minute should be within 0 - 59.) 5. Press set. to finish the clock setting. " " in the time display will flash, and the clock is Function Setting 1. Press to choose the cooking function you require .The related cooking function will be visible on the display. 2. Press or to adjust the cooking time. (Time should be within 1 minute 9 hours. The minute increments are 1 minute between 1 minute and 30 minutes; 5 minutes from 30 minutes to 9 hours.) 3. Press , then press or to adjust the cooking temperature. 4. Press to start cooking. It will begin countdown. The corresponding icon, will be visible on the display, indicating the heating is in progress. The oven will shutdown automatically if the time reaches . Beep will sound 5 times, and the display will change to clock indicating the current time. 5. If step 2 is to be ignored, the default cooking time is 9 hours. (This means the oven will shutdown automatically after 9 hours.) ■■Note: • The oven lamp will be on for all the cooking functions. • If is not pressed within 5 minutes after all cooking program has been set, the display will change to clock indicating current time. This means the cooking program has been canceled. • and functions are not for heating. • While cooking is in progress, you can adjust the cooking time by pressing or , then press . If is not pressed within 5 seconds, the cooking time will revert back to the original time to continue cooking. • While cooking is in progress, you can adjust the cooking temperature by pressing , " " will be visible on the display. Press or to adjust the cooking temperature, then press . If is not pressed within 5 seconds, the cooking temperature will revert back to the original temperature to continue cooking. EN-9
-
 1
1 -
2
-
3
-
4
-
5
-
 6
6 -
 7
7 -
 8
8 -
 9
9 -
 10
10 -
 11
11 -
 12
12 -
 13
13 -
 14
14 -
 15
15 -
 16
16 -
17
-
18
-
19
-
20
-
21
-
22
-
23
-
24
-
25
-
26
-
27
-
28
-
29
-
30
-
31
-
32
-
33
-
34
-
35
-
36
-
37
-
38
-
39
-
40
-
41
-
42
-
43
-
44
-
45
-
46
-
47
-
48
-
49
-
50
-
51
-
52
-
53
-
54
-
55
-
56
-
57
-
58
-
59
-
60
-
61
-
62
-
63
-
64
-
65
-
66
-
67
-
68
-
69
-
70
-
71
-
72
-
73
-
74
-
75
-
76
-
77
-
78
-
79
-
80
-
81
-
82
-
83
-
84
-
85
-
86
-
87
-
88
 |
 |
