Panasonic HXDC1 HXDC1 User Guide - Page 151
PLAYING BACK ON A TV, Playback using VIERA Link™ (HDAVI Control
 |
View all Panasonic HXDC1 manuals
Add to My Manuals
Save this manual to your list of manuals |
Page 151 highlights
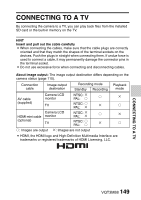
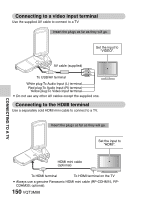
CONNECTING TO A TV PLAYING BACK ON A TV i After connecting the camera to the television, switch the TV input to the terminal to which the camera is connected. i The same playback procedure as when playing back with the camera is used to play back audio recordings as well. i The playback method is the same as when viewing images on the camera's LCD monitor. (Use the TV controls to adjust the volume.) Playback using VIERA Link™ (HDAVI Control™) What is the VIERA Link? i This function allows you to use your remote control for the Panasonic TV for easy operations when this unit is connected to a VIERA Link compatible device using an HDMI mini cable for automatic linked operations. (Not all operations are possible.) i VIERA Link is a unique Panasonic function built on a HDMI control function using the standard HDMI CEC (Consumer Electronics Control) specification. Linked operations with HDMI CEC compatible devices made by other companies are not guaranteed. When using devices made by other companies that are compatible with VIERA Link, refer to the owner's manual for the respective devices. i This unit is compatible with VIERA Link Ver.5. VIERA Link Ver.5 is the newest Panasonic version and is also compatible with existing Panasonic VIERA Link devices. (As of Dec 2010) 1 In the Option Setting Menu, for the TV OUTPUT setting, set "VIERA Link" to "ON". : [Option tab "2"] → [TV OUTPUT] → [VIERA Link] → [ON] i If you are not using VIERA Link, set to [OFF]. 2 Use an HDMI mini cable to connect this unit to a Panasonic TV compatible with VIERA Link with a HDMI mini cable. i It is recommended to connect this unit to an HDMI terminal other than HDMI1 if there are 2 or more HDMI input terminals on the TV. i VIERA Link must be activated on the connected TV. (Read the owner's manual of the TV for how to set etc.) i Always use a genuine Panasonic HDMI mini cable (RP-CDHM15, RP-CDHM30; optional). VQT3M88 151
-
 1
1 -
2
-
3
-
4
-
5
-
6
-
7
-
8
-
9
-
10
-
11
-
12
-
13
-
14
-
15
-
16
-
17
-
18
-
19
-
20
-
21
-
22
-
23
-
24
-
25
-
26
-
27
-
28
-
29
-
30
-
31
-
32
-
33
-
34
-
35
-
36
-
37
-
38
-
39
-
40
-
41
-
42
-
43
-
44
-
45
-
46
-
47
-
48
-
49
-
50
-
51
-
52
-
53
-
54
-
55
-
56
-
57
-
58
-
59
-
60
-
61
-
62
-
63
-
64
-
65
-
66
-
67
-
68
-
69
-
70
-
71
-
72
-
73
-
74
-
75
-
76
-
77
-
78
-
79
-
80
-
81
-
82
-
83
-
84
-
85
-
86
-
87
-
88
-
89
-
90
-
91
-
92
-
93
-
94
-
95
-
96
-
97
-
98
-
99
-
100
-
101
-
102
-
103
-
104
-
105
-
106
-
107
-
108
-
109
-
110
-
111
-
112
-
113
-
114
-
115
-
116
-
117
-
118
-
119
-
120
-
121
-
122
-
123
-
124
-
125
-
126
-
127
-
128
-
129
-
130
-
131
-
132
-
133
-
134
-
135
-
136
-
137
-
138
-
139
-
140
-
141
-
142
-
143
-
144
-
145
-
 146
146 -
 147
147 -
 148
148 -
 149
149 -
 150
150 -
 151
151 -
 152
152 -
 153
153 -
 154
154 -
 155
155 -
 156
156 -
157
-
158
-
159
-
160
-
161
-
162
-
163
-
164
-
165
-
166
-
167
-
168
-
169
-
170
-
171
-
172
-
173
-
174
-
175
-
176
-
177
-
178
-
179
-
180
-
181
-
182
-
183
-
184
-
185
-
186
-
187
-
188
-
189
-
190
-
191
-
192
-
193
-
194
-
195
-
196
-
197
-
198
-
199
-
200
-
201
-
202
-
203
-
204
-
205
-
206
 |
 |
